Web Portal Navigation
Your Board Cloud Instance can be managed and navigated through a Web
Portal that provides the basic functions you need and facilitates the
interaction with your System.
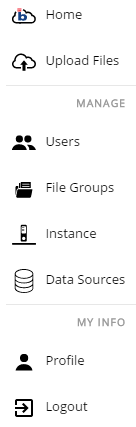
Click on the most Top Left Corner Icon (Light Blue Web Menù Icon) :
the following sliding panel prompts out.
|
User
Functions
Home : click here to view the available
Capsules and open any of them
Upload Files
: click here to view the available file schema and upload
a file from your local data storage
Profile :
click here to visualize your Profile information
Logout : click
here to Logout from the Web Portal
---------------------------------------------------------------------------------------------------------
Administration Functions (Available to System
Administrator only)
Users : click
here to create new user or edit existing user properties
File Groups :
click here to edit File Schema
Instance : click
here to Administrate your Board Cloud instance
Data Sources:
click here to be redirected to your data sources administrator
page. |
Home
Click on the "Home" Button. The Capsules Browser Panel prompts
out :
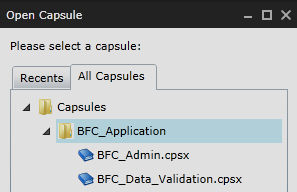
Click on the Capsule you like to Open. Attention : your Security profile
may have some restrictions . Some Capsule may be hidden. Contact your
System Administrator for additional details.
Upload Files
Click on the "Upload Files" Button. The Web Page that visualizes
the File Schema available for your Cloud instance prompts out.
The File Schema, that can be edited by the System Administration only,
it basically provides the rules (File Groups and File Definitions) to
upload files from your local data Storage to the Board Cloud Instance
(see picture below).
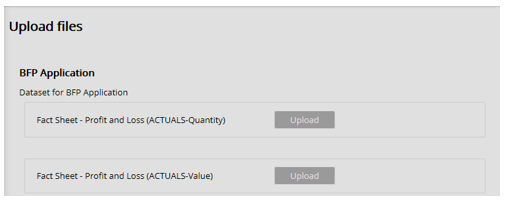
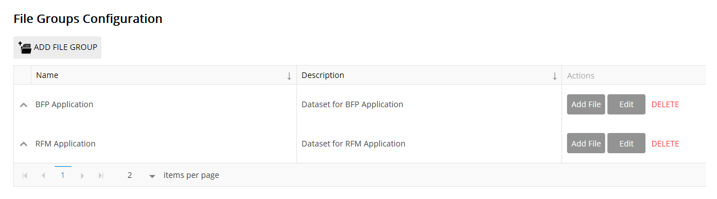
The Files are logically grouped and a short description of the Group
si available. In the sample above the Files have been grouped by Application
(BFP Application) which short description in "Dataset for BFP Application".
Each Group can of course list multiple files.
For each File that can be uploaded a short description of the File meaning
and content is available. In the sample above the name "Fact Sheet
- Profit and Loss (ACTUALS-Quantity) " indicates that the Upload
refers to the Current Trail Balances for non monetary Accounts of the
Profit and Loss Statement.
Click on the Upload Button : the Windows browser of your local or network
data storage prompts out. Select the file you like to upload and click
OK. When the upload is completed the a confirmation is sent :

Notices
Please consider that the user is unaware of the destination file location
and naming. These information are in the definition of the File Schema
and responsibility of the system Administrator. The user can then pick
any file : during the upload the File is renamed accordingly to the specs
of the File Schema and saved in the proper folder. It is of course still
important that the file structure is respectful of the data-reader protocol
specs.
Profile
Click on the "Profile" Button. The Web Page that visualizes
the summary of your profile properties prompts out.
On the left you can view your Web Portal Account Attributes :
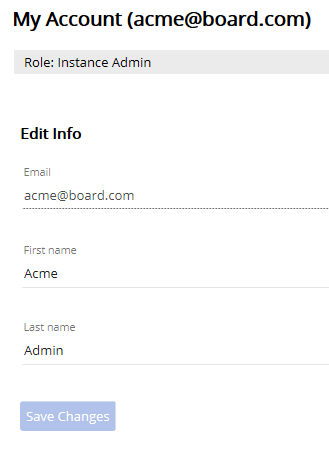
|
> Role
: it can be Web Portal User or Instance Administrator. This latter
can have access to additional functions like User Creation and
File Schema editing. Please refer to the proper section for details.
It can be changed by the Instance Administrator only.
> email
: your qualified and validate email that is also the Username
of the Web Portal. It can't be changed but only "deleted"
by the Instance Administrator only.
> First
and Last Name : they can be edited any Time by the User.
They should identify the person associated with the Username (email
address)
When done click on the "Change"
Button to Save. |
On the right you can change your Password. Remember Password must be
at least 8 characters long including one lowercase, one uppercase, one
digit and one special character.
Logout
Click here to logout from the Web Portal. When you click you're logged
out and forwarded to the login page.
Attention ! The following functions are available
to Instance Administrator only
Users
Click on the "Users" Button. The Web Page that visualizes
the summary of existing users per such instance prompts out. This page
is also the default home page of Instance Administrators when they login.
Create User
To add a New User click on the Create User Icon. The following Form
prompts out. Complete it, when done click on "Create User" Button.
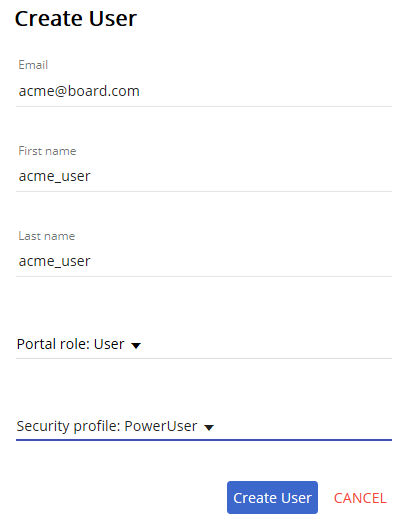 |
email
: this is the user email address and also the user's login credentials
First
and Last Name: the User Identifications names
Portal
Role : It is the Role the User plays in the Cloud Instance
Web portal. It can be User or Instance Admin. Users with "User"
Portal Role can't access the Users, File Groups and Instance Pages
and Menù Items.
You can have as many users as you
like with Instance Admin Role : it is not related with the Board
Licenses (Developer) or Role (Board Administrator)
Security
Profile : It is the Board
User Profile. Attention the Board User Profile can be created
or edit only through a Board Win Client Connection to your Cloud
Instance. It is therefore suggested to the Cloud Instance Administrator
to first create the Board User Profiles and the Cloud Instance
Users. |
Once a User is created , it must be Activated. The Activation requires
a validation of the User email address. The Status of the New User is
now "Send Activation Mail".

Clicking on this a mail will be sent to the User, asking for the credentials
validation. For How to Validate User Credentials please check at the "Credentials
and Login" Page.
When the User validates his credentials the Status becomes "Active"
Edit Users
The Users Web Page provides a summary of the existing users per
that Board Cloud Instance. Different facilities help Sorting and Searching
Users.
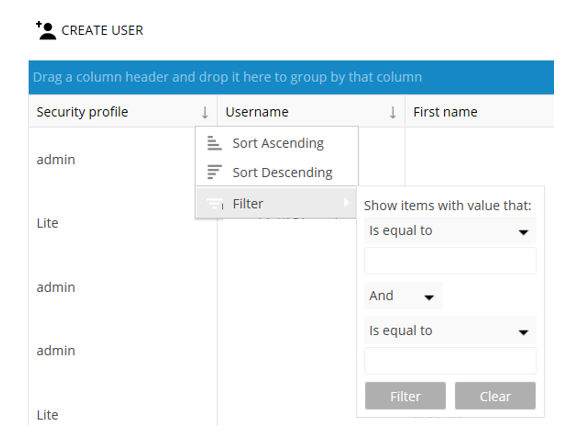
Once you find the User you like you can

Change his attributes Clicking on the "Edit" Button.
Delete the User Clicking on the "Delete" Button.
File Groups
Click on the "File groups" Button. The Web Page that visualizes
the existing File Schema per such instance prompts out.
How to define the File Schema
The File Schema of the Board Cloud Instance defines the Fileset that
is available in the File Uploader to Upload files from local data storage
(drives) to the Cloud Instance Data Storage (Board Server drive).
The Files belonging to the File-set can be grouped in File Groups to
facilitate their recognition within a Data Load Process.
To create a File Group Click on the "Add File Group" Icon.

When done press on Create. A new File group is created. Once the File
Group is created to add a File Click on the "Add File" Button.

Name : The File
Name is a Short Description of the File. This description is available
in the File Uploader to help the User to upload the Data in the Cloud
Instance without mistakes.
Path : The File
Path is the File physical Name . Be aware that is not possible to Upload
File into a Board Cloud Instance Folder other than c:\board\dataset. It
is then suggested to add a prefix to the File Path that identifies the
Application that is using such file.
To display the Files of a File Group click on the Expand Icon. To change
a File attribute click on the "Edit" Button. To Delete a File
from a File Group click on the Button "Delete".
How to upload the Files
Once the File Schema has been created (File Groups and Files) the User
can upload on the Board Cloud Instance (c:\board\dataset Folder) local
Files.
Click on the File Upload Icon. The File Schema is displayed.
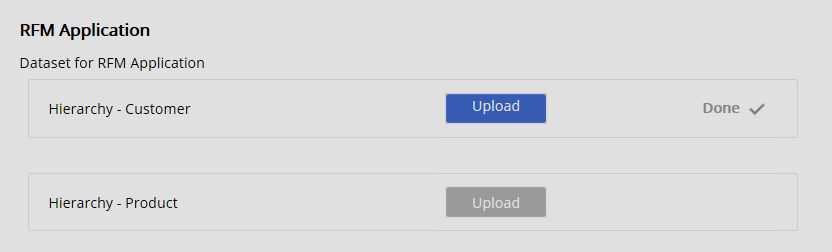
Click on the "Upload" Button of the File you like to upload,
Windows explorer opens browsing on Local Folders. Pick up the right file
and Click on Open. An "Uploading ..." message runs. When the
Upload is completed a "Done" Icon prompts out.
Note
The Destination Folder and Name of the File is entirely defined in the
File Attribute "Path" regardless the Local position or naming
of the File. During the Upload the file is renamed accordingly to the
"path" and saved in the c:\board\dataset folder.
It is up to the System Administrator to provide the User with the File
Specs accordingly to Data Reader protocol.
> The renaming includes the file extension
> If already there an existing file with the same name (Path) is
overwritten
> It is not possible to upload the file in a folder other than c:\board\dataset
Tech Note
You can include the File Upload function in a Board Web Capsule using
the following Syntax in the URL property of a Board Button.
https://cloud.board.com/#/dashboard/upload-files
: It opens the File Uploader Web Page
https://cloud.board.com/#/upload-files?path=file_path
: it uploads the file you pick up in the c:\board\dataset folder renaming
it "file_path"
Instance
Clicking on the Instance Icon you can customize some properties of your
Board Cloud Instance
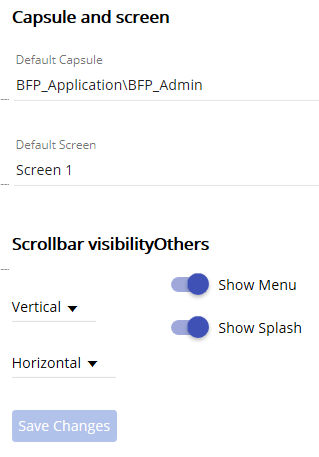 |
Default
Capsule : It is possible to Open a Default Capsule as the
User logins
Default
Screen: It is possible to Open a Default Screen of the
Default Capsule as the User logins
In the sample on the right when the
user logins the "Screen 1" of the Capsule BFP_Admin
opens. Please notice that the capsule is in the folder c:\board\capsules\BFP_Application
Vertical/Horizontal
: it is possible to hide or disable the scrollbars
Show
Menu : If Off the Capsule doesn't show the Quick Bar Menù.
|
When done click on "Save Changes" Button.
On the left of the Instance Page you can visualize the instances's addresses
. Such addresses can't be used to connect to the Web or Client Application.
The login must be always be performed connecting to the Cloud Instance
Portal.