This article explains how to install Board in a multi-node on-premises environment.
This article covers:
A multi-node setup separates the Web layer from the application layer. Board Web runs on the Web Node. Board Engine runs on the Board Engine Node.
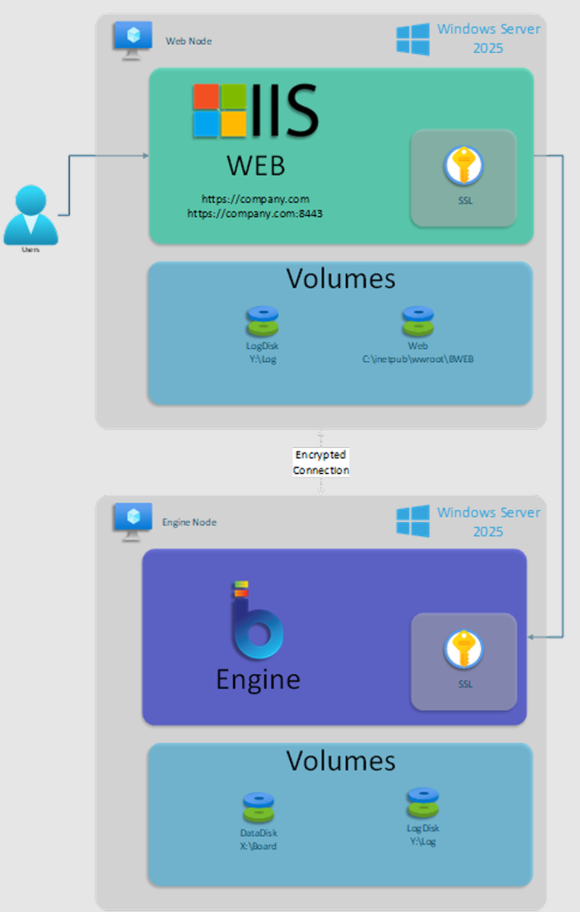
This diagram shows the Web Node and the Board Engine Node on separate Windows Server machines:
The Web Node hosts IIS and Board Web.
The Board Engine Node hosts Board Engine.
The diagram also shows separate volumes for Board Web files, Board data, and logs.
Users connect to Board Web through HTTPS. Board Web then communicates with Board Engine over an encrypted connection.
This separation gives each node a clear role and can simplify operations, maintenance, and resource management.
Publishing Board Web under IIS can help when you need to:
Secure access to Board Web with HTTPS.
Publish the same Board Engine through multiple sites with different configurations.
Allow IT teams to maintain and support the website in a standard Windows Server environment.
Configure scheduled application pool recycles.
Prerequisites
Before you install Board, prepare both nodes.
Infrastructure sizing. Infrastructure sizing depends mainly on these factors:
The Board Engine Node is the most important node for sizing because it manages data and processing.
Size
Board Engine Node resources
Small
8 to 16 vCPU and 64 GB to 128 GB RAM
Medium
16 to 64 vCPU and 128 GB to 512 GB RAM
Large
More than 64 vCPU and more than 512 GB RAM
For all sizes, use a vCPU clock frequency of 3.0 GHz or higher.
The Web Node usually needs fewer resources than the Board Engine Node. Size the Web Node based on expected concurrent web sessions and total web traffic.
These values are guidelines. Validate the final sizing based on the project, Data Model size, application complexity, and expected workload.
Install Microsoft IIS on the Web Node. Make sure IIS is installed and configured correctly before you install Board Web.
Install Microsoft .NET Framework 4.8. Board requires the .NET Framework 4.8 runtime environment to function correctly.
On the Web Node, enable these IIS role services under "Application Development":
ASP.NET 4.8
WebSocket Protocol
Enable required Windows features. Enable all necessary Windows features as shown in the tables below to ensure compatibility and full functionality of the Board platform.
Open Server Manager and click on “Add roles and features”
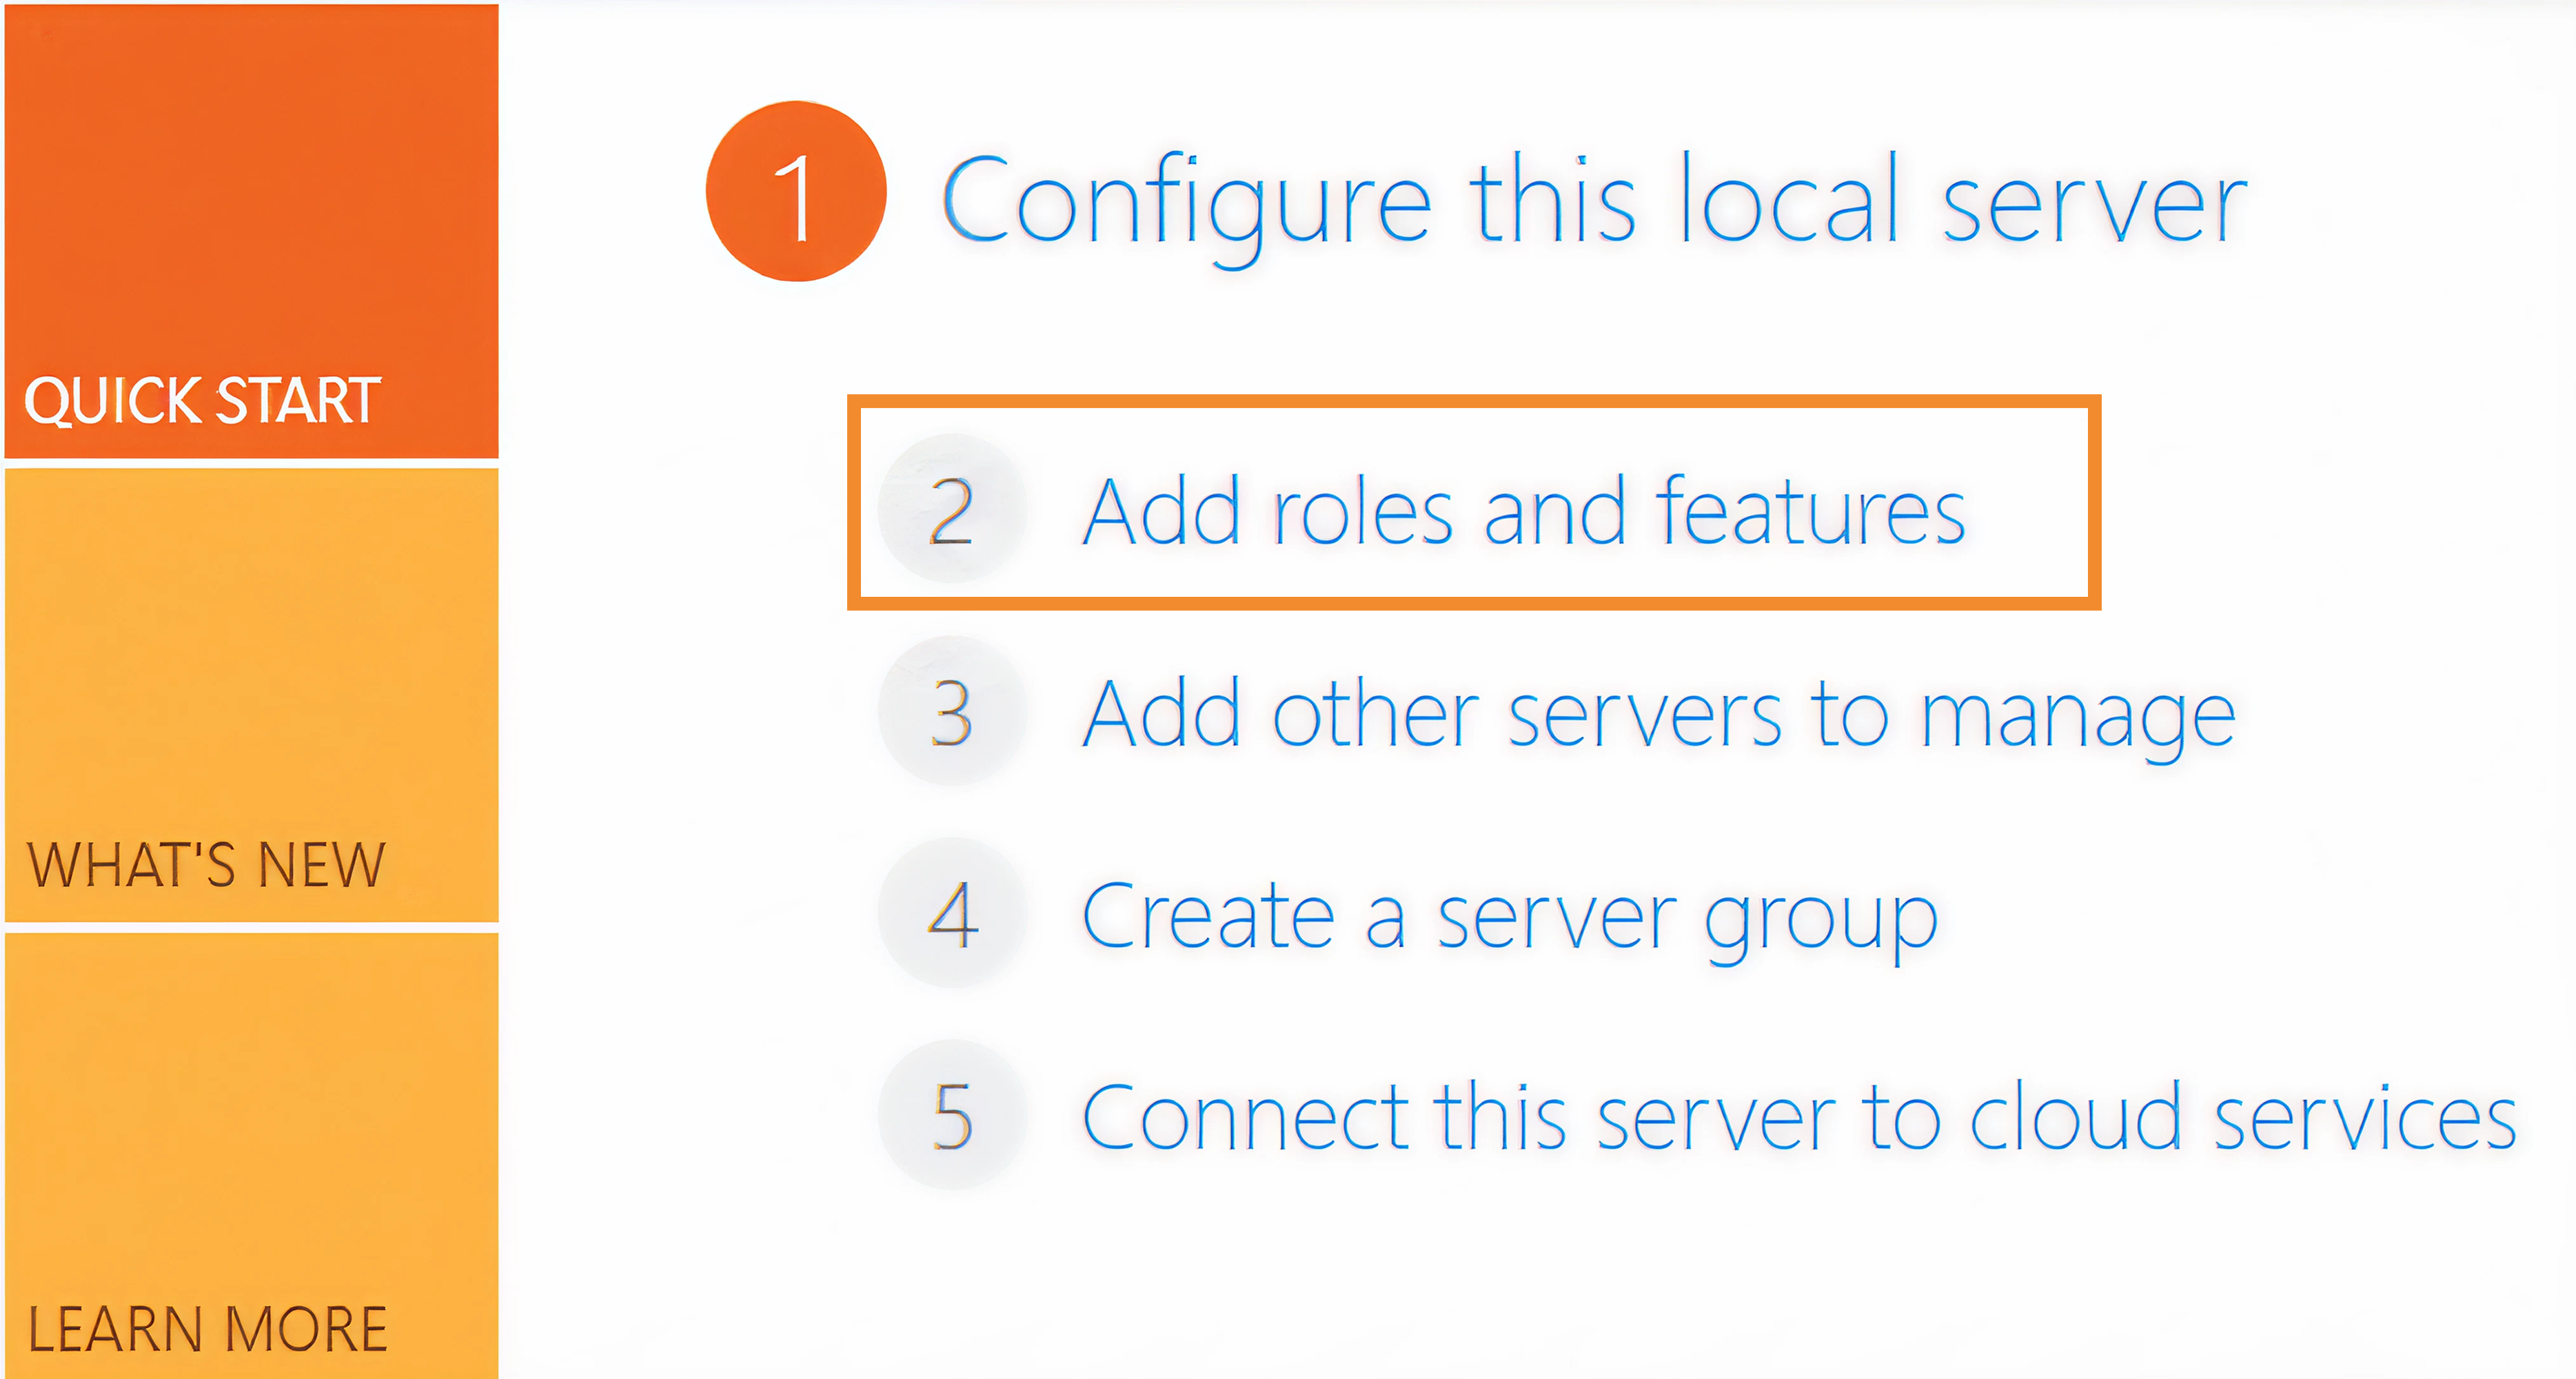
In the “Add Roles and Features Wizard”, make sure the following role services and features are enabled:
Roles for the Web Server (IIS)
Category
Role Service
Common HTTP Features
Default Document
Common HTTP Features
Directory Browsing
Common HTTP Features
HTTP Errors
Common HTTP Features
Static Content
Health and Diagnostics
HTTP Logging
Performance
Static Content Compression
Security
Request Filtering
Security
Windows Authentication
Application Development
.NET Extensibility 4.8
Application Development
ASP.NET 4.8
Application Development
ISAPI Extensions
Application Development
ISAPI Filters
Application Development
WebSocket Protocol
Management Tools
IIS Management Console
If your environment uses Windows Authentication, make sure "Windows Authentication" is enabled under "Security".
Windows Features
Category
Feature
.NET Framework 4.8 Features
.NET Framework 4.8
.NET Framework 4.8 Features
ASP.NET 4.8
Windows PowerShell
Windows PowerShell 5.1
Install Board on the Board Engine Node
Step 1: Run the Board setup file
Download the Board server installation package from the official Board downloads page in Community.
Extract the installation package.
Right-click the setup executable.
Select "Run as administrator".
Run the setup as administrator to make sure all components and services are installed correctly.
(1).png)
Step 2: Complete the installation Wizard
Follow the setup wizard.
Accept the license agreement.
Keep the default installation path unless your infrastructure requires a custom path.
Select "Install".
When the setup completes, select "Finish".
.png)
Step 3: Verify the installation
After the installation completes, verify that Board Engine and the related services are installed by opening the Board Server Configuration app.

Step 4 (Optional): Customize Board path on the Board Engine Node
Use this procedure when Board data must be stored on a dedicated drive.
Stop Board service. Stop the service before you change the Board path. This prevents conflicts during the path change.
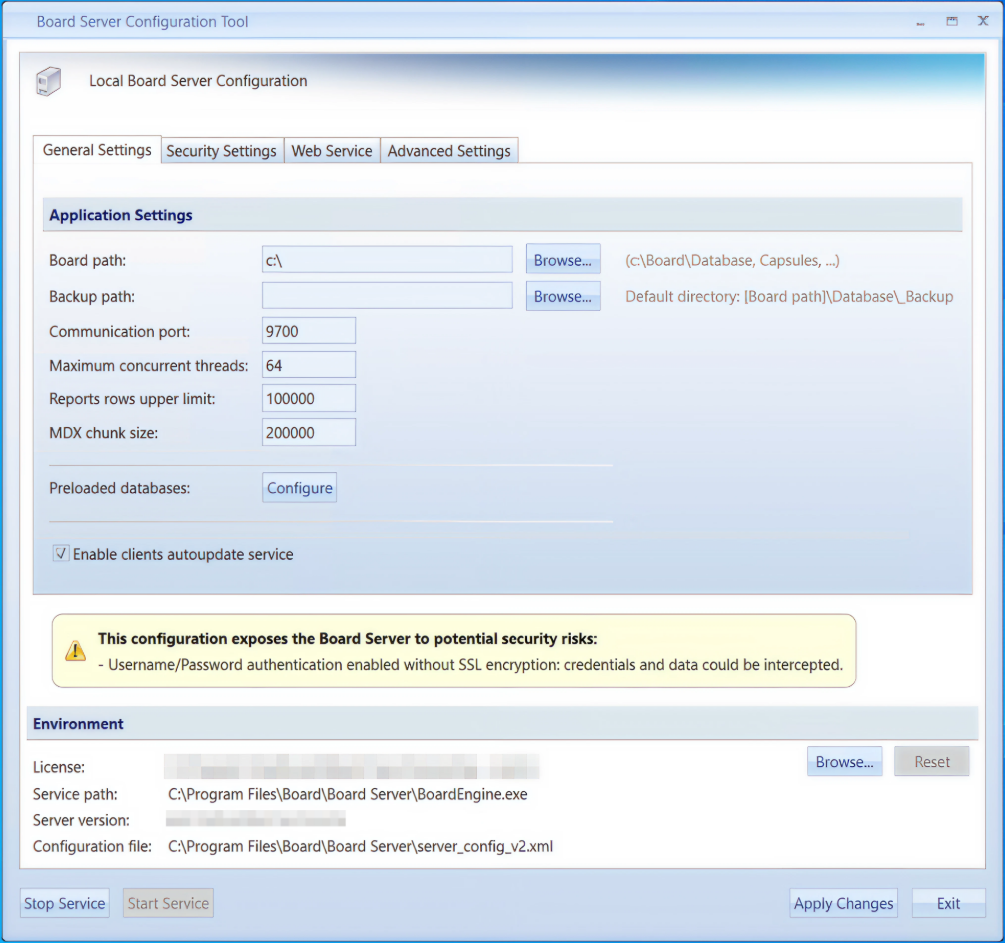
Open "Board Server Configuration".
Select "Stop Service".
Change Board path.
In "Board Server Configuration", go to the "General Settings" tab.
In "Board path", click on “Browse” and select the drive and folder where you would like Board to store its data.
Use a path such as
X:\Board.
Move existing data.
Copy all folders from the current Board data path to the new path.
Keep the same folder structure in the new path.
Verify that all folders exist in the new path.
For example, move the folders from
C:\BoardtoX:\Board..png)
Apply changes.
In "Board Server Configuration", select "Apply Changes".
Select "Start Service".
Install Board Web on the Web Node
Board Web runs under IIS on the Web Node.
Step 1: Download the Board Web package
Download the WebHTML5_IIS package from the official Board downloads page in Community.
Extract the package.
Step 2: Check for blocked files
Right-click the downloaded ZIP file.
Select "Properties".
If Windows shows "This file came from another computer and might be blocked to help protect this computer", select "Unblock".
 (1) 2.png)
Make sure the attribute “Read-only (Only applies to files in folder)” is unchecked
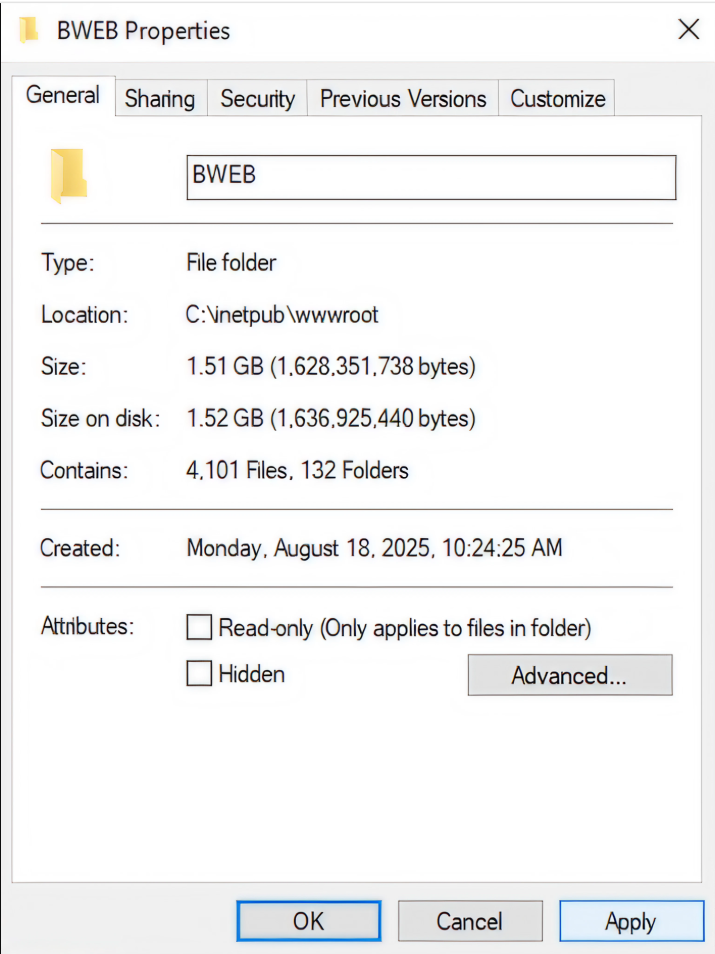
Click "Apply".
To confirm the changes made in the last step, choose “Apply changes to this folder, subfolders and files“.
 (1) 2.png)
Step 3: Create IIS folder
On the Web Node, create a new folder for Board Web under the IIS web root.
Use a path such as
C:\inetpub\wwwroot\BWEB.
Step 4: Copy the Board Web files
Copy the contents of the extracted ZIP file to the IIS folder.
Verify that the folder contains the expected Board Web files and folders.
.png)
Step 5: Set folder permissions
Right-click
C:\inetpub\wwwroot\BWEB.Select "Properties".
Select the "Security" tab.
Select "Edit".
Grant "Full control" to the
IIS_IUSRSgroup.Select "Apply".
Select "OK".
Step 6: Configure the certificate between Board Web and Board Engine
Board Web and Board Engine use a certificate to support secure communication between the Web Node and the Board Engine Node.
Use a certificate that meets your company security requirements. For production environments, use a trusted Certificate Authority when required by your security policy.
Create the certificate.
Create a certificate on one server, then export it with the private key in PFX format.You can create a local certificate with Windows PowerShell.
cd cert:

$cert = New-SelfSignedCertificate `
  -DnsName company.com `
  -FriendlyName MyCert `
  -CertStoreLocation Cert:\LocalMachine\My

$rootStore = New-Object System.Security.Cryptography.X509Certificates.X509Store `
  -ArgumentList Root, LocalMachine

$rootStore.Open("MaxAllowed")
$rootStore.Add($cert)
$rootStore.Close()
Replace “company.com” with the host name for your environment.
Export the certificate.
Run these commands in an elevated Windows PowerShell session.$mypwd = ConvertTo-SecureString -String "YourPassword" -Force -AsPlainText cd .\LocalMachine\My\ dir Get-ChildItem -Path Cert:\LocalMachine\My\<certificate_thumbprint> | Export-PfxCertificate ` -FilePath C:\temp\myBoardPfx.pfx ` -Password $mypwdReplace “<certificate_thumbprint>” with the certificate thumbprint.
Do not use the sample password from the source article in a real environment.
Import the certificate on both nodes.
Import the PFX certificate on both servers: Web Node and Board Engine Node.
Use this certificate store:
Local Machine\Personal\Certificates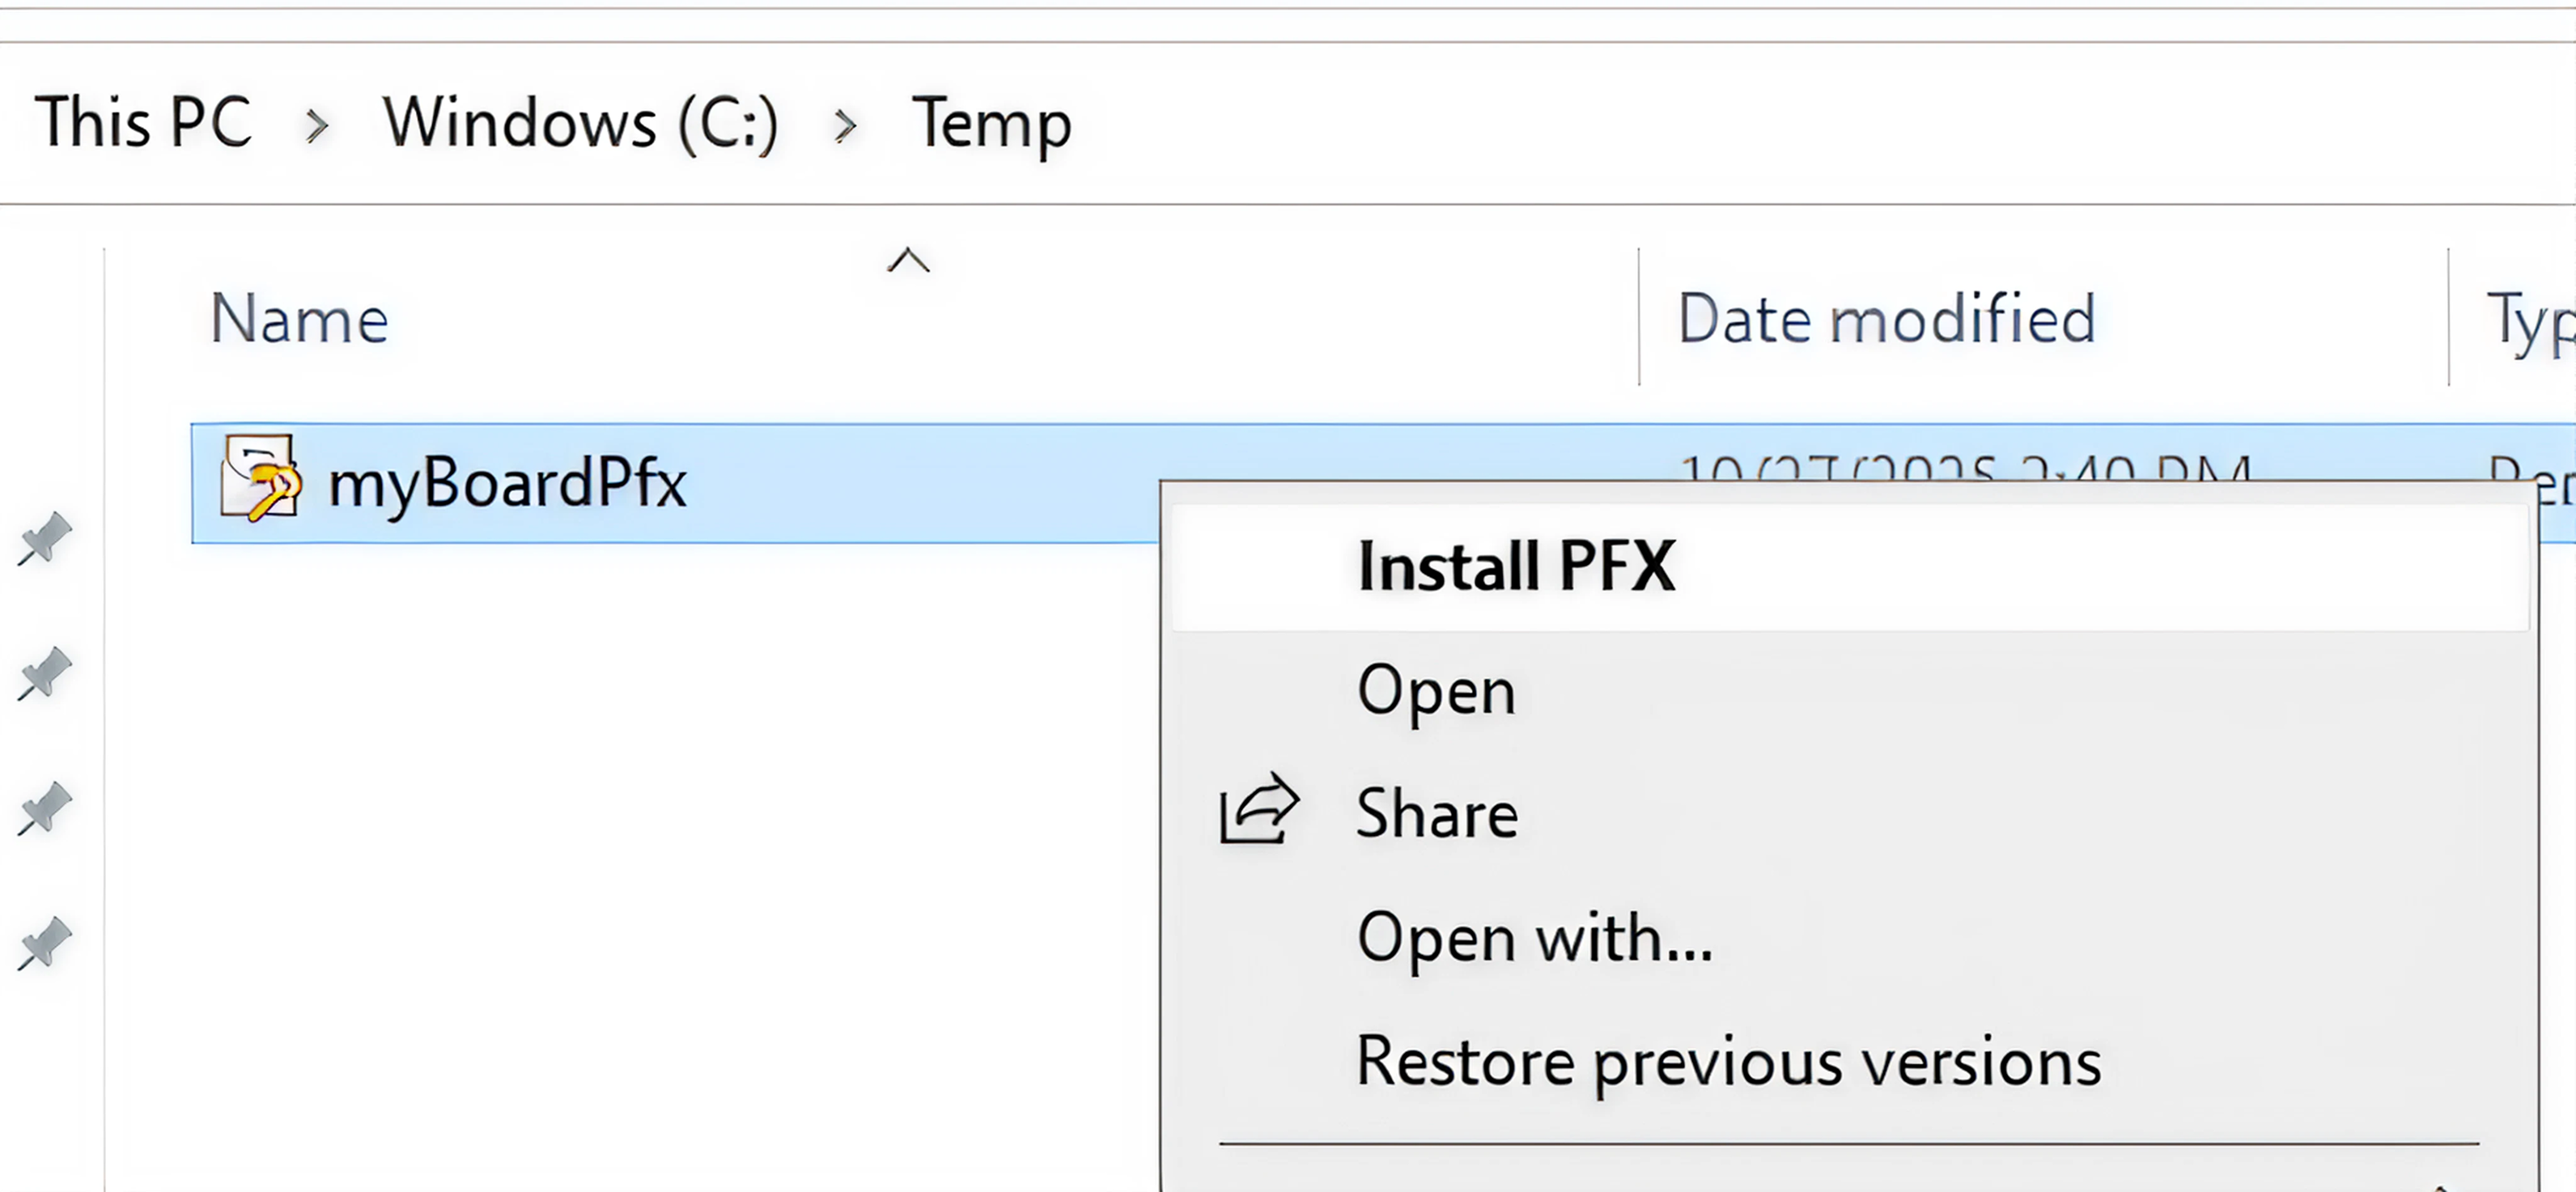

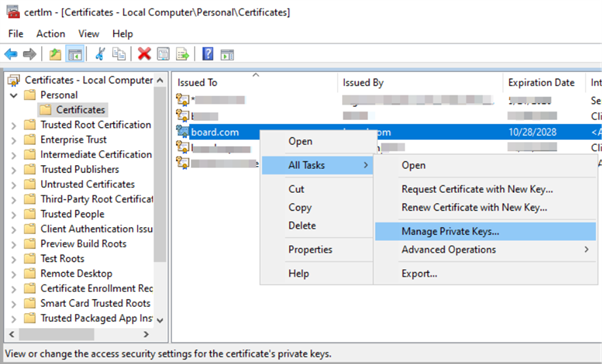
Configure certificate permissions.
Open "Certificate Manager" by running
certlm.msc.Go to "Personal".
Go to "Certificates".
Right-click the certificate.
Select "All Tasks".
Select "Manage Private Keys".
Select "Add".
Enter
IIS_IUSRSand click “OK”.Grant "Read" permission.
Select "Apply".
Select "OK".
Add the certificate configuration to Board Web.
Open this file on the Web Node:
C:\inetpub\wwwroot\BWEB\App_Data\config\appSettings.confAdd or update these parameters in the configuration section of the file above:
<add key="certificateStoreName" value="My" />
<add key="certificateStoreLocation" value="LocalMachine" />
<add key="certificateThumbprint" value="<certificate_thumbprint>" />
Replace “<certificate_thumbprint>” with the certificate thumbprint.
Add the certificate configuration to Board Engine.
Open this file on the Board Engine Node:
C:\Program Files\Board\Board Server\server_config_v2.xmlAdd or update these parameters in the configuration section of the file above
WebSigningCertificateStoreName="My"
WebSigningCertificateStoreLocation="LocalMachine"
WebSigningCertificateThumbprint="<certificate_thumbprint>"
Replace “<certificate_thumbprint>” with the certificate thumbprint.
Configure IIS and Board Web settings
After you copy Board Web files to the IIS folder and configure the certificate, configure IIS to host the site. Then update the Board Web configuration file so Board Web can use the correct public URL and connect to Board Engine.
Before you add the HTTPS binding, make sure the SSL certificate is already installed on the Web Node.
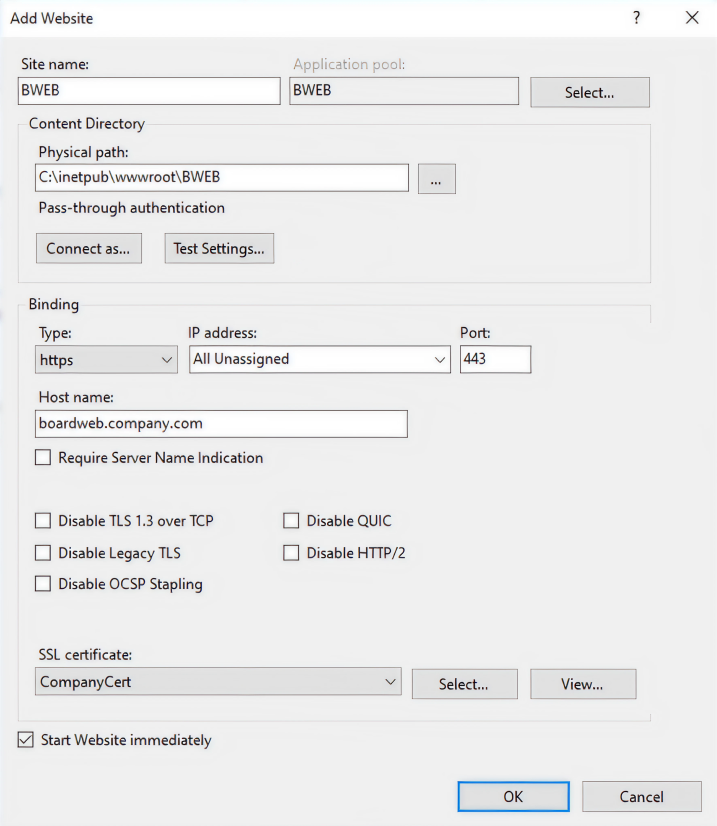
Step 1: Create the IIS website
Open "IIS Manager" on the Web Node.
Create a new website.
Set "Site name" to
BWEB, or use the name required by your environment.Set "Physical path" to
C:\inetpub\wwwroot\BWEB.Add an HTTPS binding.
Set the host name to the external name of the Web Node, such as
boardweb.company.com.Set the port to
443.Select the SSL certificate that you created or installed earlier.
Select "OK".
Step 2: Configure the Application Pool Settings
In "IIS Manager", select "Application Pools".
Select the application pool for the Board Web site.
Select "Advanced Settings".
Set "Load User Profile" to
True.Select "OK".
.png)
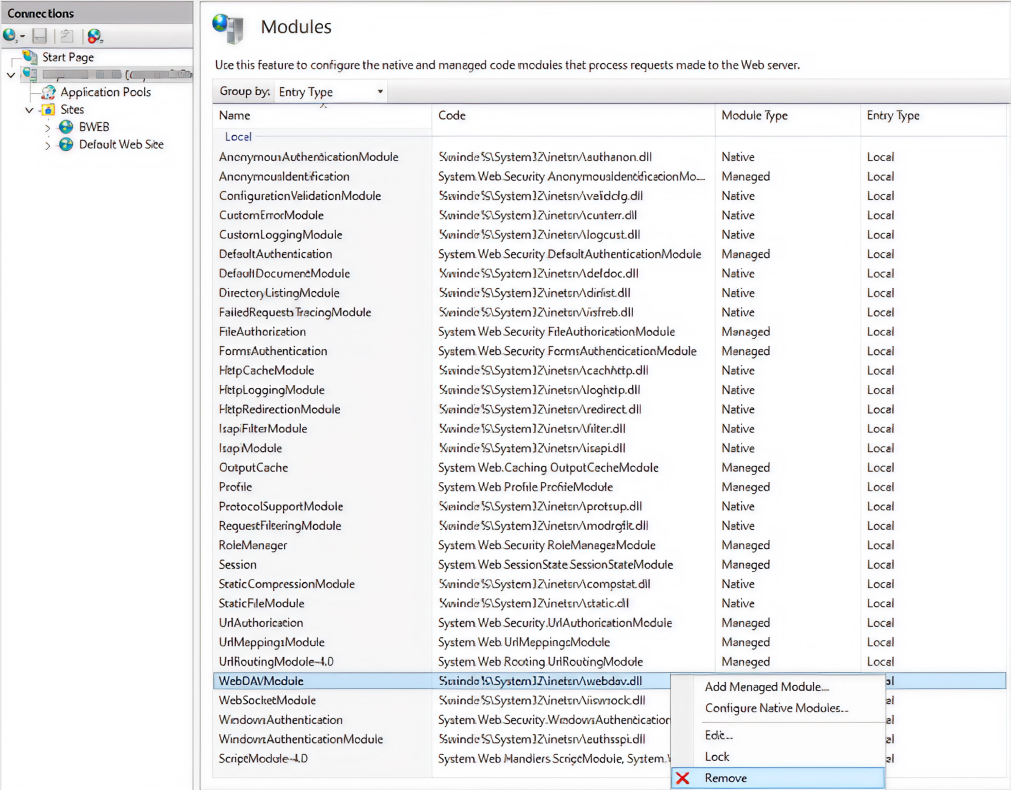
Step 3: Remove the WebDAV module
If WebDAVModule is present, remove it from the IIS modules configuration.
In "IIS Manager", select the Board Web site.
Open "Modules".
Select "WebDAVModule".
Select "Remove".
Step 4: Configure Board Web connection settings
Find the file located in the Board Web site folder on the Web Node:
C:\inetpub\wwwroot\BWEB\App_Data\config\appSettings.conf
Use this file to define the public Board Web URL and the connection to Board Engine.Add or update these parameters in the configuration section of the file above
<add key="host" value="https://boardweb.company.com/" />
<add key="publicOrigin" value="https://boardweb.company.com/" />
<add key="boardEngine" value="https://boardengine.company.com/" />
Replace “https://company.com/” with the external URL used to access Board Web.
The “host” and “publicOrigin” values must match the public URL configured in the IIS binding.
The “boardEngine” value must point to the Board Engine Node. Board Web uses this value to communicate with Board Engine.
Step 5: Open ports on the Board Engine Node
Board uses ports 9700 to 9710 for communication between Board Web and Board Engine.
Open this port range in Windows Firewall on the Board Engine Node: 9700-9710
Step 6: Configure the Board Mailer Service
The Board Mailer Service configuration is stored in the Board Web folder on the Web Node.
Edit the Mailer service configuration file.
Open the file
C:\inetpub\wwwroot\BWEB\bin\Board.Mailer.Service.exe.configUpdate the values for the web URL, watch path, and log folder:
<add key="WebUrl" value="https://boardweb.company.com" />
<add key="watchPath" value="C:\inetpub\wwwroot\BWEB\App_Data\broadcasting" />
<add key="logFolder" value="C:\inetpub\wwwroot\BWEB\App_Data\broadcasting\Log" />
Replace “https://boardweb.company.com/” with the Board Web URL for your environment.
The
App_Data\broadcasting\Logfolder stores broadcasting logs used by the Board Mailer Service.The
WebUrlvalue must match the Board Web host configured inappSettings.conf.
Reconfigure and start the Board Mailer Service.
If needed, restart the server and then run these commands in an elevated Command Prompt (Run cmd as Administrator):
"C:\Windows\Microsoft.NET\Framework\v4.0.30319\installutil.exe" "C:\inetpub\wwwroot\BWEB\Bin\Board.Mailer.Service.exe"

sc config BoardMailerService start=auto

sc start BoardMailerService
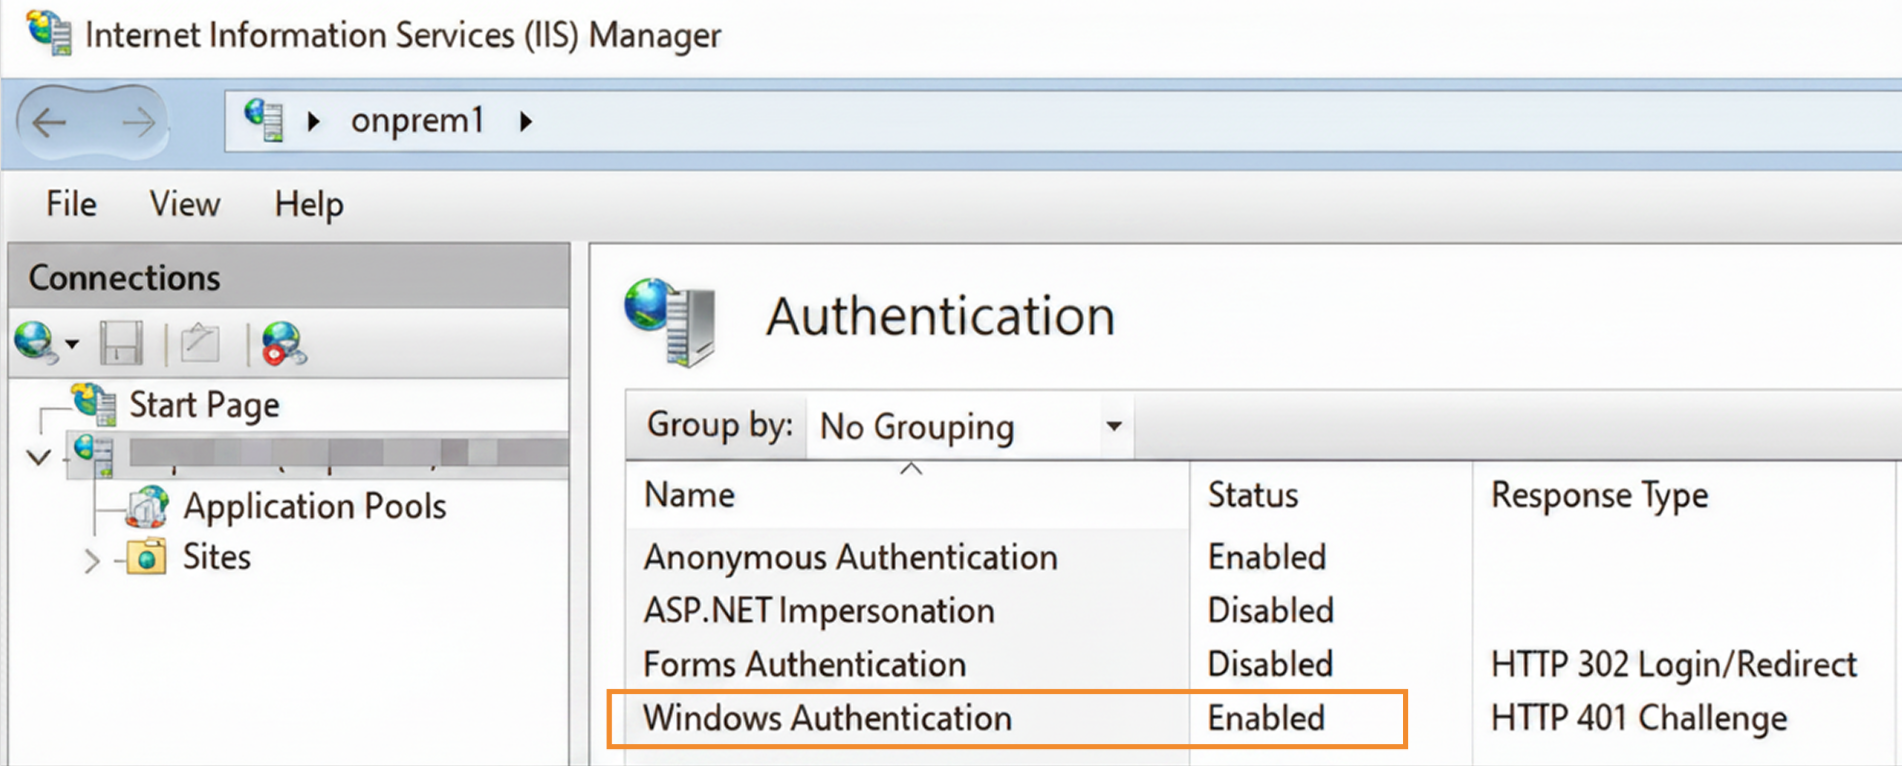
Windows Authentication
Open “IIS Manager” on the Web Node.
Select the
BWEBsite.Open “Authentication”.
Enable "Windows Authentication".
Configure a custom Log folder (Optional)
This section is optional. Use it only when you need to store Board logs in a different location.
Run the following commands in an elevated Command Prompt (Run cmd as Administrator):
On the Board Engine Node:
mklink /J "X:\Board\Dataset\Log" "K:\Board\Log"On the Web Node:
mklink /J "C:\inetpub\wwwroot\BWEB\App_Data\log" "K:\Board\WebLog"
Replace the paths with the folders used in your environment.
Validate the installation
After the setup is complete, validate the installation.
Verify that Board Engine is running on the Board Engine Node.
Verify that the Board Mailer Service is running on the Web Node.
Open the Board Web URL in a supported browser.
Verify that the HTTPS certificate is valid.
Verify that the Web Node can connect to the Board Engine Node.
Verify that ports
9700to9710are open from the Web Node to the Board Engine Node.Verify that users can access Board Web.
Verify that logs are written to the expected folders.
Test the main user flows used in your environment.