This topic describes the Capsule Package section, how to create a Capsule Package, and its other features.
The Capsule Package page allows you to create and manage Transporter Packages that you can run to transport the Capsule folders and Capsules of a Package to the current Platform. You can use this feature to transfer the Capsule folder structure from one Platform to another by creating a Capsule Package on one Platform and then uploading and running the Package on another Platform.
To access the Capsule Packages section, access the System Administration space of the desired Platform and click on the Capsule Packages tile. You will be taken to the Capsule Packages page.
.png)
In the Capsule Packages section, you can see all existing Capsule Transporter Packages and their main information: the table is sortable and searchable using the interactive header fields. You can also show or hide columns to your liking, by clicking the Column chooser button in the upper right corner of the table.
The table contains the following information:
Name. This column displays the name of each Capsule Package.
Source platform. This column displays the name of the source environment where each Capsule Package was created.
Target platform. This column displays the name of the target (current) environment where each Capsule Package will be run.
Creation Date. This column displays when the Capsule Package was created.
Comments. This column displays additional comments on each Capsule Package. You can click on the desired column field to edit a comment.
Last run. This column displays the date and time of the last run of each Capsule Package, in the following format: DD/MM/YYYY, HH:SS.
Last run Result. This column displays the result of the last run of each Capsule Package.
Size. This column displays the total storage space in megabytes that each Capsule Package occupies on the Platform machine.
Creating a Capsule Package
To create a Capsule Package:
From the Capsule Packages section of the desired Platform, click on the blue plus icon
 next to "Capsule Package" to open the "New transporter Package" configuration panel. You can also do this by clicking on the "CAPSULE PACKAGE" button from the Capsule Snapshot page.
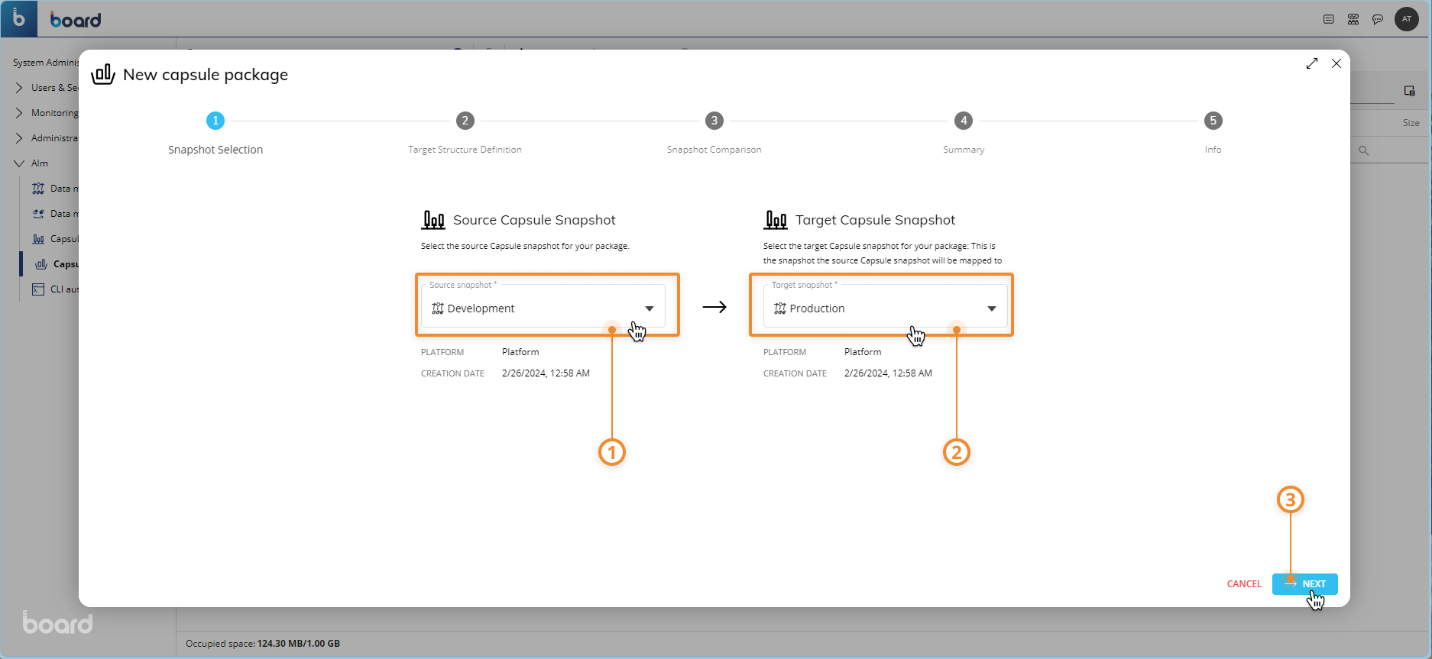
Snapshot selection. Here you must choose the source Capsule Snapshot from the left dropdown list and then choose the target Capsule Snapshot from the right dropdown list. You can click on the arrow in the middle to switch them.
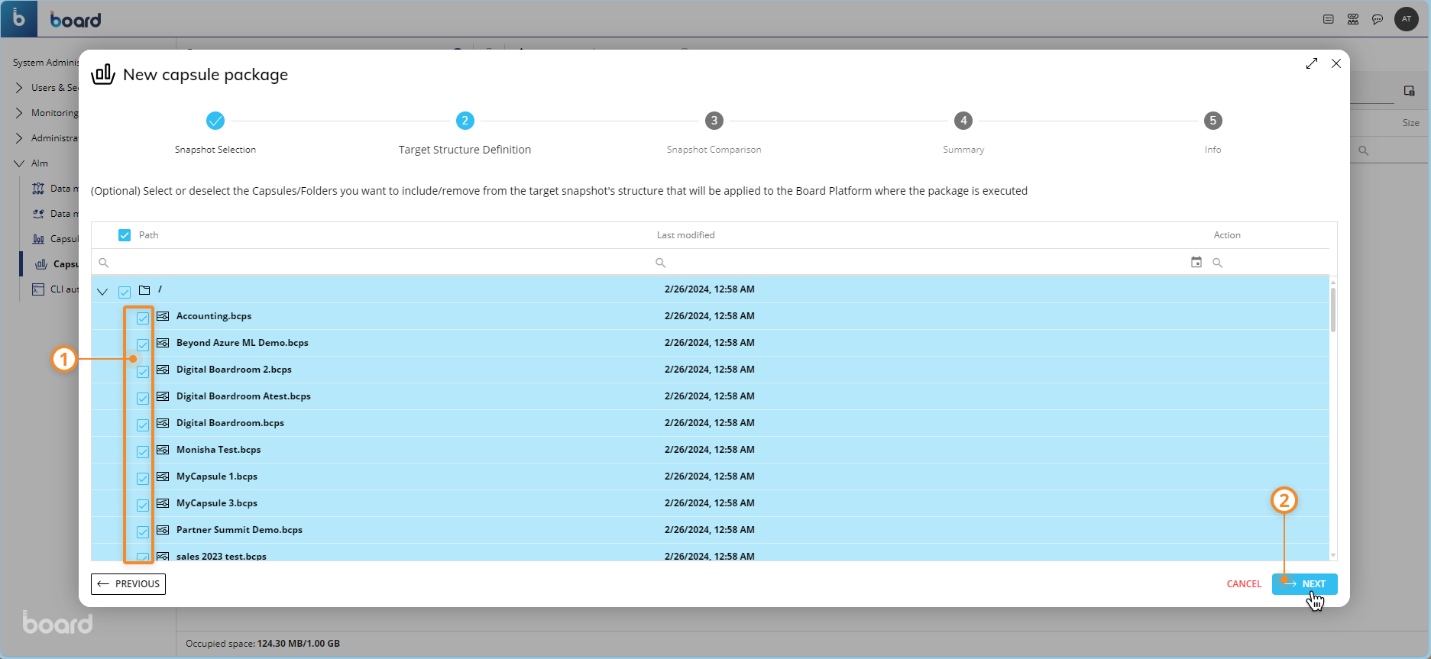
Target structure definition. Here you can select or deselect the Capsules and Capsule Folders in the list that you want to include/remove from the target Snapshot’s structure that will be applied to the Platform where the Package is executed. Essentially, this is where you can clean the target structure, if needed.
The list displays the full structure of the target Capsule folders and Capsules along with a date and time that indicates the last time each Capsule folder and Capsule was modified.
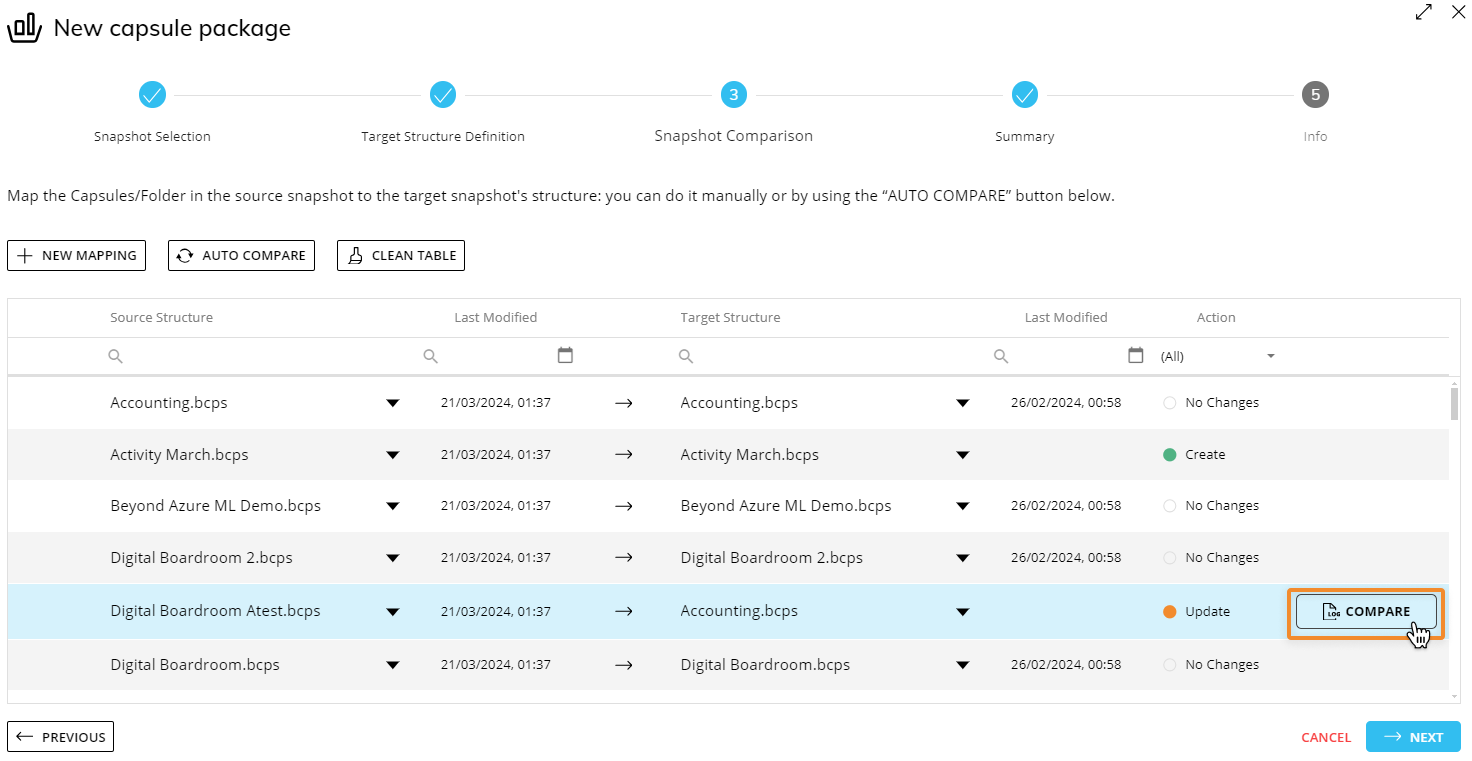
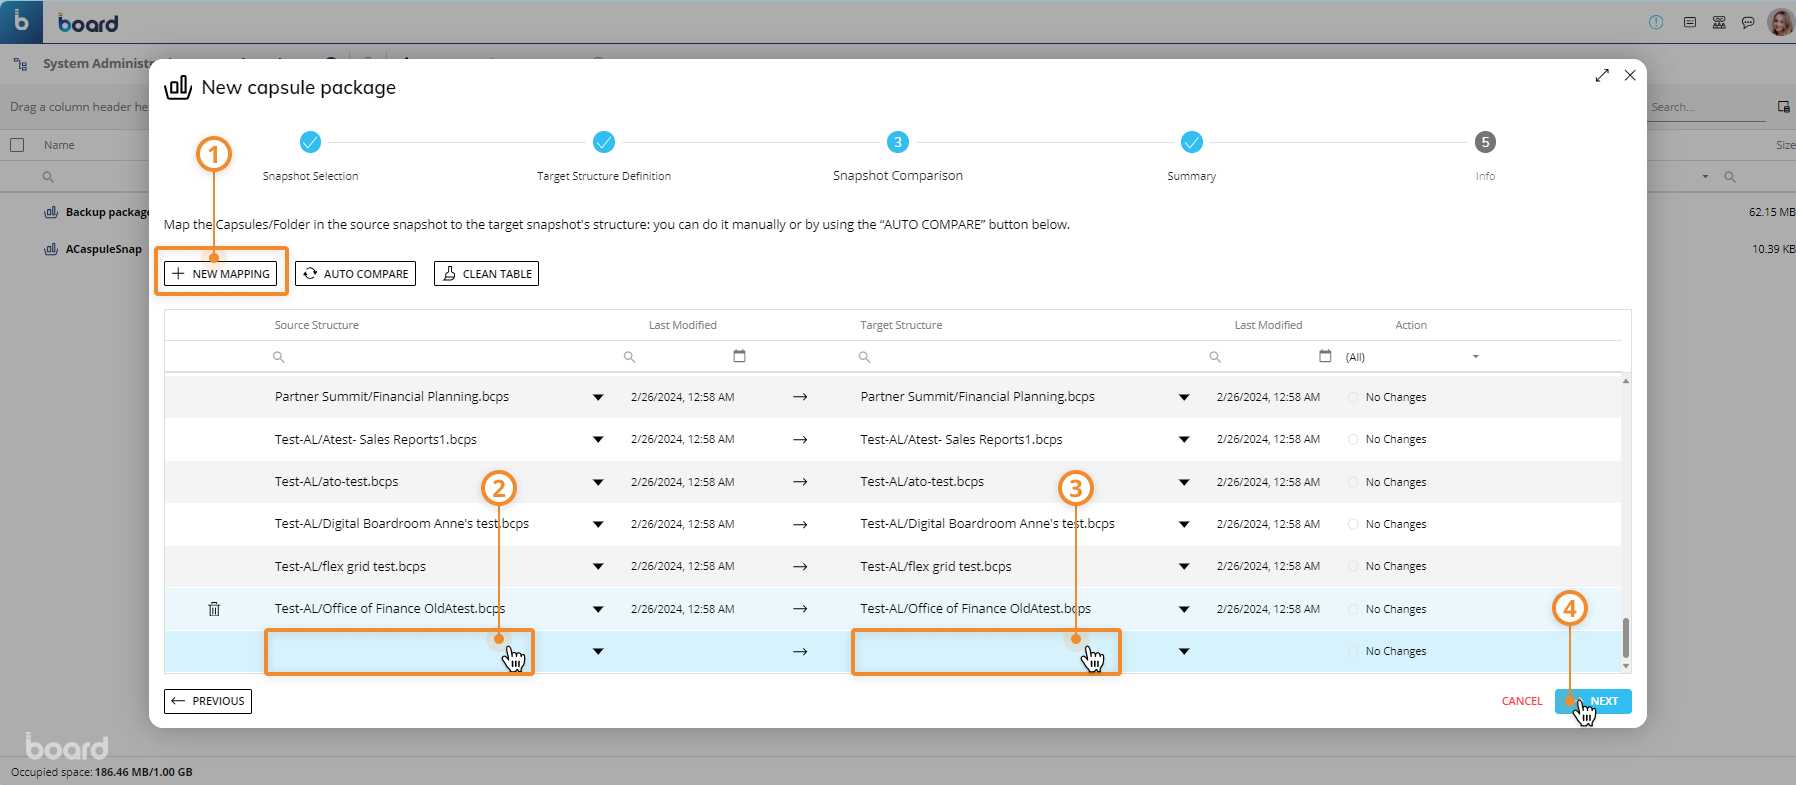
Snapshot comparison. Configure which Capsules you want to transfer from the structure of the source Snapshot to the structure of the target Snapshot. The mappings are displayed in a tableview that contains the following information:
Source structure. This column shows the full path of each Capsule in the source structure.
Last update. This column displays the date and time of the last time each Capsule of the source structure was modified.
Target structure. This column displays the full path of each Capsule in the target structure.
Last modified. This column displays the date and time of the last time each Capsule of the target structure was modified.
Action. This column displays if a target Capsule will be updated or created. The column will display "No changes" in the case where a Capsule is the same in both source and target structures and has the same "Last Update" dates.
Compare Log. The last column displays a "COMPARE" button that you can click to open the "Compare log" popup window where you can check the differences between source and target Capsules. This button only displays when the target structure needs to be updated.
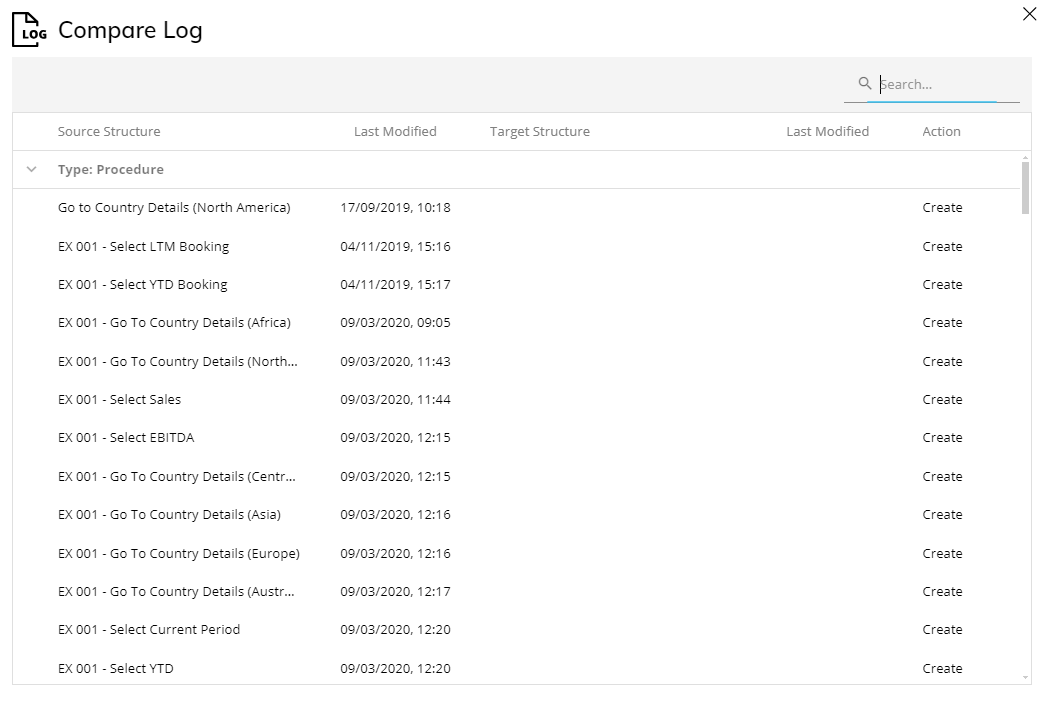
The "Compare log" shows a tableview, similar to the source and target structure mappings one, which displays the name of the Screens, Procedures, Masks, and images that will be created, deleted, or updated in the Capsules of the target structure.
You can configure the mappings between source structure and target structure in the following ways:
Auto compare. You can click on the "AUTO COMPARE" button to copy the entire source structure to the target structure. Board will automatically compare the two structures and update the Capsules of the target structure that have the same name and are located in the same Capsule folders as in the source structure, and add any Capsules and Capsule folders that do not currently exist in the target structure.
You can manually edit, delete or add a mapping row after performing the Auto compare feature.
Manual mapping. You can click on the "+NEW MAPPING" button to add one or more rows which you can manually configure to specify the Capsules you want to transfer. To do this, proceed as follows:
Click on the "+NEW MAPPING" button to add a mapping row.
From the "Select source Capsule" dropdown list on the left, choose the source Capsule that you want to transfer.
Click on the "Capsule/Folder" field to open a dropdown list where you can choose a target Capsule that you want to update/substitute (the Action column field will display the "Update" value) or choose a Capsule folder where you want to transfer the source Capsule (the Action column field will display the "Create" value).
In addition, you can manually enter the target path and change the name of the target Capsule in the "Capsule/Folder" field. You can enter the path and name in the following format: CapsuleFolder/CapsuleSubFolder/CapsuleName.bcps
In the cases where you are transporting the structure of a Development environment to a Production environment, it is highly recommended not to manually create a Capsule folder structure in the target Production environment that is different from the Development environment and therefore has not been tested.
You can click on the "CLEAN TABLE" button to delete all the mappings from the table.
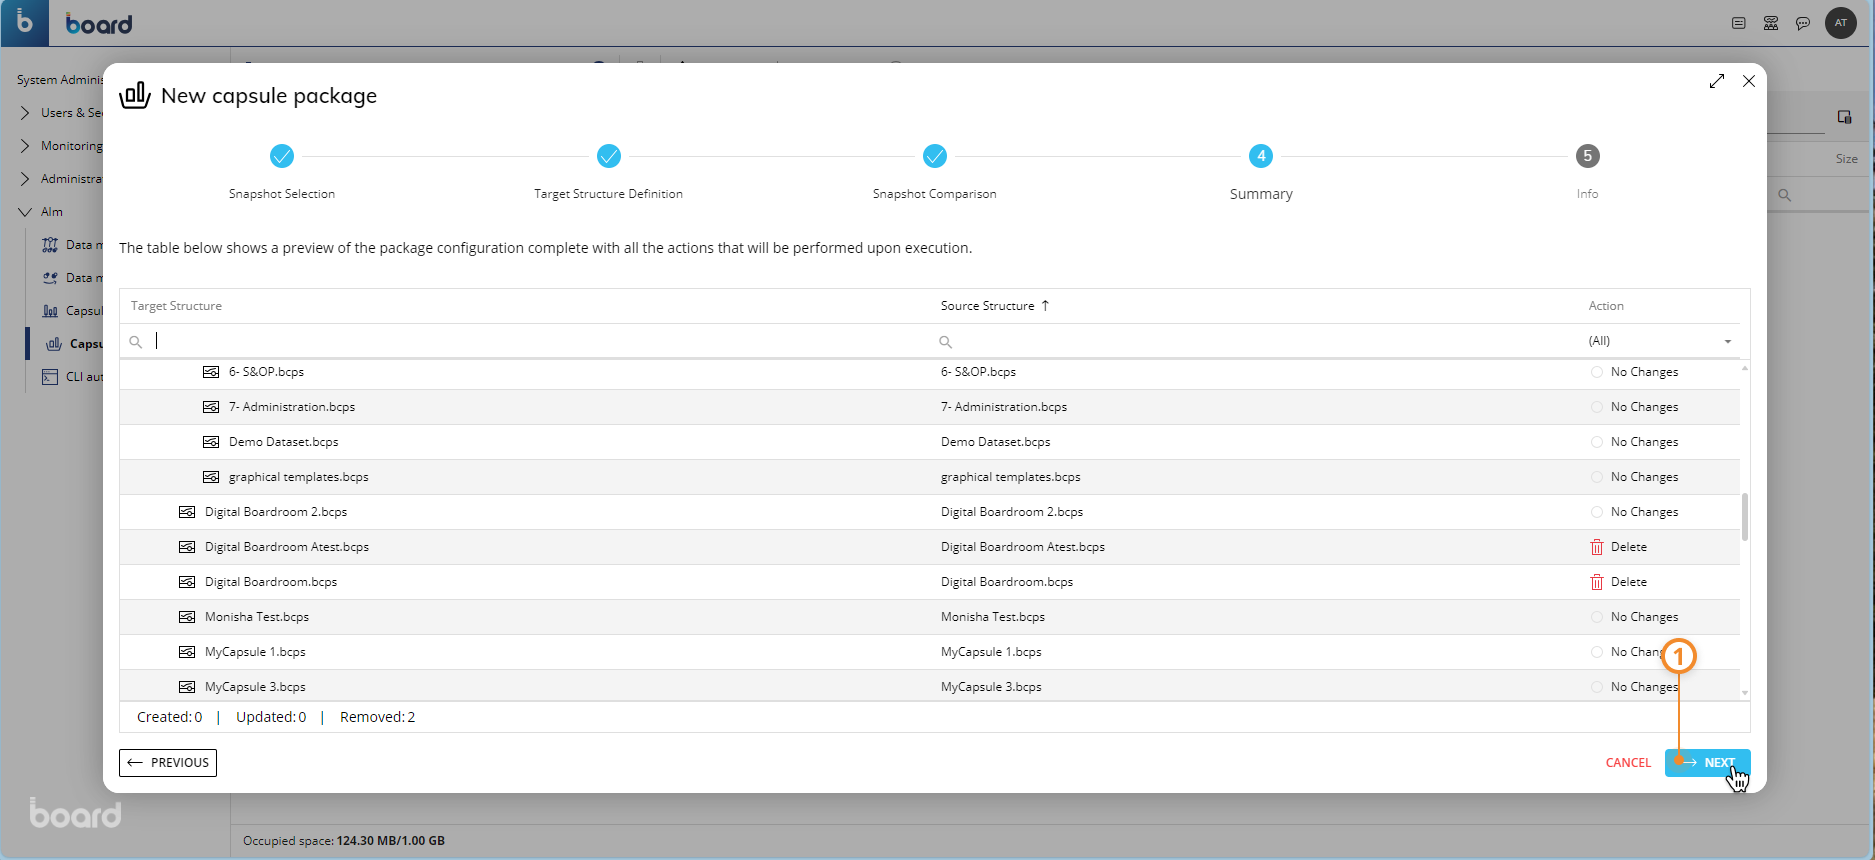
Summary. Here you can check a preview of the Package configuration. Board displays a table that contains the following information:
Target structure. This column displays the structure of the target after the mapping configuration.
Source. This column displays the names of the Capsule folders and Capsules of the source structure that have been mapped to the Capsule folders and Capsules of the target structure.
Action. This column displays the type of action that will be performed on each Capsule and Capsule folder when you execute the Package in the target Platform. The actions are Create, Update, Remove, or No changes.
Info. Here you must enter the name of the Package in the "Name" field and add any additional comments in the "Note" field. You can also enable the "Backup" option, which automatically creates a Snapshot of the Capsule folder structure of the current Platform when you run the current Capsule Package.
If the storage space limit is reached, Board will automatically delete the oldest Snapshots to free the necessary space for the new Snapshot. The Snapshots that have the "Golden copy" option enabled are excluded from the automatic deletion.
Click on "SAVE" to save the Capsule Package.
Managing a Capsule Package
The Capsule Packages page allows you to perform the following management tasks on existing Packages:
Edit a Capsule Package
Remove a Capsule Package
Upload a Capsule Package to the Platform you are working on
Download a Capsule Package to your local computer
Run a Capsule Package
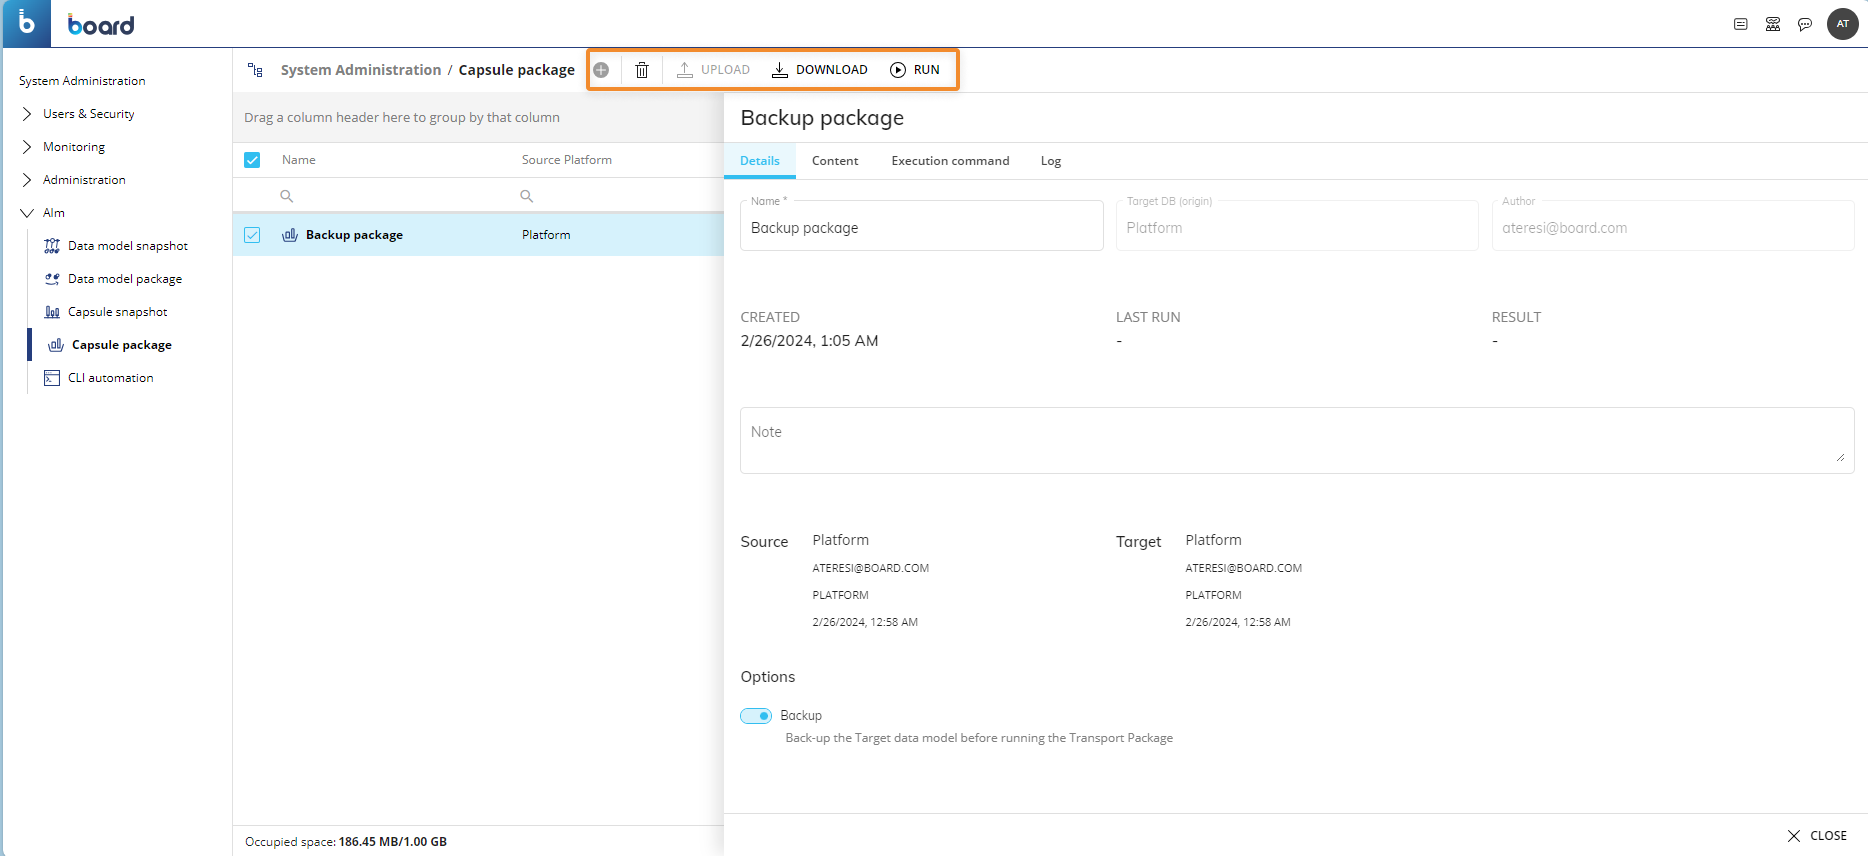
To edit a Capsule Package, select it to bring up the Package configuration panel and modify the desired options explained in the steps in the Capsule Package creation process. You can also right click over the Package and click "Edit".
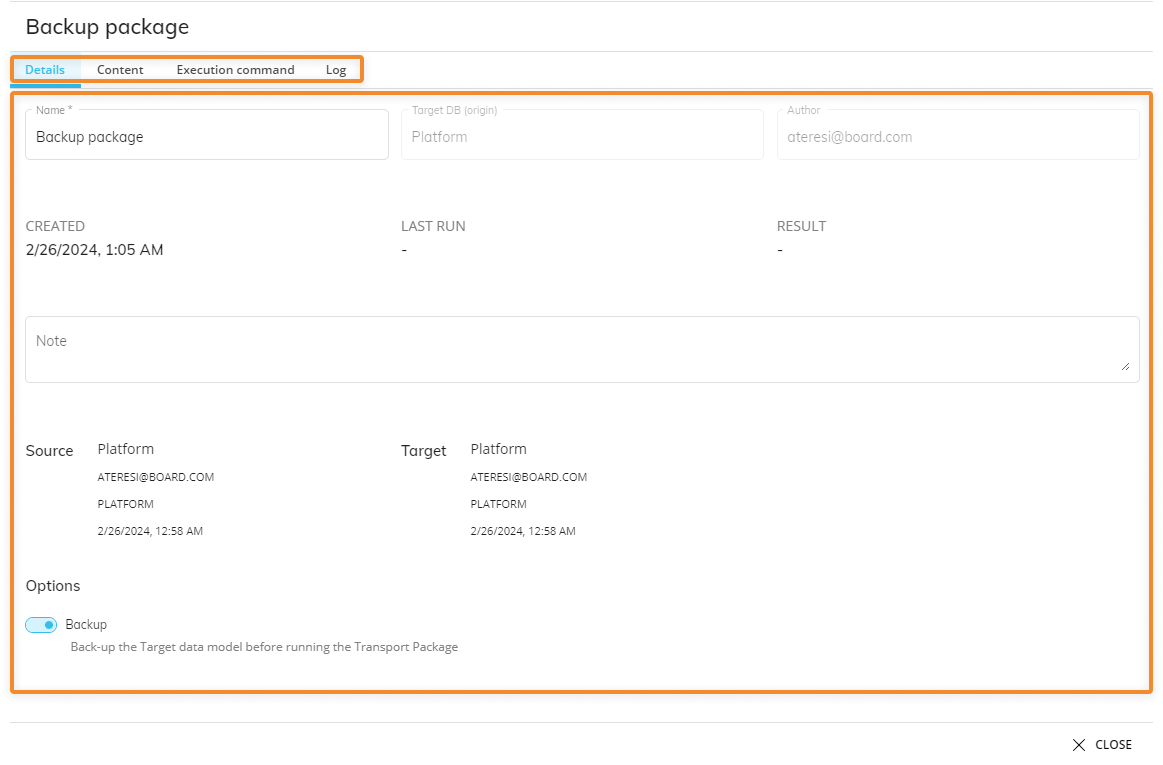
The Package configuration panel displays additional information under the following tabs:
Content. This tab contains a table that displays the Capsule folder structure of the selected Package.
Execution command. This tab contains the commands that you can use to run the Package via the CLI Automation.
Logs. This tab contains a log that provides information about the execution of the Package.
To delete Capsule Packages, select the desired ones and then click on the trash icon. You can also right click over the selected Package(s) and click "Delete".
To upload Capsule Packages, Click on the "UPLOAD" button and choose the .trsp file containing the Capsule folder structure of the Package.
To download Capsule Packages, select the desired ones and then click on the "DOWNLOAD" button. A .trsp file that contains the selected Packages will be downloaded to your local machine. You can also right click over the selected Package(s) and click "Download".
To run a Capsule Package, select it and click "Run" to open a popup window. Click "RUN PACKAGE" to execute the run. Follow the instructions below.
Running a Capsule Package
To run a Capsule Package:
From the Capsule Packages page, select the desired Package and click on the "RUN" button above the table to run it.

Board will perform a pre-execution check where it will list any possible warning or error messages. You may find these messages in the following cases:
The Capsule Package action on a Capsule displays the value "Update", but that Capsule does not exist in the current Platform. The Capsule Package will create that Capsule in this case.
The Capsule Package action on a Capsule displays the value "Create", but that Capsule already exists in the current Platform. The Capsule Package will overwrite that Capsule in this case.
The Capsule Package action on a Capsule displays the value "No changes", but that Capsule is different in the current Platform. The Capsule Package will overwrite that Capsule in this case.
The Capsule Package action on a Capsule displays the value "No changes", but that Capsule does not exist in the current Platform. The Capsule Package will create that Capsule in this case.
The Capsule Package action on a Capsule displays the value "Remove", but that Capsule does not exist in the current Platform. The Capsule Package will not do anything in this case.

You cannot run a Capsule Package if there are errors during the pre-execution check.
Click on "RUN PACKAGE" to run the Package execution.
The configured Capsule folder structure and content of the Package will be applied to the current Platform after you run a successful execution of the Package.