This topic describes how to create a new Drill Through protocol and all available options from the Drill Through page found under "Entity options" of a Data Model. Click on a Data Model to open it and then click on the "Drill Through" tile.
Creating a Drill Through
To begin creating a Drill Through, proceed as follows:
From the Drill Through page of a Data Model, click the orange plus icon
 in the top left corner next to "Drill Through".
Name your Drill Through with a relevant name and group it accordingly.
Groups are not part of the multidimensional Data Model (i.e. they cannot be used in reports or Procedures): the only purpose of groups is to improve viewing and searching through the list of Drill Throughs.
Click "NEXT".
Connection
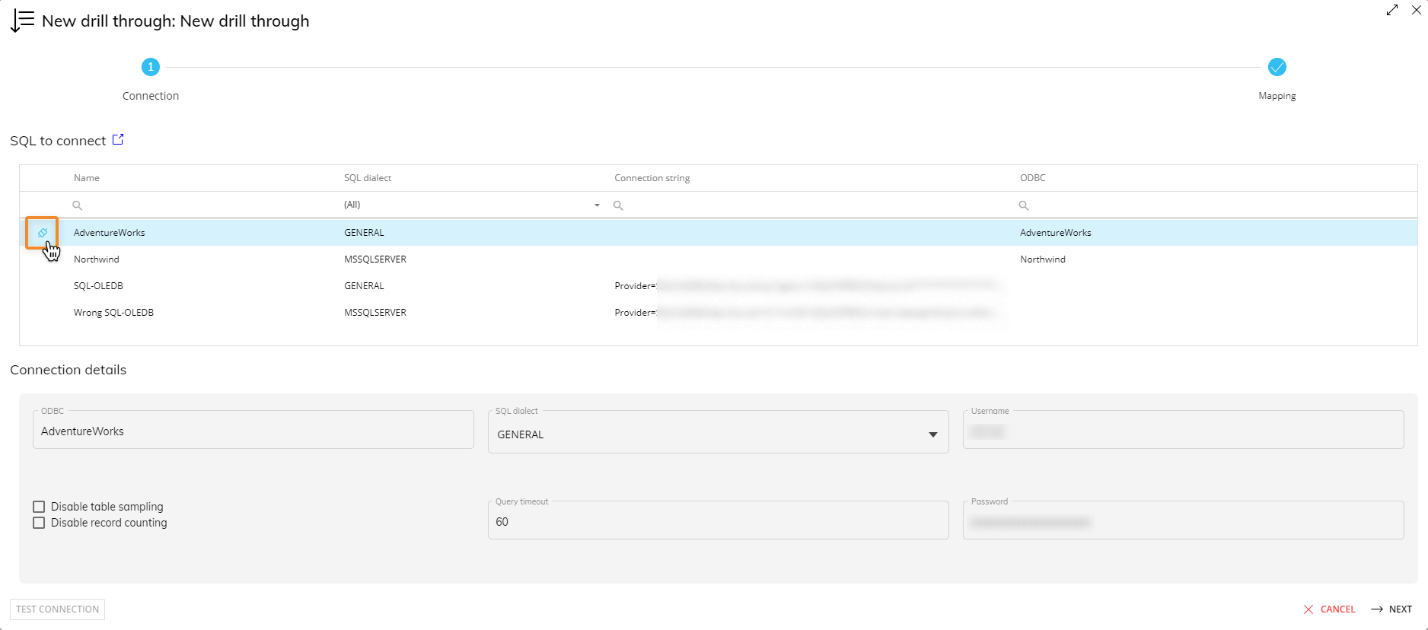
If you have not already set up a Data source Connection, click open window icon next to "SQL to connect" to open a new browser window to the Data sources page where you enter the parameters for the connection you are creating.
There are 2 different connection type available:
ODBC connection
To complete the ODBC connection configuration for a Drill Through:
Select the name of the ODBC Connection. This is defined externally to the Board Data Model section, in the "Data sources" page under System administration.
Define the SQL dialect for queries. This can be changed to match whichever database type is in use. If the database you are connecting to is not listed, set the type to "General". The following properties are available:
Query timeout: set of waiting seconds. When you're using an ODBC database, such as Microsoft SQL Server, there may be delays because of network traffic or heavy use of the ODBC server. Rather than waiting indefinitely, you can specify how long to wait before the database engine produces an error. This setting may not be long enough to allow some queries to run against ODBC data sources.
Disable record counting: Enable/disable counting of affected rows in a query. If disabled, the data reading process completion percentage is not available during the protocol execution.
Disable table sampling: Enable/disable sampling on the database.
Enter the credentials that were defined at the creation of the SQL server that is being connected to.
Click on "CREATE" to save the Data source.
Return to the original tab where you are creating a Drill Through, refresh the page, and recreate the Drill Through. Click the "Connect" button to establish a connection with the source Database and "NEXT" to define the mapping of the Entity codes that correspond to fields in the external table on which you want to drill. The Entities chosen determine the possible starting points from which users can Drill Through.
Note that you will have to return to the Drill Through page, refresh the page, and recreate the Drill Through to connect to the recently created Data source.
OLE-DB connection
To complete the OLE-DB connection configuration for a Drill Through:
Define the name of the OLE-DB Connection and the connection string. The connection string can be defined by clicking on the "CONFIGURE" button or just clicking on the connection string field. A pop-up window will then appear for the configuration of the connection string.
The connection parameters depend on the provider you want to connect to.The connection string has a maximum limit of 32 characters.
Define the SQL dialect for queries. This can be changed to match whichever database type is in use. If the database you are connecting to is not listed, set the type to "General". The following properties are available:
Query timeout: set of waiting seconds. When you're using an ODBC database, such as Microsoft SQL Server, there may be delays because of network traffic or heavy use of the ODBC server. Rather than waiting indefinitely, you can specify how long to wait before the database engine produces an error. This setting may not be long enough to allow some queries to run against ODBC data sources.
Disable record counting: Enable/disable counting of affected rows in a query. If disabled, the data reading process completion percentage is not available during the protocol execution.
Disable table sampling: Enable/disable sampling on the Database.
Enter the credentials that were defined at the creation of the SQL server that is being connected to.
Click on "CREATE" to save the Data source.
Return to the original tab where you are creating a Drill Through, refresh the page, and recreate the Drill Through. Click the "Connect" button to establish a connection with the source Database and "NEXT" to define the mapping of the Entity codes that correspond to fields in the external table on which you want to drill. The Entities chosen determine the possible starting points from which users can Drill Through.
Note that you will have to return to the Drill Through page, refresh the page, and recreate the Drill Through to connect to the recently created Data source.
When a data source has been connected, the icon to the left hand side will change from a black disconnected plug to a light blue connected plug. You can also click the icon to connect to the source Database.
Mapping
Next, the Data Sources must be mapped. On the left-hand side are the Board Data Model objects (Entities) that will be possible starting points from which users can Drill Through. For example, a protocol which includes the Product and Customer Entities allows users to drill from a chosen Customer or a Customer-Product couple through to an external relational table. The objects from which you want to allow users to drill through should be dragged to the center area outlined in blue.
The "Generic field" object under the "More" group can be used to add other fields to the Drill Through protocol, in case those fields have no counterpart in the Board Data Model and therefore they cannot be mapped to any Entity.
On the right-hand side are the database tables and views from the connected source. The relevant field should be dragged next to the corresponding Board object, in the area outlined in green.
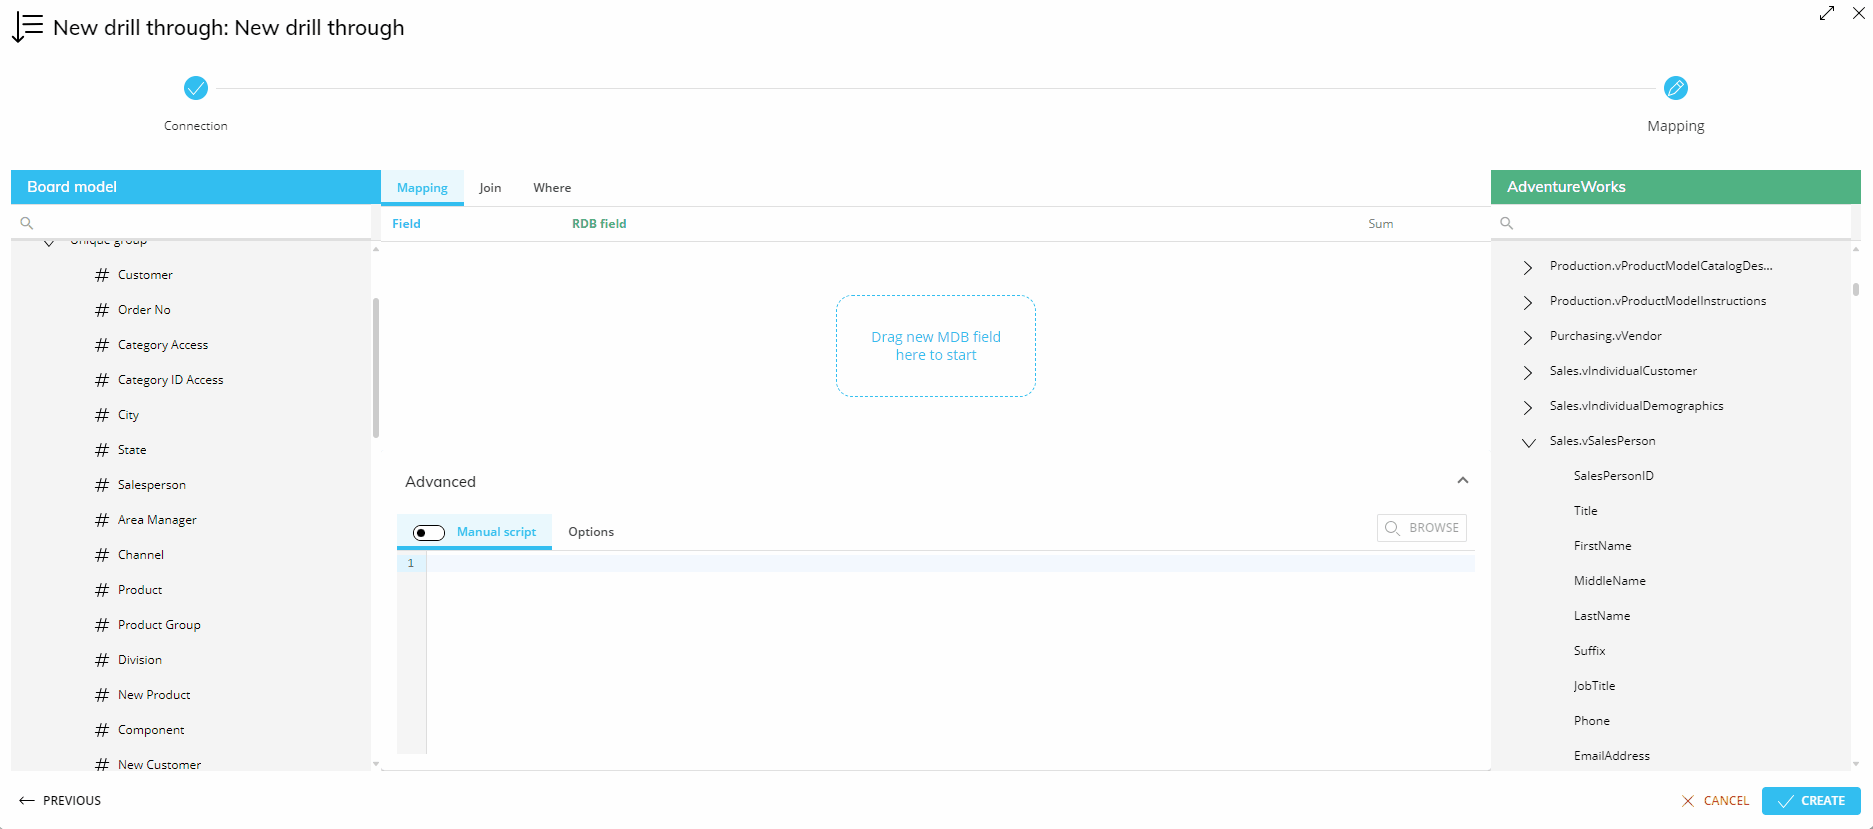
If more than one table is used, a JOIN condition will be required to join the tables on the relevant field: this can be done from the "JOIN" page that can be reached from the tabbed menu on top. To define a join clause, use the available dropdown menus to select the column shared by two tables.
If needed, a WHERE condition can be added to filter the results of the query: this can be done from the "WHERE" page that can be reached from the tabbed menu on top. To define a WHERE condition, you can manually write the desired RDB item or you can drag and drop it onto the WHERE condition configuration area so that writing it is easier and less prone to syntax errors.
The "SQL-MANUAL" toggle at the bottom of the page allows you to manually edit your SQL statement: to do so, switch to the "MANUAL" setting. This option is particularly useful when more complex actions are required.
If the manual query syntax is not written correctly and this prevents the Drill Through from concatenating the necessary WHERE clause at the end of the SQL statement, then the Drill Through won't display any information. Errors in Drill Through executions are logged in the SQLError log that can be downloaded from the "SQL Error" folder under the "LOGS" section in the Cloud Administration Portal. The log file name includes the timestamp, for example, SQLError_202208.log.
Drill Through connection Options
Other options are available under the OPTIONS tab are the following:
Join syntax. The syntax, which is used for JOIN-condition (WHERE or INNER JOIN condition). The "Where" option defines the join conditions using the WHERE clause, while the "Join" option uses the INNER JOIN clause. The result of the query is the same, regardless of the syntax used, however if you need to define an OUTER JOIN (or other types of SQL JOINs) it is recommended to use the Join option and then manually edit the INNER JOIN clause instead of completely rewriting the statement generated by Board.
Data type. If this value is selected to "Convert", a transformation formula is automatically generated whenever the data type and format of the source fields differs from data type and format expected by Board. This option is applicable only if the "SQL dialect" field of the ODBC or OLE DB connection, which indicated which is the relational database you are connecting to, has been set to an option other than "General".
Date format. This option is valid only for certain RDBMS types and it is automatically set by Board. It is used to specify the physical format of the date field. Two options are available:
Number. This option should be used when date fields of the relational database are in the format of a serial number (dates are conventionally stored in numerical fields where the integer part represents the year, month and day and the fractional part the time).
Text. This option should be used when date fields of the relational database are in text format.
Click on the "BROWSE" button to see a preview of the query execution and its result on the first 500 rows of the source tables.
Drill Throughs from aggregate Entities
A Drill Through protocol only allows you to drill from an Entity that has been mapped into the protocol. In order to drill from a more aggregate Entity, you must manually define an Entity-Relationship (E/R) protocol that connects the parent Entity to the child Entity included in the Drill Through protocol. While this is not necessary for the Data Reader since it handles the aggregation thanks to the Relationship definition within Board, when you want to drill through to an external database, you need to manually map each Entity to the corresponding field, even if said Entities are part of the same Relationship tree in Board.
For example, if you need to Drill Through to the invoices table by City starting from an aggregate report (assuming that the invoices table contains a Customer field and doesn’t include the City field), you must define an Entity-Relationship protocol that connects the City Entity with the Customer Entity.
To configure the necessary E/R protocols, you must follow the same procedure described for generic Drill Through protocols.
A Drill Through executed from an aggregate Entity can return a very large number of records, so it is not advisable to configure this type of Drill Through.