This topic describes how to add a Smart Import Object to a Screen or a Container and its specific properties.
To create a Smart Import Object, navigate to the Screen editing page and locate the Smart Import Object from the Screen Objects list in the left panel. Drag and drop one fo them onto your Screen or Container.
Configure a Mapping
The next step is to set up the mapping configuration which will define how the external data should be imported into the Data Model and mapped to Entities and Cubes.
To configure a Smart Import mapping, proceed as follows:
On the table, click a column header and type the desired column name. Repeat the procedure for all the columns you want to make available to users in Play Mode. Column names are required for the mapping process.
When at least one column name has been defined, the "CONFIGURE MAPPING" button in the Object Properties panel becomes active. Click on it to open the mapping configuration popup window.
The mapping configuration popup window can also be opened by clicking on the Configure mapping icon
 from the Object toolbar.
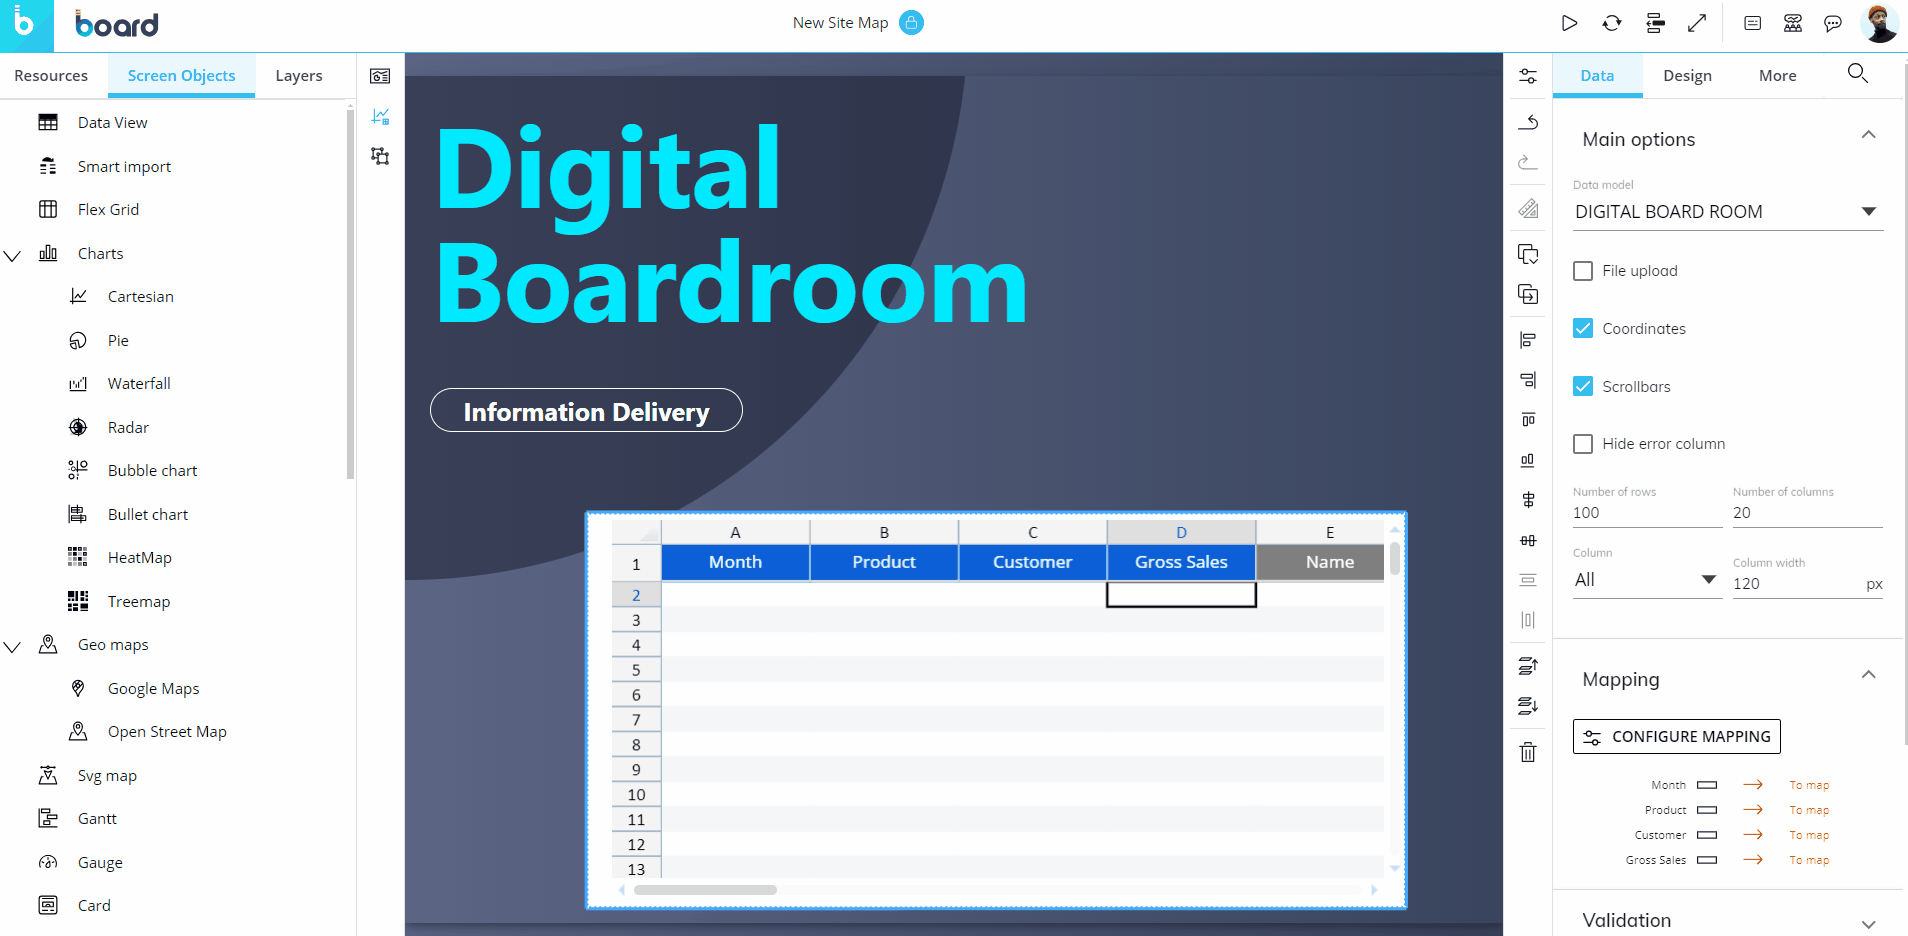
Configure all 3 steps to import your data:
Starting from the "Data model" section on the left, map Entities and Cubes to the previously configured columns by clicking on the "+" button and selecting the desired items from the sliding panel: when you add an Entity to the list, you can decide to map the member code (required) or description (optional) using the dropdown menu next to the Entity name.
Adding an Entity description field will automatically add the Entity code field as well.
When you add a Cube, you must add all its dimensions (Entities) as well.If needed, drag items (columns) in the "Source" section up and down so that they are next to the Entity or Cube they will feed. You can also click on the pencil icon that appears when hovering over each item to select the desired column and map it to the corresponding Entity or Cube on the left using the dropdown menu.
The "Client filters" option in the dropdown menu is only available for Entities: select it to dynamically apply the user's custom filters (active Selections and Pager synchronizations) to the corresponding Entities in Play Mode. When the option is enabled, no action can be selected in the "Rules" section.
To clear an item in the "Source" section, click on the trash icon that appears when you hover over the desired item.In addition to the source columns defined in step 1, from the dropdown menu, you also have the following options:
Client filters. This option is only available for Entities: select it to dynamically apply the user's custom filters (active Selections and Pager synchronizations) to the corresponding Entities in Play Mode. When the option is enabled, no action can be selected in the "Rules" section.
Fixed value. This option allows you to write a custom fixed value to a target Cube or Entity code/description for each row of data submitted. The "Fixed value" field supports numbers and text strings: for obvious reasons, the configured value should be entered in accordance with the mapped Cube/Entity type.
If the fixed value is a date or a number, it must be entered in invariant culture format (culture-insensitive): this culture is associated with the English language but not with any country/region. For example, the date format must be MM/dd/yyyy (American), while for numbers, a comma (,) must be used to separate groups of thousands and a period (.) must be used to indicate the decimal place (e.g 1,000,000.11 → one million with "11" as the two decimal digits).
If the fixed value is a text string, it must be enclosed in double quotes. For example, "budget".
As with the Client filters setting, this mapping configuration is used to automatically write values in the selected Data Model destination. For this reason, it is not displayed as a column in Play Mode and no validation rules can be set on this specific source.
Fixed values are logged in the Smart Import log right after those submitted by the user.Formula. This option allows you to map the result of a formula to a target Cube or Entity code/description for each row of data submitted. You can use logical expressions in the "Formula" field, using the same syntax as Algorithms. You can also use letters or the column name in square brackets preceded by the "at" sign (@) to refer to a specific mapped column. Example: [@Gross Sales]*2.
Numbers in formulas must be entered in invariant culture format (culture-insensitive).
The Formula field also supports Board's Substitution Formulas. If the selected Substitution Formula returns a text string or a date, it must be entered enclosed in double quotes. For example, the formula "@User abc" may return a result such as Paul abc.
As with the Client filters and Fixed value settings, this mapping configuration is used to automatically write values in the selected Data Model destination. For this reason, it is not displayed as a column in Play Mode and no validation rules can be set on this specific source.
Results of a formula are logged in the Smart Import log right after those submitted by the user.
In the "Rules" section, set the desired action for each row. This option controls whether external data will be loaded or discarded and how it will be managed by the system.
The available actions are described in the table below.Action Type
Description
Applicable to
Add new members
When the value from the data source is not the code of an existing member of the Entity, a new member is created. This option can be used to populate Entities while also feeding a Cube at the same time.
Entity code
Discard new members
The incoming record is only loaded if the value found in this field is the code of an existing member of the Entity, otherwise the record is discarded together with the data relating to it. This option is used to filter out unwanted members and values.
Entity code
Auto incremental
Automatically creates the code for new Entity members incrementally when an empty code is loaded.
Entity code
Replace description
This option always overwrites the description of Entity members with the incoming one, unless the new description is empty: in this case the existing one is retained.
Entity description
Add
If the target Cube is numeric, the incoming value from the data source is added to the Cube. If the Cube cell already contains a value, the new value is summed to the existing one. If target Cube is not a numeric Cube (i.e. a date Cube, a text Cube, etc.) the incoming value always overwrites the existing one.
Cube
Replace
This action clears the Cube cells considering the active selection and then loads incoming values into the Cube.
Cube
Merge
This action clears the target cell in the Cube and loads the incoming value. If the data source contains multiple values for the same combination, those values are added together, the target cell in the Cube is cleared, and the result is loaded.
Cube
The Discard outside selection checkbox is only available for Entity code fields. Select it to discard incoming members that are not in the active selection during the data entry process in Play Mode.
Global security settings and Cube visibility rules are automatically applied during the data entry process in Play Mode.
Example
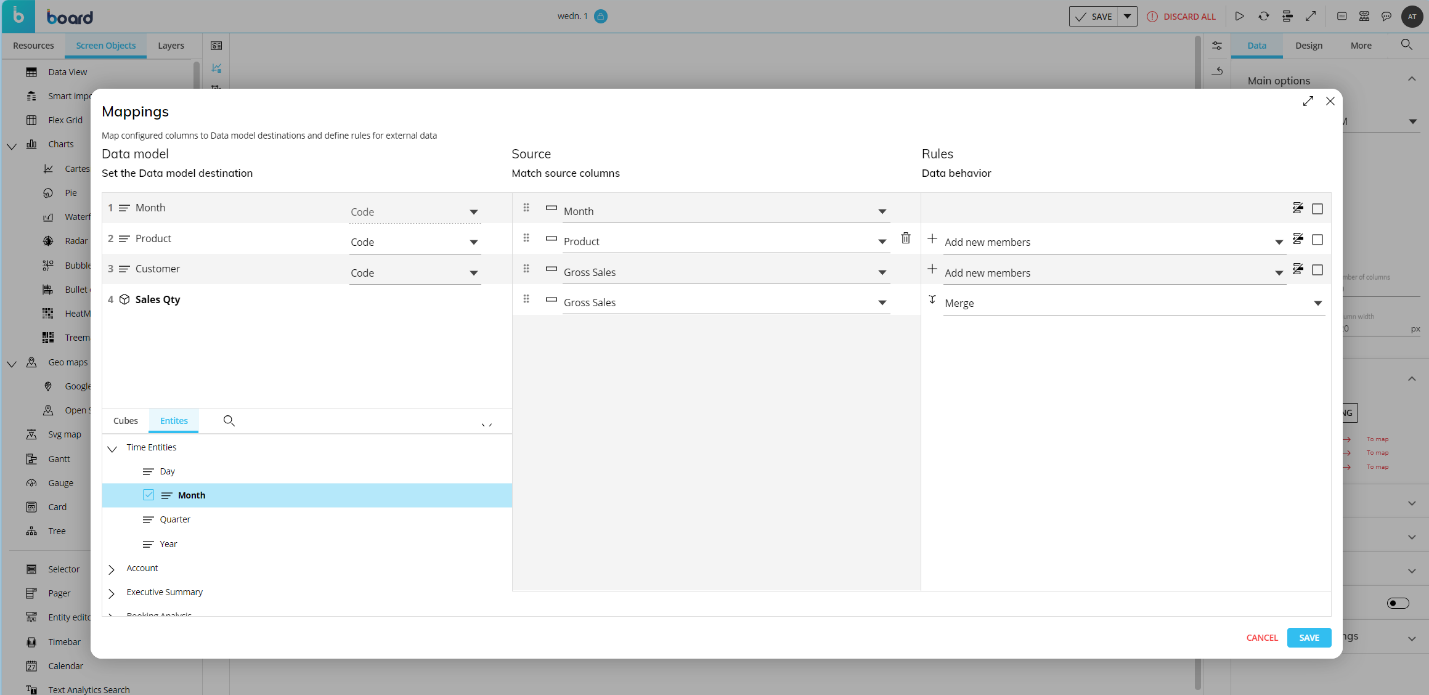
Click on "SAVE" to save and close the mapping configuration.
The Smart Import Object includes additional properties and settings that can be applied to incoming data. See below for further details.
Smart Import properties and settings
The Object has its own specific settings and additional properties. It also supports the Object toolbar and all options common to all Screen Objects, except for the "Master Object" option and the Disable Drill down option.
Properties specific to the Smart Import Object are highlighted below:
Validation rules
Under the Validation rules menu in the Object Properties panel on the right of the Screen editing page, you can set up global validation rules in order to automatically accept or reject entered values. This allows, for example, to accept the input value only if it is positive (in case of a budget price), or only if it is lesser or greater than a given value or a value from another cell of the same row.
A validation rule is a logical expression, which checks whether the condition for the entered value is TRUE or FALSE: if the expression returns TRUE, then the rule is met and the entered value is accepted; if the expression returns FALSE, the entered value is not accepted, the row or cell is highlighted, and a a custom error message is displayed in a dedicated column that appears in the rightmost position in the table. In case the data loading process is done via an .xlsx file, errors will be displayed in a dialog.
Click on the "ADD VALIDATION" button to bring up the configuration window where you can configure multiple validation rules that refer to mapped columns of the Object, just like when configuring validation rules for a Block in a Layout.
Each validation rule is configured by filling out the following two fields:
Valid when: the condition (formula) whose result can be TRUE or FALSE.
Else show: the error message.
Validation rules can only be set when the mapping is complete. Logical expressions in the "Valid when" field use the same syntax as algorithms. You can use letters or the column name in square brackets preceded by an at sign (@) to refer to a specific mapped column. Examples: B<0 LEFT(A,1)="3" LEFT([@Product],1)="6"
Suggested values
Under the Suggested values menu in the Object Properties panel to the right of the Screen editing page, you can configure suggested values that will be shown to the user during data entry actions. These values are taken from an Entity or a Cube in the Data Model, or from a manually configured Custom List.
Click on the "Suggested values" menu to open the configuration interface where you can configure a suggested value source for each mapped column of the Object, just like when configuring suggested values for a block in a Layout. Once you have completed the configuration for each column, click on the "ADD SUGGESTED VALUE" button to save it.
Suggested values can only be set when the mapping is complete. In case of suggested values taken from an Entity or a Custom list, the user will be presented with multiple suggested values for a single data entry action. The list supports vertical scrolling, and its elements are filtered as the user writes in the cell.
Column type
Under the Column type menu in the Object Properties panel to the right of the Screen in Design mode, you can identify the data type for unmapped columns.
Click on the "Column type" menu. Once opened, select the column name from the "Column" dropdown menu, and from the "Data type" dropdown menu below, select the preferential data type: numeric, text, or date.
The default option is "not set", and in that case, Board will automatically interpret the data type based on the values entered in the unmapped columns
Other properties
In the Object Properties panel to the right of the Screen editing page, the following additional properties are available:
Data submenu
Data model. This option is available only if the "Multiple Data Models" mode is enabled on the Screen. Click on the dropdown menu to choose the Data Model you want to associate with the Smart Import Object. Selecting a new Data Model will clear the existing mapping configuration.
File upload. If enabled, allows the user to upload a .xlsx data file. The option also allows the user to download and empty Excel template from the Object toolbar.
Coordinates. If enabled, column letters and row numbers are displayed.
Scrollbars. If enabled, vertical and horizontal scrollbars are displayed.
Hide error column. If enabled, the error column in the table is hidden.
Number of rows. You can manually define how many rows should be available in the table (maximum value: 10,000).
Number of columns. You can manually define how many columns should be available in the table (maximum value: 200).
Column. This option allows you to choose which columns are affected by the Column width setting.
Column width. You can manually define the width of the columns selected in the Column dropdown menu.
You can also resize columns by placing the mouse pointer on the boundary line between column headers and dragging the double-headed arrow to widen or to make the column narrower.
Under the Set trigger menu, you can select a Procedure which will be automatically triggered immediately after the Data Entry action is performed.
Design submenu
Under the Header colors, menu you can define a custom background color and custom text color for each or all column headers.
The Object toolbar
When you hover over the Object, the Object toolbar icon appears in the top left corner. Click on it to reveal the Object toolbar. You can fully expand it by clicking on the downward facing 3 vertical dots on the right
  .
.
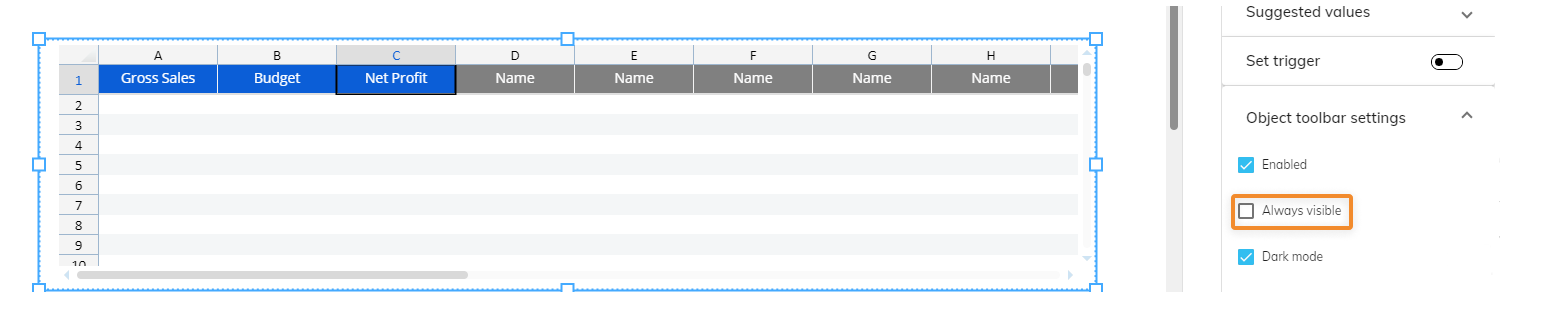
If the "Always visible" setting is enabled from the Object toolbar settings in Design Mode, all icons described below will be displayed above the Object in the Object toolbar.
The Object toolbar includes the following icons by default (unless otherwise configured):
Save Data entry
 . Saves manually entered values.
Clear content
 . Clears manually entered values in the table.
Configure mapping
 . Opens the mapping configuration pop-up window (available only in Design Mode).
Download template file
 . Downloads an empty Excel template file based on the Object table.
Upload file
 . Opens the file upload dialog.
Annotation
 . Displays any comment attached to the Object (if any). Depending on the comment configuration, the icon displayed can be a balloon icon, a question mark icon or an alert icon.