This topic describes the administrative screen for managing Data Sources, the information provided and features configured.
Data Source connections allow you to retrieve data from various Data Sources through Data Reader protocols in order to populate the desired Cubes of a Data Model.
In the Data Source section, you can create new Data Source connections or edit already existing ones.
All Data Source connections created within a Platform are stored here.
To access the Data Sources section, open the System Administration space of the desired Platform and click on the Data Sources tile.
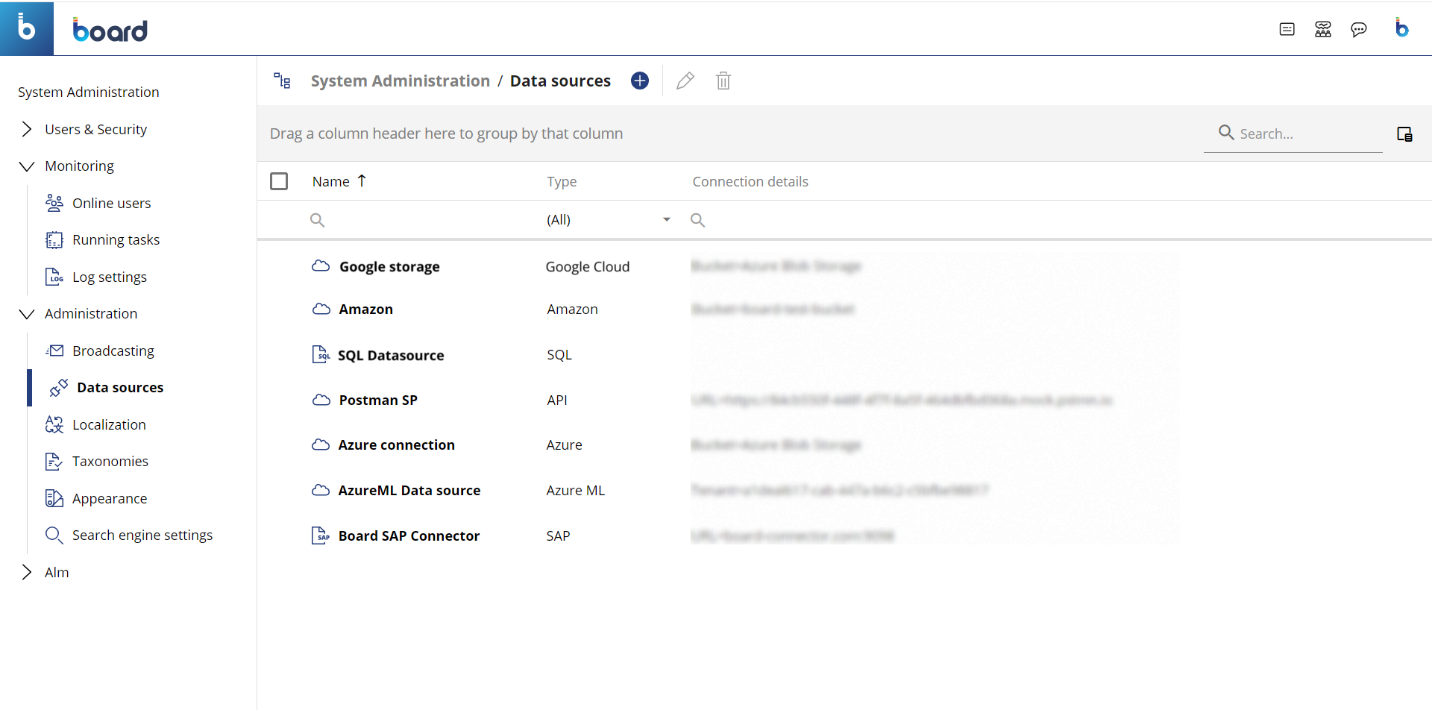
In the Data Sources page, you can see all existing Data Sources and their key details: the table is sortable and searchable using the interactive header fields. You can also show or hide columns to your liking, by clicking the Column chooser button in the upper right corner of the table.
The table contains the following information:
Name. This column displays the name of each Data Source connection.
Type. This column displays the type of each Data Source connection.
Connection details. This column displays specific details about the connection of each Data Source.
Creating a Data Source connection
Several different types of Data Source connections are available:
SQL (which can be OLE-DB or ODBC)
Creating an SQL connection
Two types of SQL connections are possible:
The configuration options vary depending on the type of connection.
SQL Data Source with an OLE-DB connection
To configure an OLE-DB connection to an SAP server:
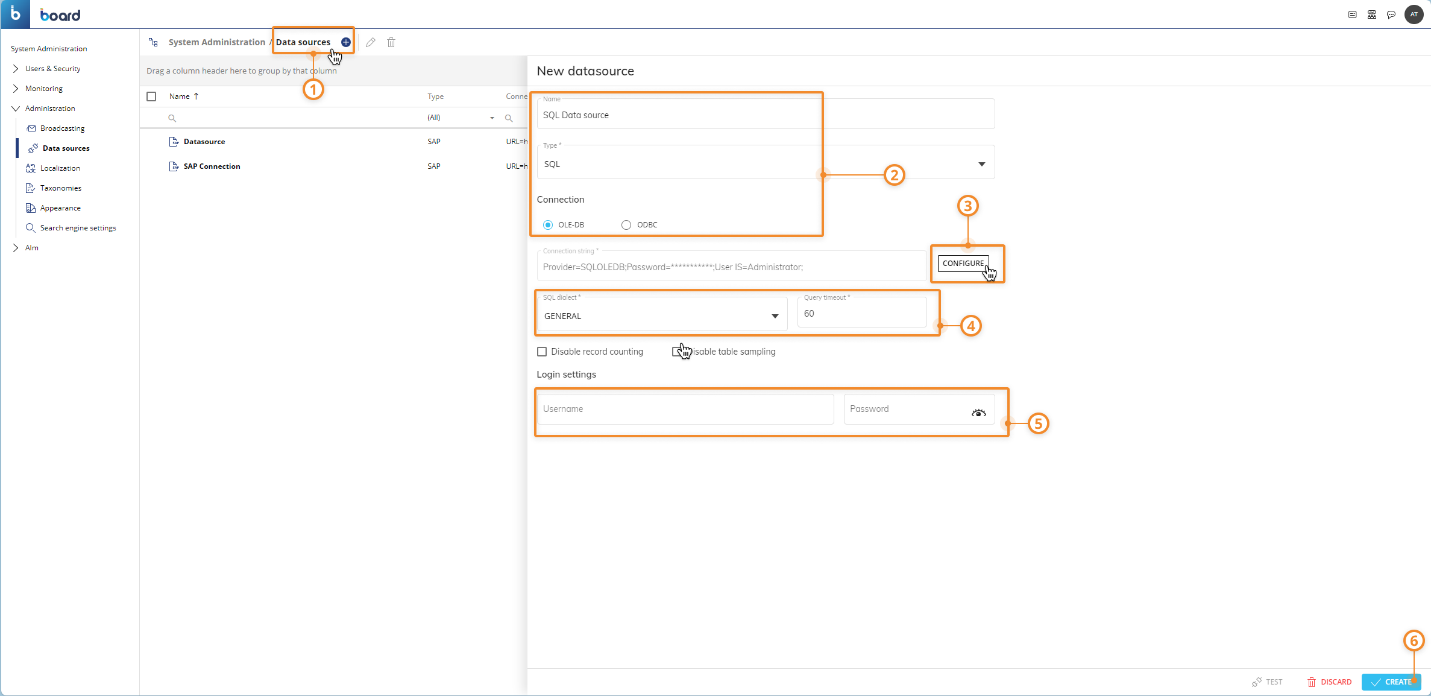
From the Data Sources section of the desired Platform, click on the blue plus button
 next to "Data source" to open the configuration panel.
Enter a name for the new connection in the "Name" field and choose "SQL" from the "Type" dropdown list. The "OLE-DB" option below should be enabled by default, if not, click on the toggle switch to enable it.
Configure the connection string by clicking on the "Connection string" field or on the "CONFIGURE" button at the end of the row. A popup window for configuring the connection string will then appear. The connection parameters depend on the provider you want to connect to. Click the "SAVE" button when you're done.
Once you have finished to configure the connection string, you can click on the "TEST" button at the bottom to test the configured connection.
Configure the SQL dialect for queries. This can be changed to match whichever database type is in use: if the database you are connecting to is not listed, set the type to "General".
The following properties are available:Query timeout: Set a wait time in seconds. When you're using an ODBC database, such as Microsoft SQL Server, there may be delays because of network traffic or heavy use of the ODBC server. Rather than waiting indefinitely, you can specify how long to wait before the database engine produces an error.
If you set a low query timeout value, some queries on the ODBC data sources may always time out: be sure to check the queries you need and set the query timeout value accordingly.
Disable record counting: Enable/disable counting of affected rows in a query. If disabled, the data reading process completion percentage is not available during the protocol execution
Disable table sampling: Enable/disable sampling on the database.
Enter the credentials in the respective "Username" and "Password" fields. These are the same credentials used to access the Data Pipeline portal. For Board on-premise instances, these are the credentials of the account used to access the SQL data source you want to connect to.
Click on "CREATE" to save the Data source configuration.
SQL Data Source with an ODBC connection
To configure an ODBC connection to an SAP server:
From the Data Sources section of the desired Platform, click on the blue plus button
 next to "Data source" to open the configuration panel.
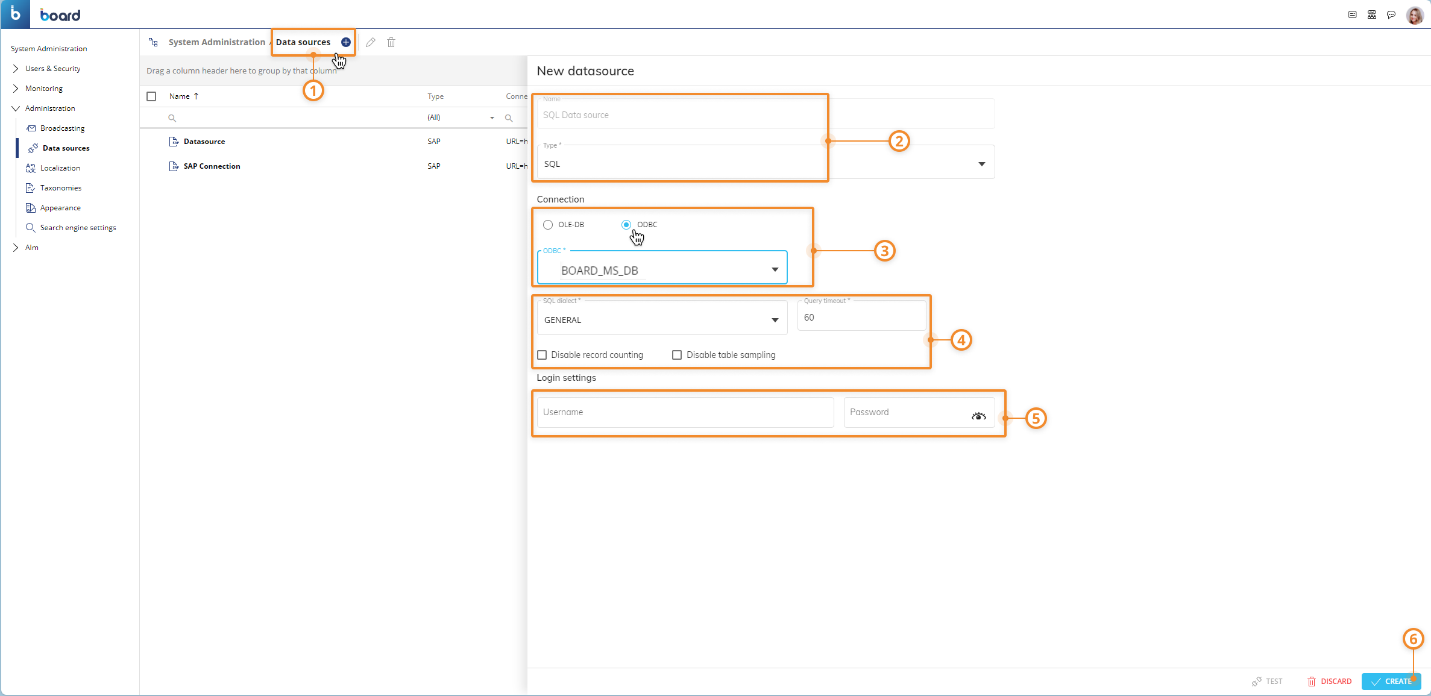
Choose "SQL" from the "Type" dropdown list and enable the "ODBC" option by clicking on the toggle switch below.
Choose the preferred ODBC SQL server from the "ODBC" dropdown list. The name of the Data Source connection will be the same as the chosen ODBC SQL server name.
The ODBC Data Sources that are displayed in the dropdown list are those configured in the environment where Board is installed.
To add a new ODBC Data Source:For Board Cloud installations:
Open the Admin Tool (also known as Administration portal) of the desired Platform.
Click on the "DATA PIPELINE" button in the menu on the left to access the Data Pipeline section.
Click on the "CLOUD DATA PIPELINE PORTAL" button to access the Data Pipeline portal and then log in. You can use the credentials displayed in the Data Pipeline section of the Admin Tool if you are logging in for the first time.
.png)
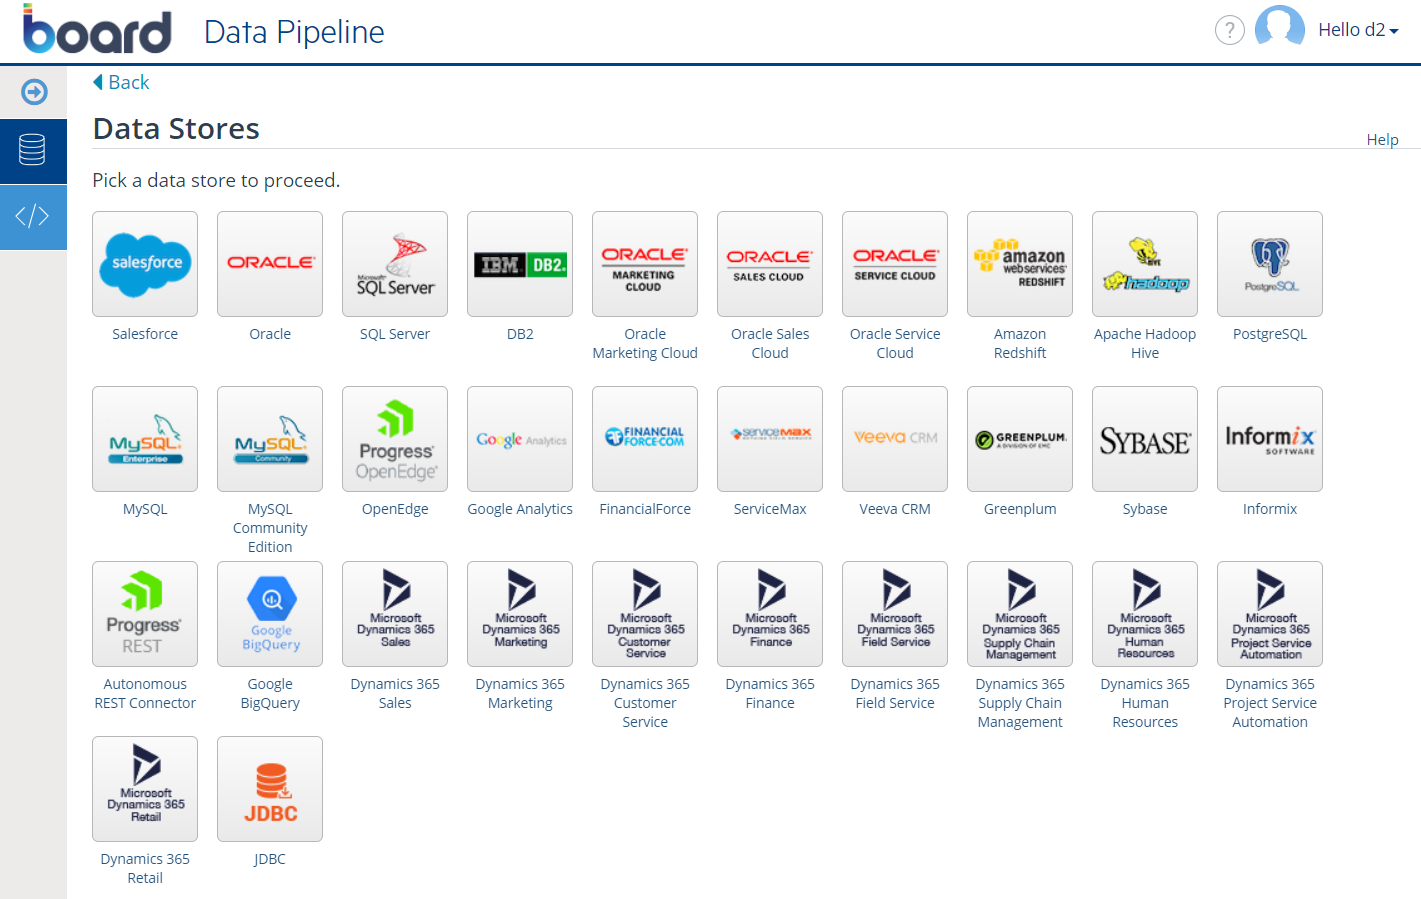
Click on the "+New Data Source" button in the upper right corner of the Data Pipeline portal page to add a new Data Source.

Click on the desired Data Source and configure its options. If your Data Source is located on a local machine (on-premises), for example a MySQL database, then you will need to install the On-Premise Connector (OPC) on that machine or another one in the same network and connect it with the Cloud Data Pipeline Portal of your Platform. See this Board Community page for more information.
After configuring the Data Source connection, return to the Data Pipeline section of the Admin Tool and click on the "ADD NEW" button at the bottom of the page. A pop-up window will appear.
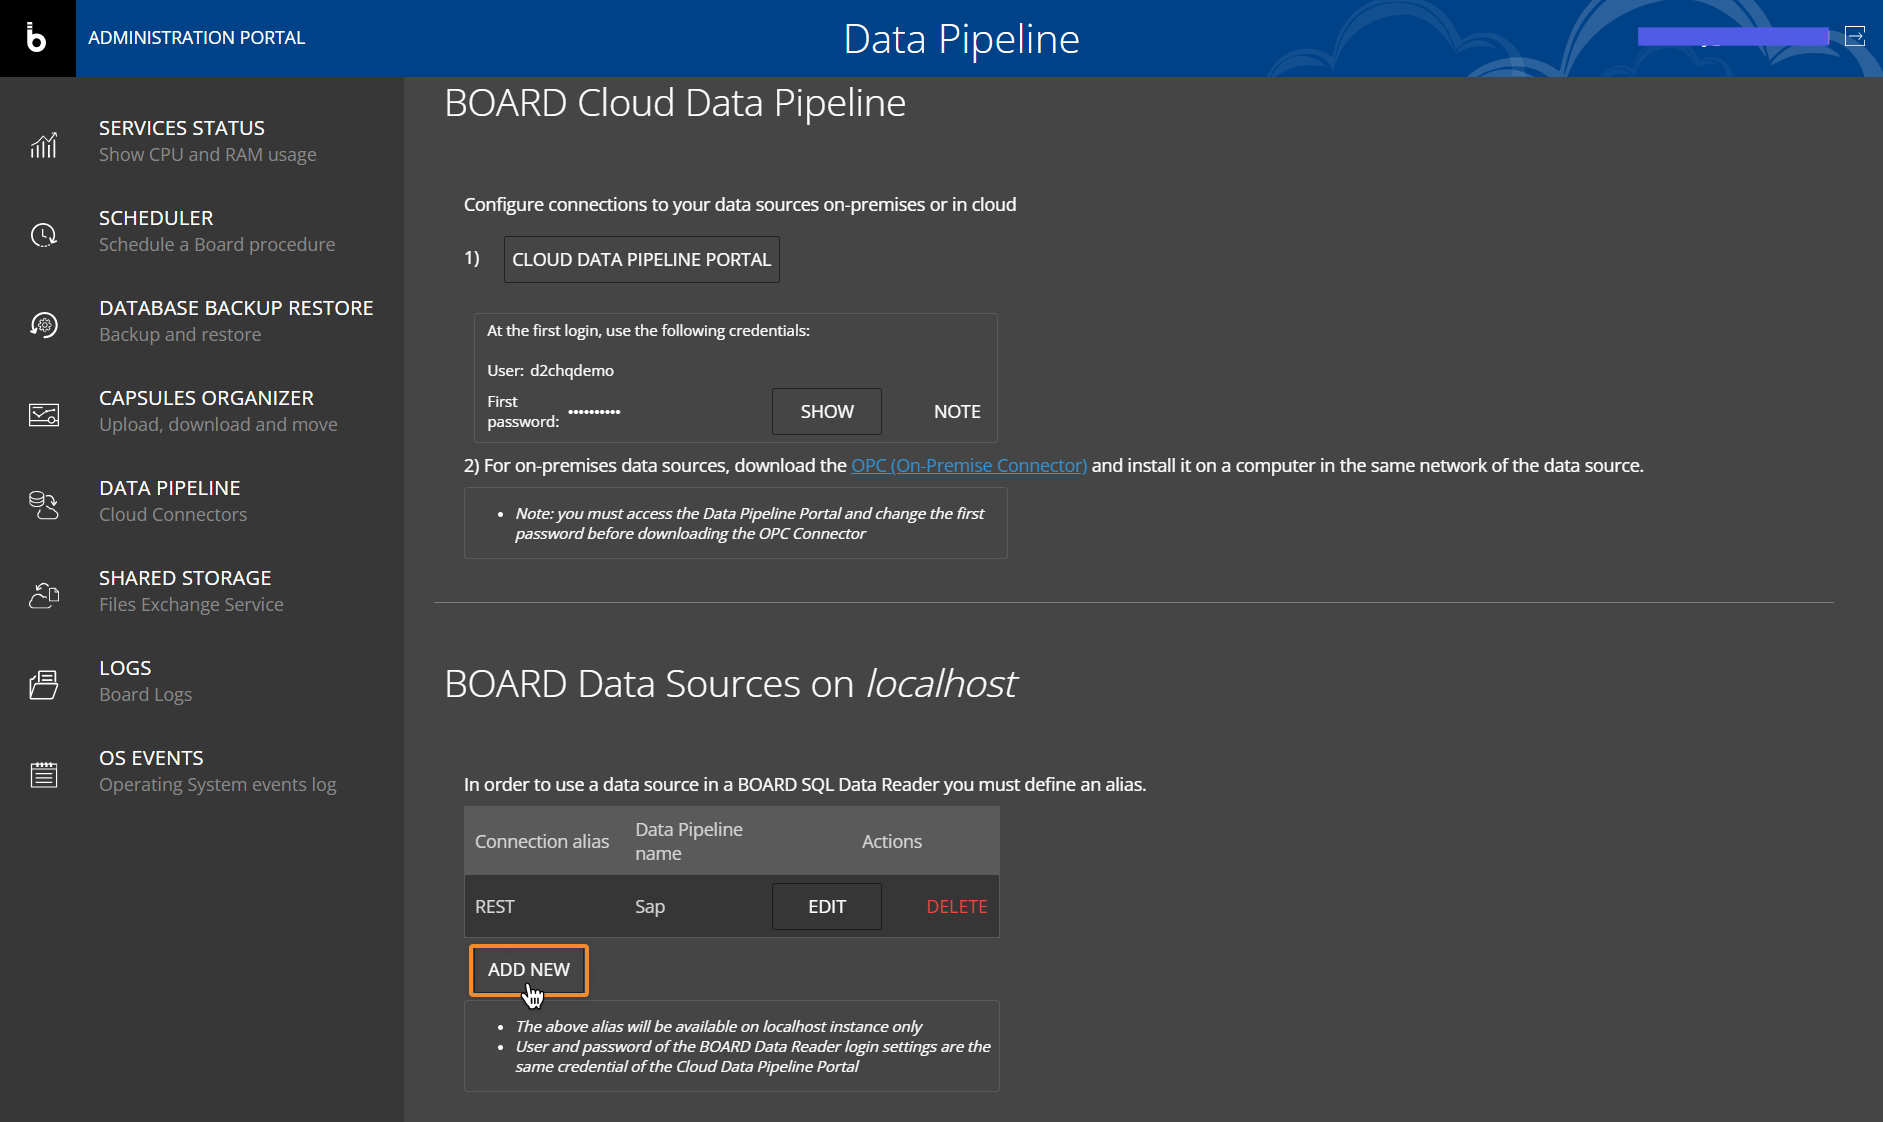
Enter an alias in the "Connection name" field. This is the name that will appear in the "ODBC" drop-down list in the Data Sources section of Board.
Enter the name of the Data Source in the "Data Source name" field. The Data Source is the one you configured in the Cloud Data Pipeline Portal.
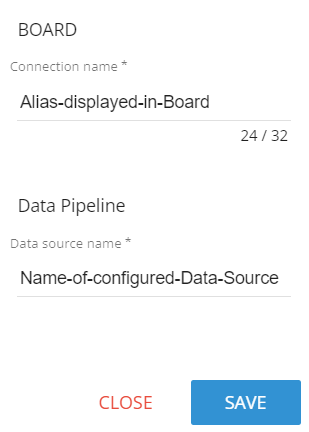
Click on "SAVE".
For on-premises Board installations:
Open the ODBC Data Source Administrator (64-bit version) in the machine where Board is installed by opening the Control Panel, clicking on Administrative Tools (inside the "System and Security" category), and finally clicking on "ODBC Data Sources". See this Microsoft page for more information.
Go to the "System DNS" tab.
Click on "Add" to add and configure your desired ODBC Data Source.
When done, click "OK".
Configure the SQL dialect for queries. This can be changed to match whichever database type is in use: if the database you are connecting to is not listed, set the type to "General". The following properties are available:
Query timeout. Set a wait time in seconds. When you're using an ODBC database, such as Microsoft SQL Server, there may be delays because of network traffic or heavy use of the ODBC server. Rather than waiting indefinitely, you can specify how long to wait before the database engine produces an error.
If you set a low query timeout value, some queries on the ODBC Data Sources may always time out: be sure to check the queries you need and set the query timeout value accordingly.
Disable record counting. Enable/disable counting of affected rows in a query. If disabled, the data reading process completion percentage is not available during the protocol execution.
Disable table sampling. Enable/disable sampling on the Database.
Enter the credentials in the respective "Username" and "Password" fields. These are the same credentials used to access the Data Pipeline portal. For Board On-premises instances, these are the credentials of the account used to access the SQL data source you want to connect to.
Click on "CREATE" to save the Data Source configuration.
Creating an SAP connection
To configure a Data Source connection to an SAP server:
From the Data Sources section of the desired Platform, click on the blue plus button
 next to "Data Source" to open the configuration panel.
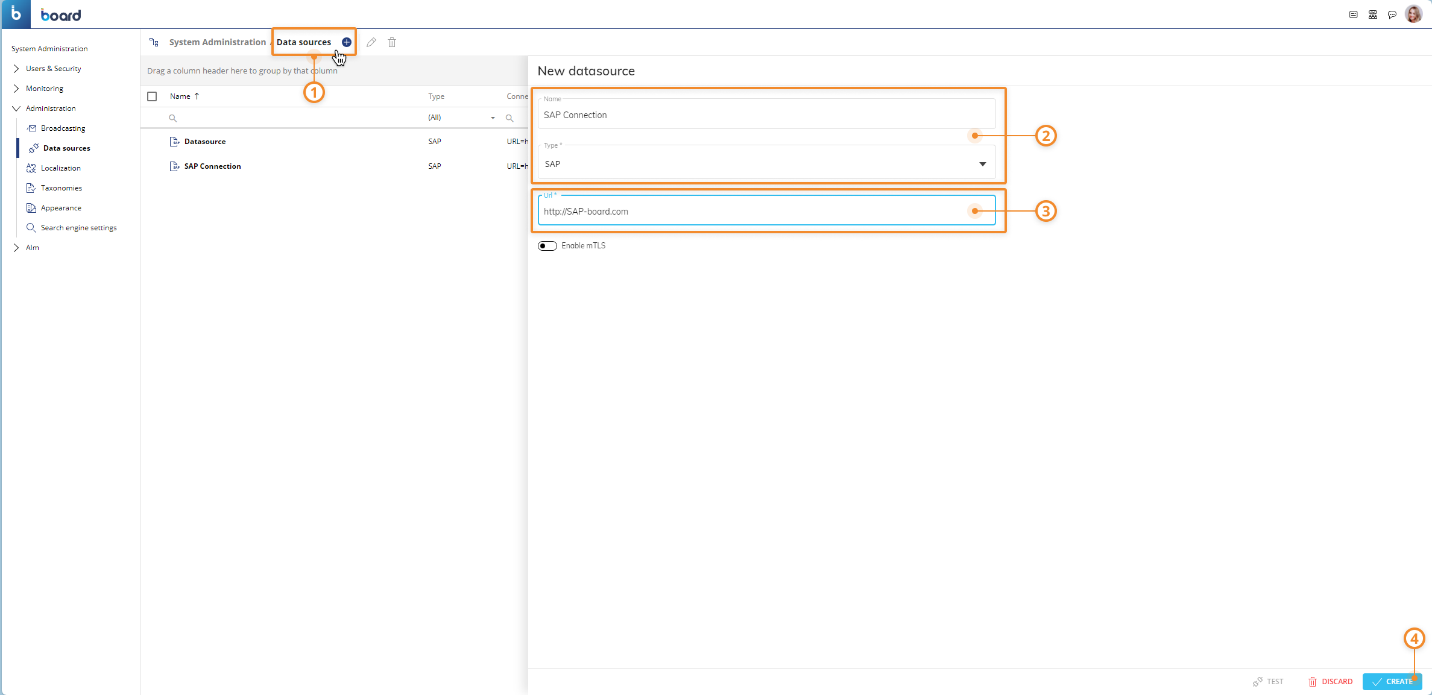
Enter a name for the new connection in the "Name" field and choose "SAP" from the "Type" dropdown list.
Enter the address of the SAP connector Server in the "URL" field.
Click on "CREATE" to save the Data Source configuration.
Mutual TLS (mTLS) authentication method for SAP Data Sources
The configuration of SAP Data Sources supports the mutual TLS (mTLS) authentication method. This method verifies the identity of both Board and SAP in a connection between those two environments using the dedicated Board Connector for SAP.
The adoption of the mTLS authentication ensures that traffic is secure and trusted in both directions between Board and SAP: it prevents various kinds of cyberthreats, such as Brute force attacks, Spoofing attacks, Phishing attacks, and many more.
The mutual TLS authentication method relies on 3 aspects:
Public key and private key. Those keys are used from both parties to encrypt and decrypt messages: anything encrypted with the public key can be decrypted only with the private key and vice versa.
TLS certificate. The TLS certificate is a file that holds important information required for verifying the identity of both parties, information on who issued the certificate, and the certificate’s expiration date.
TLS handshake. The TLS handshake process verifies the TLS certificate and both communicating parties exchange messages to acknowledge each other, verify each other, establish the encryption algorithms they will use, and agree on session keys.
How to enable the mutual TLS (mTLS) authentication method for SAP Data Sources in Board
To use mTLS for connecting Board to SAP Data Sources:
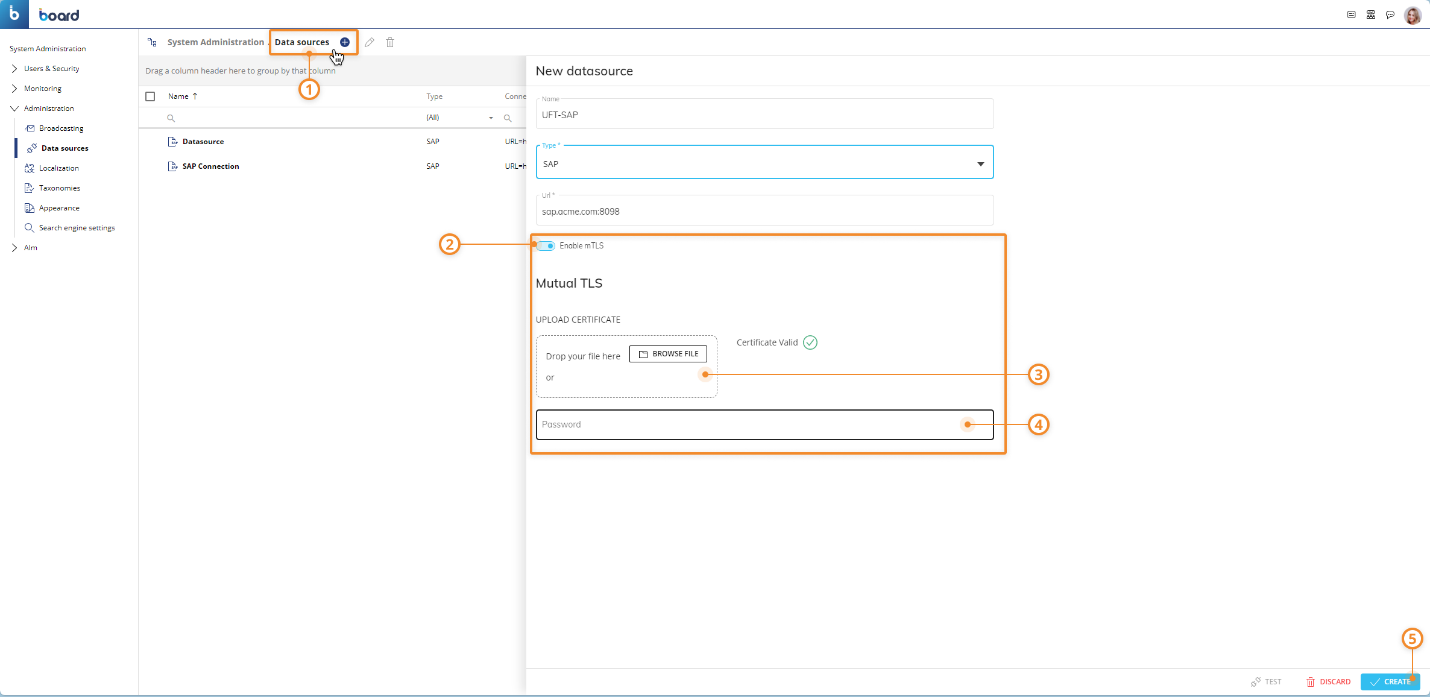
From the "Data Sources" section under System Administration, click on the desired SAP connection.
Click on the "Enable mTLS" toggle switch.
Upload the required TLS Certificate (required). The Certificate must have .p12 or .pfx file extension.
Enter the Certificate password that Board will use to read the certificate during the TLS handshake process.
Click on "CREATE".
Please note that the mutual TLS (mTLS) authentication method is available only for Cloud Platforms and it’s supported by the Board Connector for SAP version 5.6 and newer.
Connection to cloud storage services
If you want to set up a Text file Data Reader and the file you wish to read is stored on a cloud storage service, you need to configure a connection to it in the Data Sources section of Board.
Board supports the following cloud storage services:
Creating an Amazon S3 connection
To configure a Data Source connection to an Amazon S3 cloud storage:
From the Data Sources section of the desired Platform, click on the blue plus button
 next to "Data Source" to open the configuration panel.
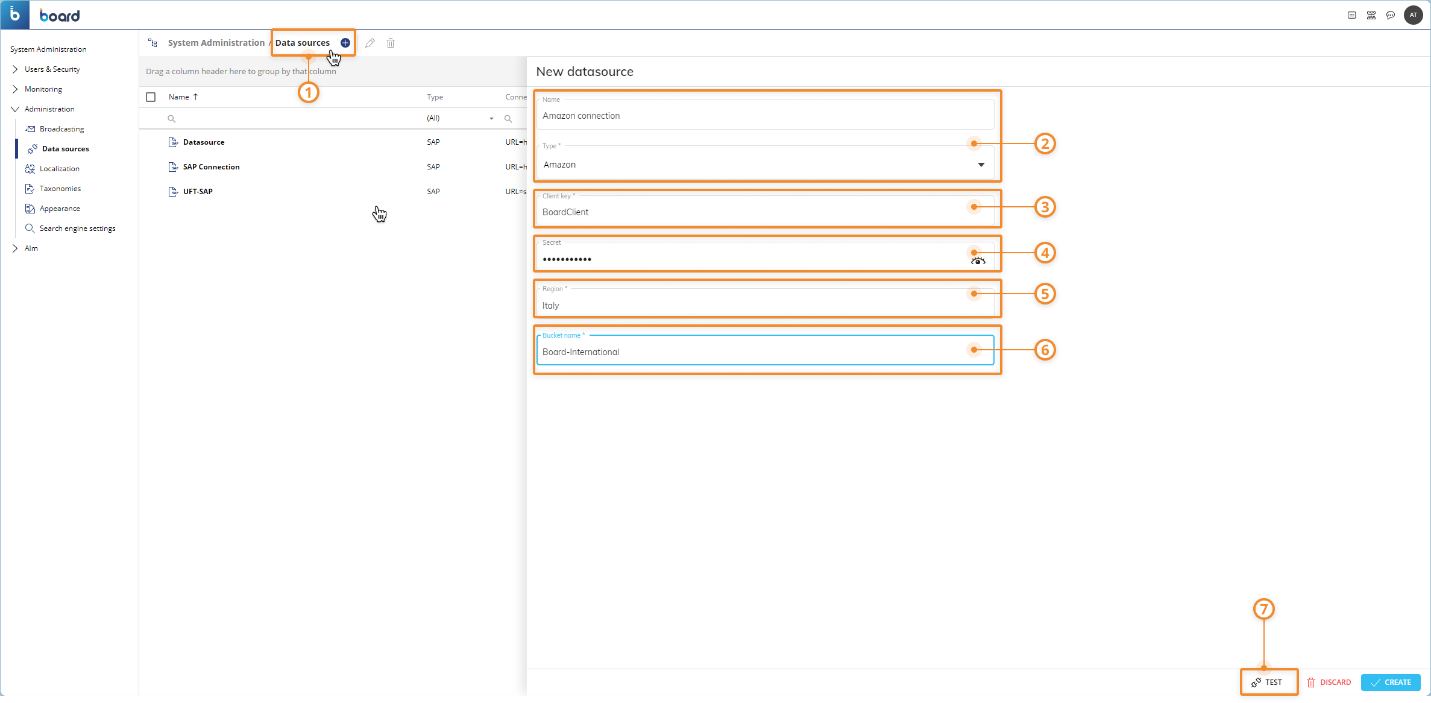
Enter a name for the new connection in the "Name" field and choose "Amazon" from the "Type" dropdown list.
Enter the Client Key in the "Client Key" field.
Enter the Client Secret in the "Secret" field.
Enter the AWS Region in the "Region" field.
Enter the name of the desired S3 bucket container in the "Bucket name" field.
Click on "TEST CONNECTION" to perform a connection test and then click on "CREATE" to save the new Data Source connection.
Fields marked with an asterisk (*) are required.
Please refer to Amazon S3 documentation for more details.
Creating an Azure Blob Storage connection
To configure a Data Source connection to an Azure Blob storage:
From the Data Sources section of the desired Platform, click on the blue plus button
 next to "Data Source" to open the configuration panel.
Enter a name for the new connection in the "Name" field and choose "Azure" from the "Type" dropdown list.
Enter the connection string of the desired Azure Storage Account in the "Connection string" field.
Enter the name of the desired Azure Blob container in the "Container name" field.
Click on "TEST CONNECTION" to perform a connection test and then click on "CREATE" to save the new Data Source connection.

Fields marked with an asterisk (*) are required.
See Azure Blob Storage documentation for further details.
Creating a Google Cloud Storage connection
To configure a Data Source connection to a Google Cloud storage:
From the Data Sources section of the desired Platform, click on the blue plus button
 next to "Data Source" to open the configuration panel.
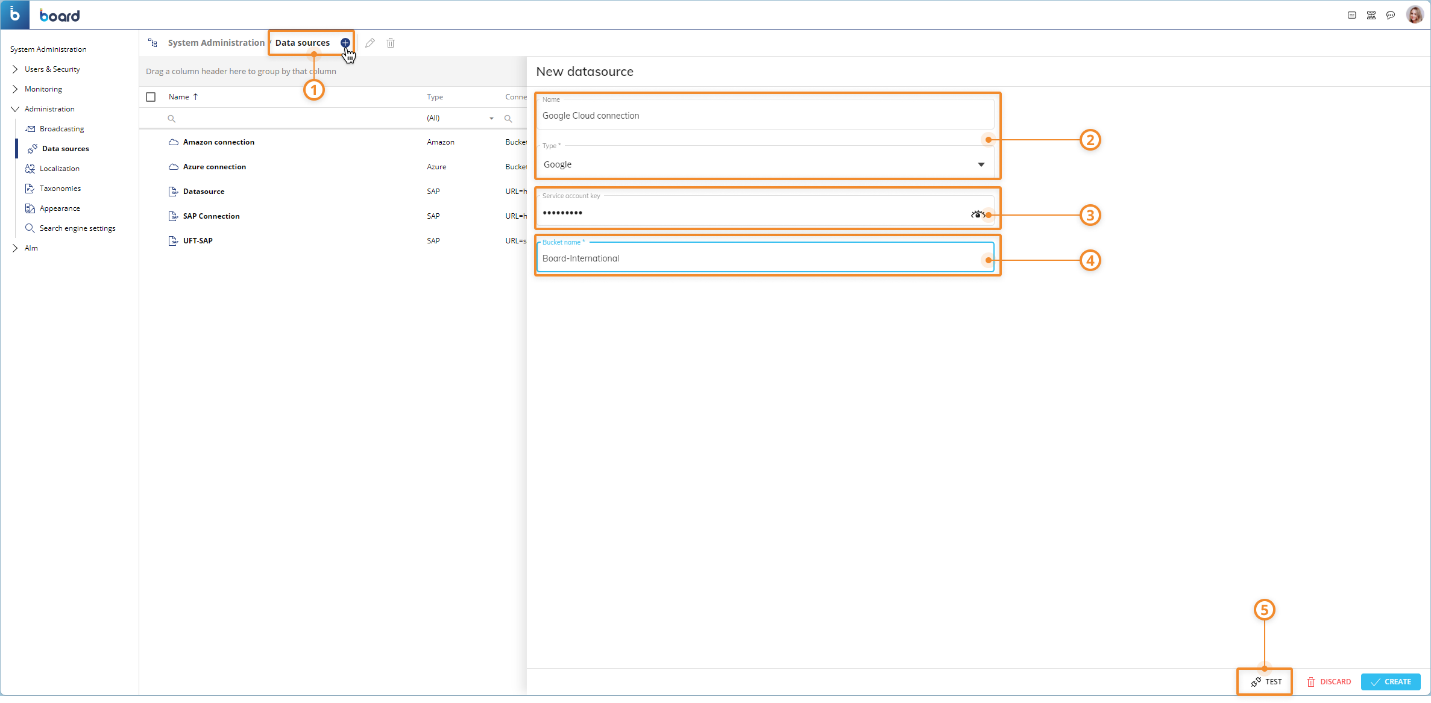
Enter a name for the new connection in the "Name" field and choose "Google" from the "Type" dropdown list.
Enter the key of the desired Google service account in the "Service account key" field.
Enter the name of the desired Google Cloud bucket container in the "Bucket name" field.
Click on "TEST CONNECTION" to perform a connection test and then click on "CREATE" to save the new Data Source connection.
Fields marked with an asterisk (*) are required.
See Google Cloud storage documentation for further details.
Creating an API connection
To configure a Data Source connection using an API:
From the Data Sources section of the desired Platform, click on the blue plus button
 next to "Data Source" to open the configuration panel.
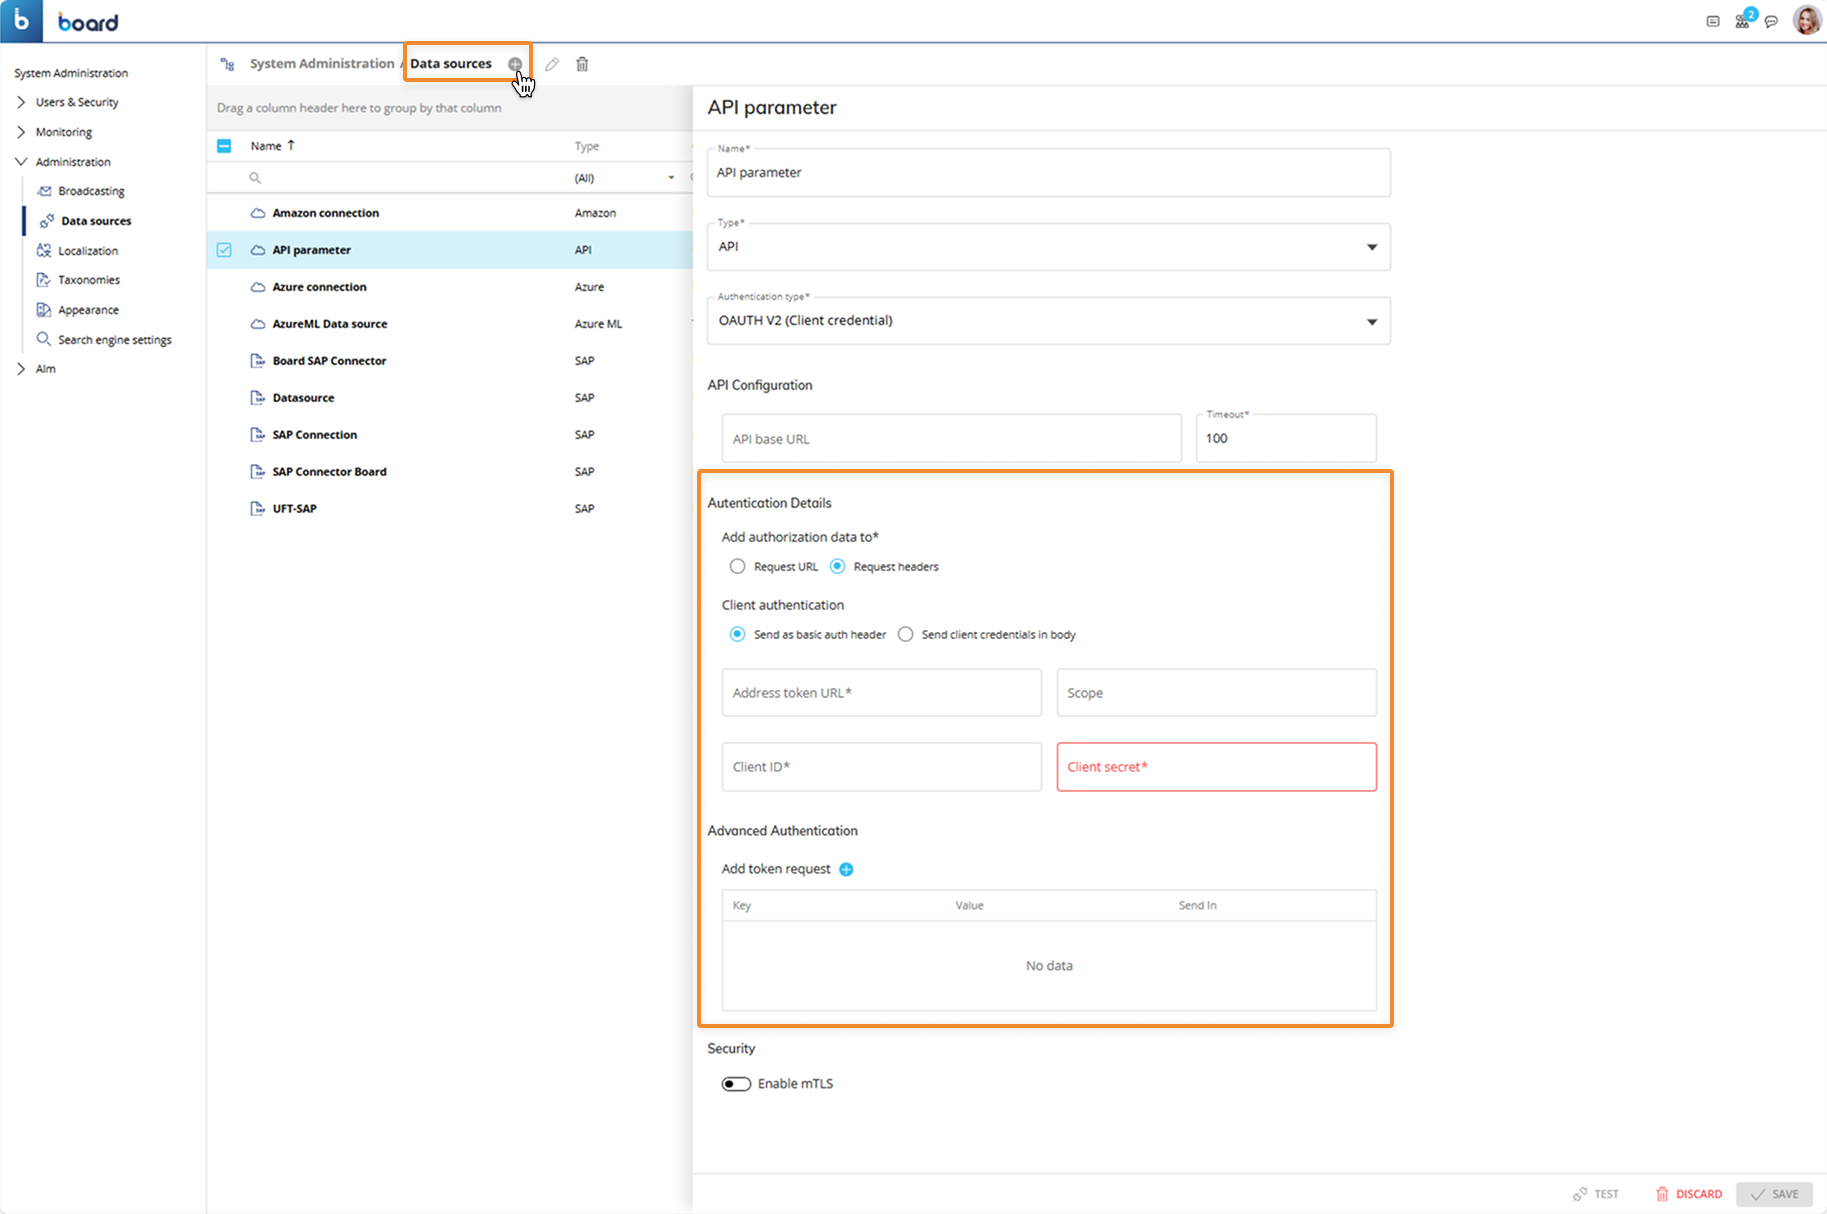
Enter a name and choose the "API" option in the "Type" dropdown menu.
Choose one of the supported authentication methods. When you choose an authentication method, the necessary authentication configuration fields automatically appear below (for example "Client ID", "Client Secret" etc.).
None.
API Key. Credentials are transferred as key/value pairs. The key is an encrypted string where the value is used by the other system to uniquely identify the key, e.g. AIzaSZasfDRa4JsXZ-HjGw7ISLn_3namBGewQe.
Basic Authentication. Credentials are transferred as user ID/password pairs.
OAUTH V2 (Client credentials). Credentials are transferred as a Client ID/Client Secret pair to authenticate with Board and request an access token to allow the Procedure step to call the external API. See Client Credentials flow specifications.
 The OAUTH V2 authentication type also offers a "TEST" button in the lower right corner of the configuration panel. If the connection is not successful, a notification message is displayed.
Enter the "API Base URL" field when the external API to be called by Board using the configured Data Source connection has a consistent prefix in its URL. If the "API Base URL" field is provided, then that URL will be automatically imported in the step configurations.
Enter the "Timeout" field when you anticipate that a Data Source connection might take longer than 100 seconds, which is the default timeout parameter. You can customize the timeout time of the REST API call by editing the default.
Provide the security details for the authentication method depending on your installation requirements.
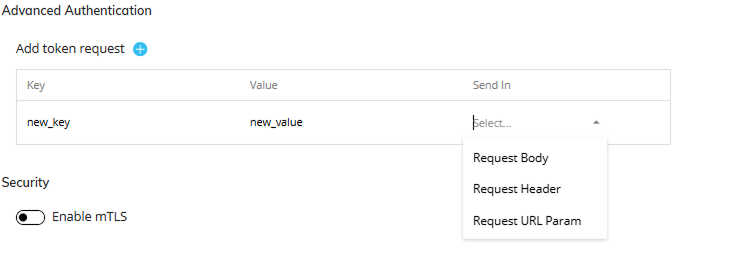
Advanced Authentication - token request parameter grid: additional arbitrary parameters as key/value pairs can be added here to any OAuth2.0 token request, so that the default OAuth2.0 fields are over-written to meet any special third‑party requirements. Any of these tokens can be sent in either the "Request Body", the "Request Header", or the "Request URL parameters". If one of these extra tokens contains either the "client_id" OR "client_secret", then the expected behavior for the "client_id" is disregarded and the intended location of the new extra token is used for both of them. For example, if you overload only the "client_secret" and put it in the header, then both the "client_ID" and "client_secret" will be in the header, even if the "Send In" drop-down value indicates that they must be in the body.
(Optional) Enable the mTLS authentication.
Click "CREATE" to save the new Data Source connection.
Mutual TLS (mTLS) authentication method for API Data Sources
The configuration of API Data Sources supports the mutual TLS (mTLS) authentication method. This method verifies the identity of both Board and the APIs. When activated, the Admin user uploads a certificate into the Data Source configuration and uses the uploaded certificate for REST API calls on the specific Data Source so that the source system validates the requests before returning the information.
The adoption of mTLS authentication ensures that traffic is secure and trusted in both directions between Board and the API: it prevents various kinds of cyberthreats, such as brute force, spoofing, and phishing attacks.
This feature is supported by API key, Basic authentication, and OAuth2.
This feature is the same offered for the SAP connection type.
This enhancement is only available for Cloud customers.
The mutual TLS authentication method relies on 3 components:
Public key and private key. Those keys are used by both parties to encrypt and decrypt messages: anything encrypted with the public key can be decrypted only with the private key and vice versa.
TLS certificate. The TLS certificate is a file that holds required important information for verifying the identity of both parties, information on who issued the certificate and the certificate’s expiration date.
TLS handshake. The TLS handshake process verifies the TLS certificate and both communicating parties exchange messages to acknowledge each other, verify each other, establish the encryption algorithms they will use, and agree on session keys.
How to enable the mutual TLS (mTLS) authentication method for API Data sources in Board
To connect Board to an API Data Source:
In the "Data Sources" section under System Administration, click on the desired API connection or create a new one by clicking the blue plus icon
next to Data Sources and following the instructions above.When all other required fields are entered, click on the "Enable mTLS" radio button.
Upload the required TLS Certificate (required). The Certificate file extension must have a .p12 or .pfx file extension.
Enter the Certificate password that Board will use to read the certificate during the TLS handshake process.
Click on "SAVE" to save your changes or "CREATE" if creating a new Data source.

Creating an Azure ML Connection
Once the Azure ML feature requirements are satisfied, you can create a Data Source connection to the Azure ML cloud:
Use the Data Sources tile in the System Administration area and click on the blue plus button
 next to "Data Source" to open the configuration panel.
Enter a name for the new connection in the "Name" field and choose "Azure AutoML" from the "Type" dropdown list.
Enter the following Azure AutoML cloud information:
Tenant ID. Enter the Tenant ID, which is a unique identifier assigned to your Azure Active Directory (AAD) tenant.
Client ID. Enter the Client ID of your ADD service.
Client Secret. Enter the Client secret for the authorization of the entered Client ID.
Subscription ID (Optional). Enter the Subscription ID, which is a unique identifier associated with your Azure subscription. This is the workspace where all the necessary Azure AutoML resources are located. If not specified, the default subscription will be chosen.
Resource group (Optional) . Enter the name of the Resource group, which is a sub-section of the Subscription. If not specified, the first available Resource group will be chosen.
Workspace name (Optional). Enter the name of the Azure ML Workspace. If not specified, the first available Workspace will be used. The associated storage account is automatically recognized.
Container name (Optional). Enter the name of the Blob storage container where the training data and experiment outputs are stored. If not specified, the first available Blob container in the Workspace will be used.
Cluster. Enter the name of the Azure compute cluster within the Workspace that will be used to train and develop the models.
Virtual machine size. Enter the Azure Virtual Machine size which specifies the hardware configuration and computational resources allocated for the inference calls to the Endpoints.
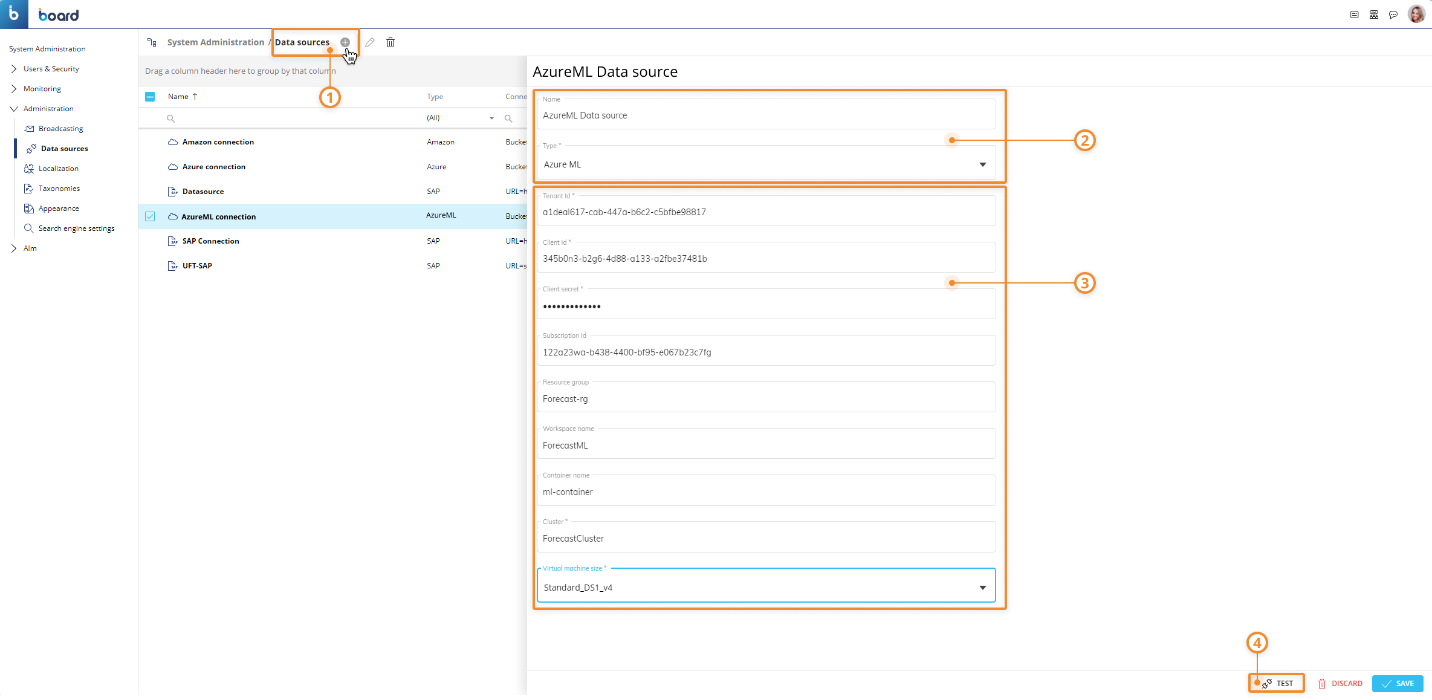
Click on "TEST CONNECTION" to check if the connection works and then click on "CREATE" to save the Data Source.
Once the Data Source is correctly configured, you can start using it in the Azure ML page.
Managing a Data Source connection
To edit one or more Data Source connections, select one or more connections and click the pencil icon or right-click and select "Edit". To edit a single connection, click on the connection row to open the configuration panel and modify the desired options explained in the steps above. When editing multiple connections, the "Type" can be edited simultaneously, and once the "Type" is the same among the multiple connections, its specific settings can be configured together.
To delete one or more Data Source connections, select one or more connections and then click on the trash icon.
To retrieve data from a Data Source through a Data Reader, see Creating a Data Reader protocol.