- 12 Sep 2025
- 5 Minutes to read
- Print
- DarkLight
Creating a Dynawrite Object
- Updated on 12 Sep 2025
- 5 Minutes to read
- Print
- DarkLight
This topic describes how to add a new Dynawrite Object to a Screen or a Container and its specific properties.
To create a new Dynawrite Object, you need to access a Screen in Design mode.
Once you're in the Screen editing page, locate the Dynawrite Object from the Screen Objects list in the left panel, then drag and drop it onto your Screen or Container.
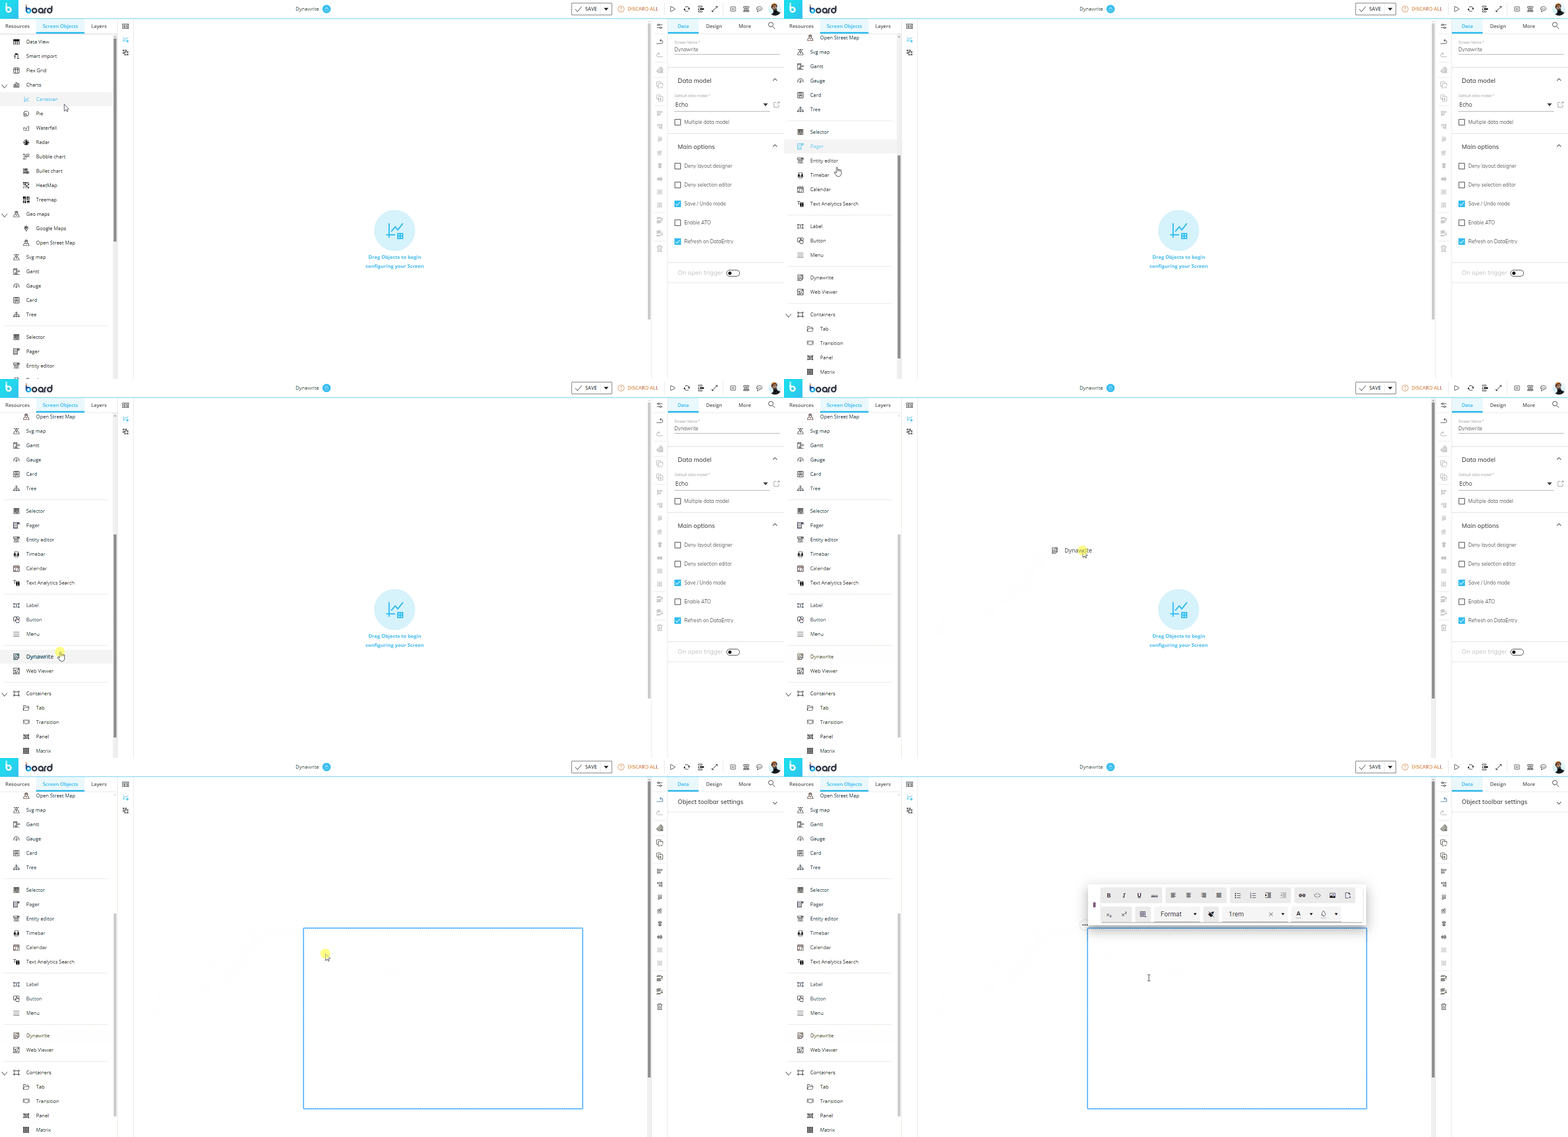
The Dynawrite Object, just like every other Object, can be moved, resized, duplicated via copy/paste and easily aligned with other Objects on the Screen.
See Configure Screen Objects for more details.
Dynawrite Object: use cases
When you create a Dynawrite Object, it is initially empty: click on the Object area and type your desired text as needed.
The editor menu will appear over your textbox. To move the textbox, hover over the left side of the editor menu and your cursor will change to the Move cursor with 4 arrows to allow you to move the editor menu.
You can use the Dynawrite Object for:
Displaying custom text (as a tooltip, a comment or an annotation, for example) created with the supplied WYSIWYG rich text editor. You can also display images, add links to files, or enter clickable URLs using the appropriate buttons in the editor.

External resources (files and images) must be hosted online in order to be displayed in the Dynawrite Object or linked from it.
Displaying dynamic information loaded at runtime (e.g. in Play mode) using substitution formulas. See the dedicated paragraph for more details.
Displaying values or text from a Cube. Associate it with a Layout that will define a value to be displayed. Select the Object and click the "Configure layout" button (
 ) in the Properties toolbar located vertically along the Properties panel of the Capsules workspace. See the dedicated paragraph for more details.
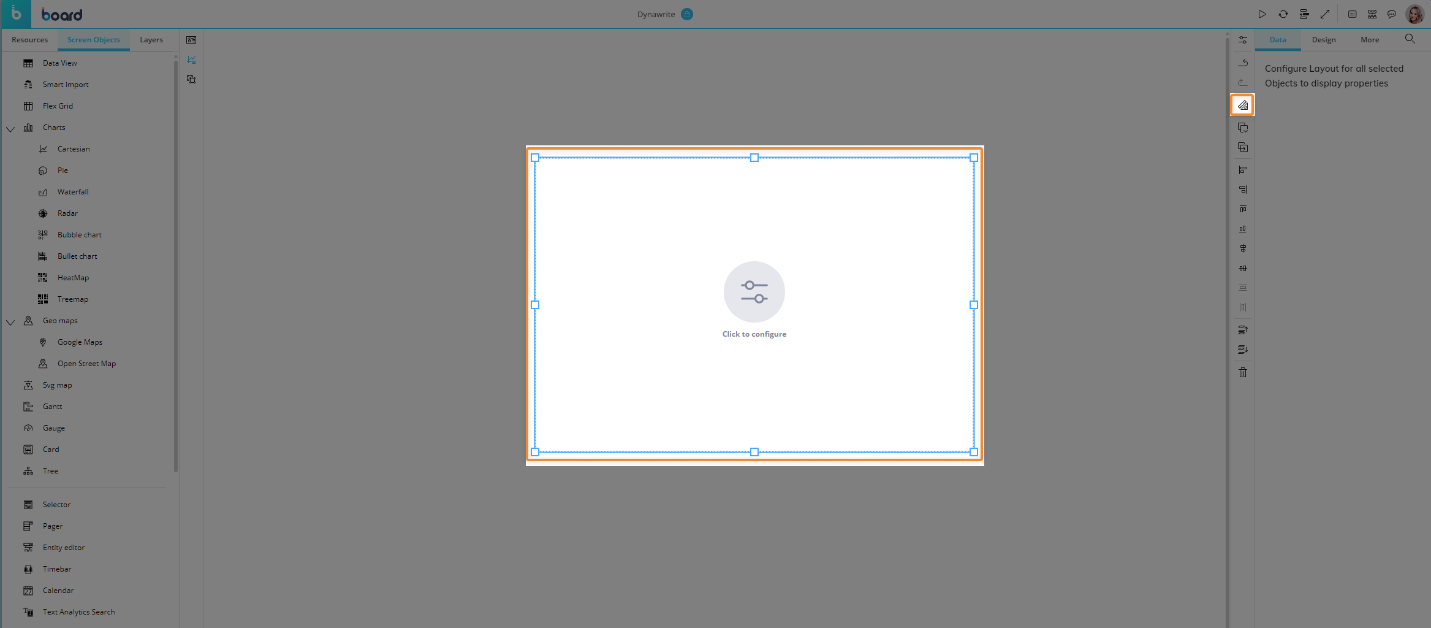
See The Layout Object, Configure a Layout, and About Data Blocks of a Layout for more details on the Layout Object.
Collecting and storing text entered by end users in Play mode via Data entry actions on a RTF Cube. See the dedicated paragraph for more details.
Display images using the Insert Image feature in the WYSIWYG rich text editor (
 ).
).
In Play mode, end users will be able to edit the content of a Dynawrite Object only via Data entry actions on a properly configured RTF Cube in the associated Layout.
How to use the Dynawrite Object for displaying dynamic information using substitution formulas
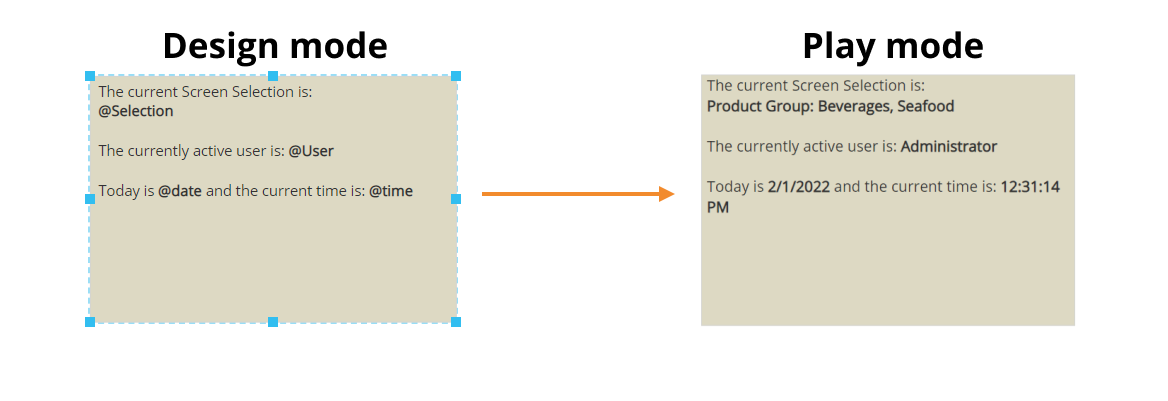
The Dynawrite Object supports substitution formulas which can be used to dynamically display contextual information, such as the current Screen Selection or the current user.
You can enter substitution formulas in combination with free text or images as desired.
The following image shows a Dynawrite containing text and substitution formulas, in Design and Play mode.
How to use the Dynawrite Object for displaying data/text from a Layout
In addition to static elements such as text or numbers, a Dynawrite Object can also display values or text taken from a Block of a Layout.
In this case, the Dynawrite Object can only display one value at a time. The association of the Dynawrite Object with a Layout will erase all existing content. If a Dynawrite Object is associated with a Layout, switching to Play mode will cause the Layout to refresh and all custom formatting will be cleared, as will any manually entered text. The Dynawrite Object supports the Data entry feature only if a RTF Cube has been properly configured in this way in the associated Layout. The Dynawrite Object doesn't support the Color alert feature.
To do so, proceed as follows:
Select the Object and click the "Configure layout" button (
 ) in the Properties toolbar located vertically along the Properties panel.
Configure at least one Block in the Layout editor.
In the Object Properties panel, select the desired Block in the "Show value" field. The first Block you create will be automatically selected.
If you want to display text from an RTF Cube, apply a Selection so that a single RTF file is selected.
Save the Layout.
For numeric Cubes only: you may define an Entity in the Axes area and set the same Entity in parallel to a Pager to cycle through all members of that Entity and have the Dynawrite Object display the corresponding value.
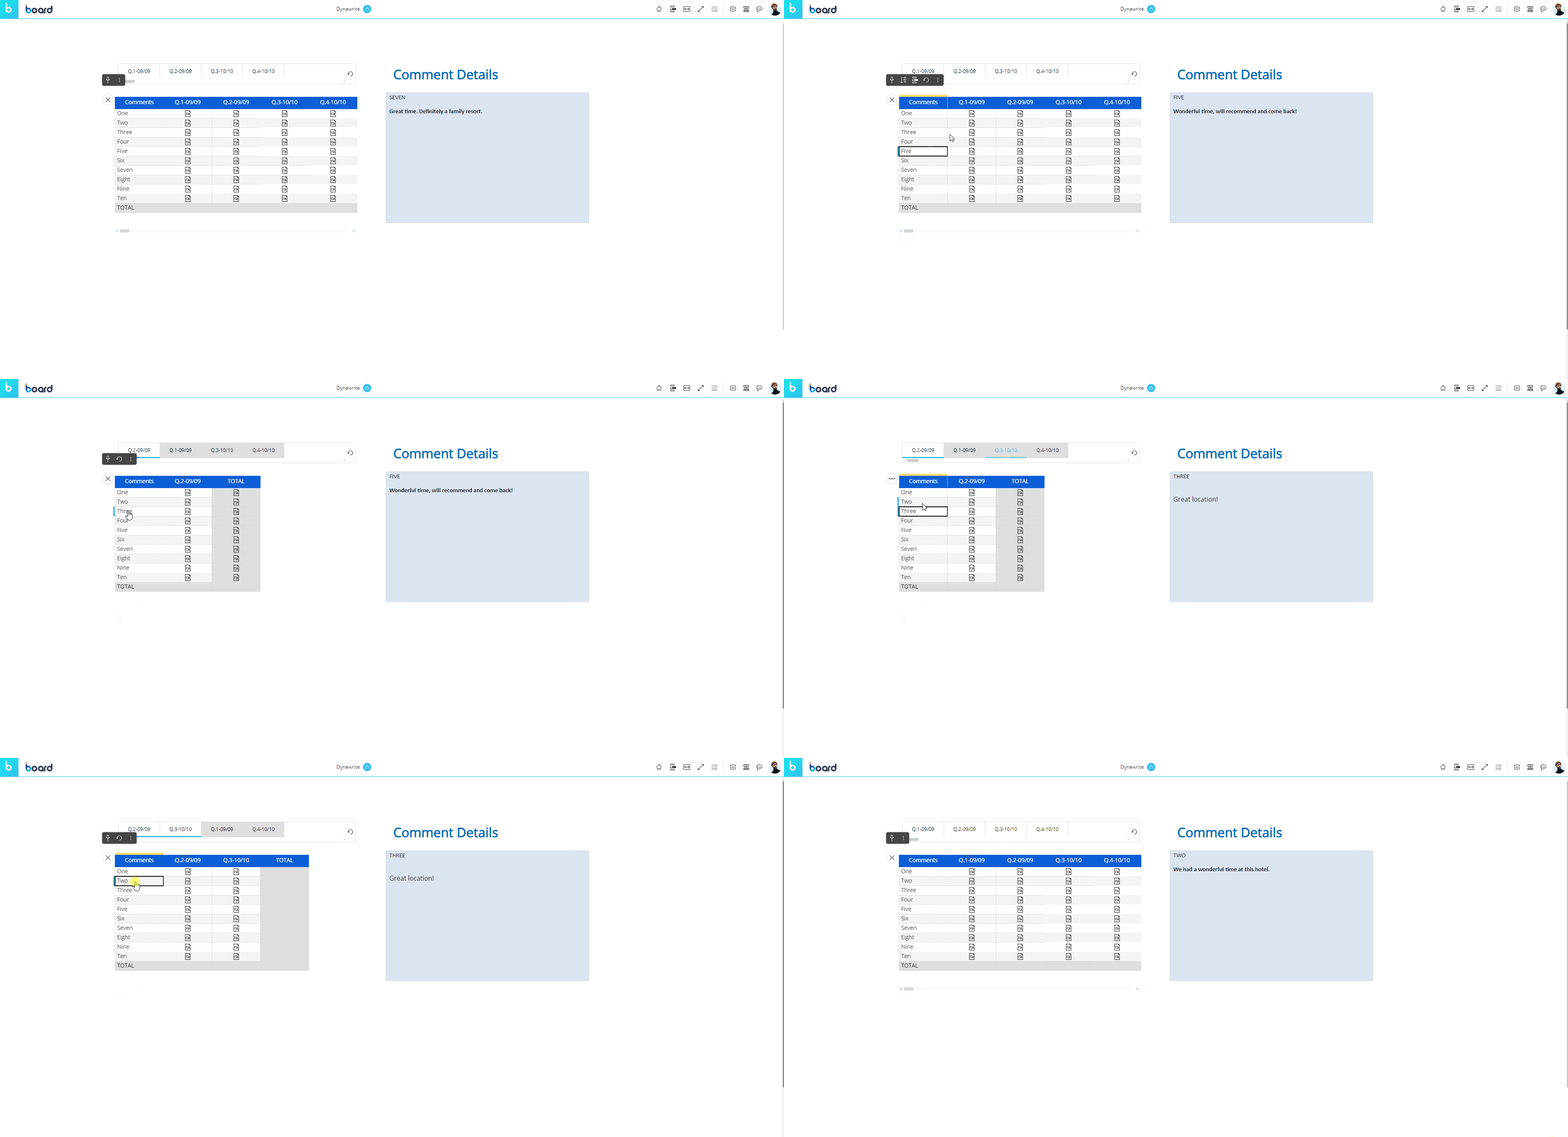
The following example shows a Dynawrite associated with an RTF Cube that contains comments about a Conference: by selecting a specific day and comment using a Selector and a Data View with the Master option turned on, the Dynawrite Object displays the actual comment from the corresponding RTF file stored in the Cube.
Data entry on a Dynawrite Object
If you enter custom text in a Dynawrite or associate it with a Layout and save the Screen, end users will not be able to edit the content in Play mode.
The only way to allow that is by enabling Data entry on the Block in the associated Layout: the Block must be a text Cube (RTF Cube).
The Data Split & Splat is not supported in this case, so be sure to apply an appropriate Screen Selection so that end users will work on a single RTF file in Play mode, otherwise data entry actions won't be saved.
To enter text on an RTF Cube, click on the Dynawrite area and enter the desired text.
If Save/Undo mode is enabled on the Screen, after you have entered your text, press the save icon in the floating panel at the top left of the Object to actually save the new text in the Cube. To do this, you can also press the F9 key on your keyboard.
The undo arrow icon allows you to restore the last saved values (i.e. it discards all unsaved changes).
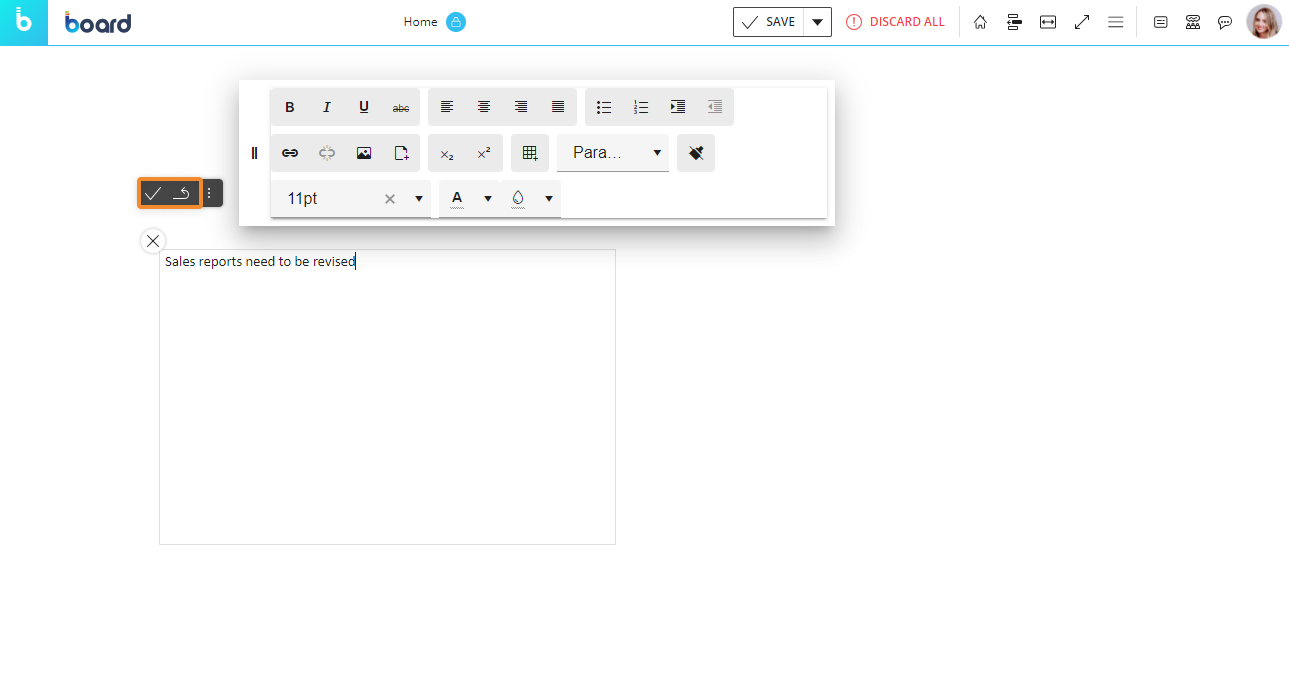
If an RTF file exists for the current selection, end users will be able to edit the information it contains using the rich text editor in Play mode. If no RTF file exists for the current selection, saving manually entered text will automatically create a new RTF file that will be saved in the Cube.
Interacting with the Dynawrite Object in Design mode
In Design mode, you can interact with the Dynawrite Object as described in the Uses cases paragraph in this page.
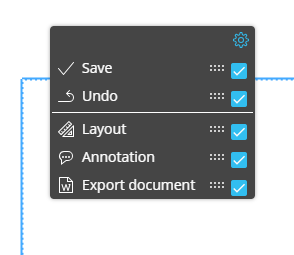
You can also configure which options will be available in the Object toolbar in Play mode.
To do so, double-click or Ctrl + click the Object and click the Object toolbar icon ( ) in the top left corner, then expand it by clicking on the 3 vertical dots (
  ). The configuration panel is accessible from the cog icon in the top right corner.
.svg)