This page catalogues all the updates made to 14.1 by date.
Read about bug fixes in detail on the Bug Fixes page.
17 Dec 2024 (V 14.1.0.1.256843)
This update includes Bug fixes related to:
Procedures
Data readers
Data export
Data View
Smart Import
20 Nov 2024 (V 14.1.0.1.244711)
Data export. When exporting a printable report of a Tab Container Object, the Tab opened on the Screen will display in the preview and export in the printable report.
7 Nov 2024 (V 14.1.0.1.239126)
This release includes bug fixes related to:
Data View
Drill throughs
Export to Excel
Profiles
and other Objects
29 Oct 2024 (V 14.1.0.1.233740)
Flex Grid. A new setting has been added to the Flex Grid Object Properties panel called "Enable clicking URL". Enable this setting to activate hyperlinks in Play mode.
Top Menu. A new option, "Privacy & Terms", has been added to the Top Menu. There you can find Board's Privacy Policy. The link is also available on the Sign-in main page so to be immediately visible to all users even before accessing the platform.
.png)
Banner Messages. Toast warnings and messages have been moved to the bottom middle of a screen from the bottom right to prevent any button or feature overlap.
10 Oct 2024 (V 14.1.0.1.223765)
Export to Excel
Improvements have been made to the Export to Excel option.
Remove Empty Sheets
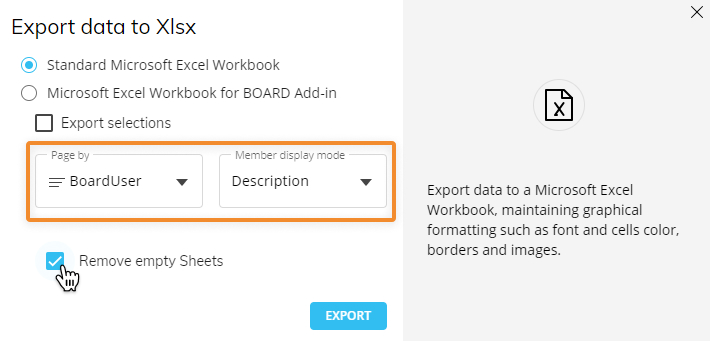
When exporting to Excel with the "Page by" functionality active, a new option appears in the export window called "Remove Empty Sheets". When enabled, any empty sheets that would normally display in the report will be removed to reduce excess pages.
This flag is enabled by default. It can only be disabled when the Page by display mode dropdowns are configured, as described below.
Page by display mode
This feature organizes each page based on the display name chosen for a specific Entity and is only available when a single Object is exported and a Selector or Pager is on the same Screen as the Object being exported.
To do this, open the Export to Excel window and proceed as follows:
Select an Entity you would like to organize the report pages in the "Page by" dropdown.
Choose the display mode of which you want the Entity to be displayed by under "Member display mode".
Default
Description
Code
Code and description
Export Printable Report
Improvements have been made to the Export Printable Report option.
Page by display mode
This feature organizes each page based on the display name chosen for a specific Entity and is only available when a single Object is exported and a Selector or Pager is on the same Screen as the Object being exported.
To do this, expand the options for the Print area listed in the Content tab of the Export printable report window and continue as follows:
Repeat by Entity. Choose an Entity of which you want to organize the report pages by under "Repeat by Entity".
.png)
Member display mode. Choose the display mode of which you want the Entity to be displayed by under "Member display mode".
Default
Description
Code
Code and description
.png)
Filter repeat by Entity (optional). Filter the repeat by Entity configuration to reduce the amount of pages exported in the report or focus on more specific parameters in the report.
Cube. Choose a Cube to filter the repeat by Entity configuration.
Condition. Choose a condition to filter the repeat by Entity configuration by selection between the following. You must choose a condition if you choose to filter the repeat by Entity with a Cube.
Is 0. Filters data from the chosen Cube meeting the condition "is 0".
Is not 0. Filters data from the chosen Cube meeting the condition "is not 0".
Last, go to the "Export settings" tab and drag and drop "Page by display name" from the "Dynamic elements" section into the header of footer area surrounded by dotted lines.
.png)
Click Export.
Logo
You can now add a logo image to the header or footer of a printable report, which will automatically resize to the margins. You can also define a margin height manually to accommodate the image size.
.png)
To do so, drag and drop "Logo” from the Dynamic elements section to the header or footer area contained by dotted lines. Once placed, a menu will open to configure the Logo source and settings.
Logo source
Default. The default image is configured in the images section of Board. To configure the default image, click on "Configure default" to open the page and upload an image or edit an already existing image and select "Default image”.
.png)
There can only be one default image per Capsule saved at a time and only one default image logo used per report.
Supported image file types are .jpg, .png, and .gif.
External link. Add an external image link in the "Load logo from link" field.
The external URL must specify the file type, for e.g. https://testurl.com/image.png and not https://testurl.com/image.
.png)
Logo settings
Fill. Choose the fill setting of how you want the logo to appear:
None. The image appears according to its dimensions. If its dimensions are smaller than the logo fill area, white space appears surrounding the image.
Fill. Fills the area with the image. The image is stretched to fit the Screen's dimensions regardless of its dimensions.
Uniform. Expands the image’s size accordingly with its dimensions until one side fits to the Screen's dimensions.
Uniform to fill. Expands the image to fill the area without stretching the image. This means that the image could appear cropped.
.png)
Alignment. Choose the position of the logo for vertical and horizontal alignment.
Vertical. Choose from top, middle, or bottom alignment vertically.
Horizontal. Choose from left, middle, or right alignment horizontally.
24 Sept 2024 (V 14.1.0.0.216049)
Folder security. Now, only active security configurations will be shown in the Security Report.
Web Viewer. URLs added to a Web Viewer Object can now contain additions to the top-level domain such as a query, parameter, path, etc.
10 Sept 2024 (V 14.1.0.0.208107)
Procedures. The labels for Time functions, Block references, Total by, and Nexel that display next to the Data Block in a Layout to identify the configured Block settings now display when editing a Dataflow Procedure Layout.
User Profile (on-premises only). The option to change a user's password has been added to "My Profile" for on-premises users.
26 Aug 2024 (V 14.1.0.0.201029)
Drills. Icons and tooltips when selecting a default member during a Drill configuration have been introduced.
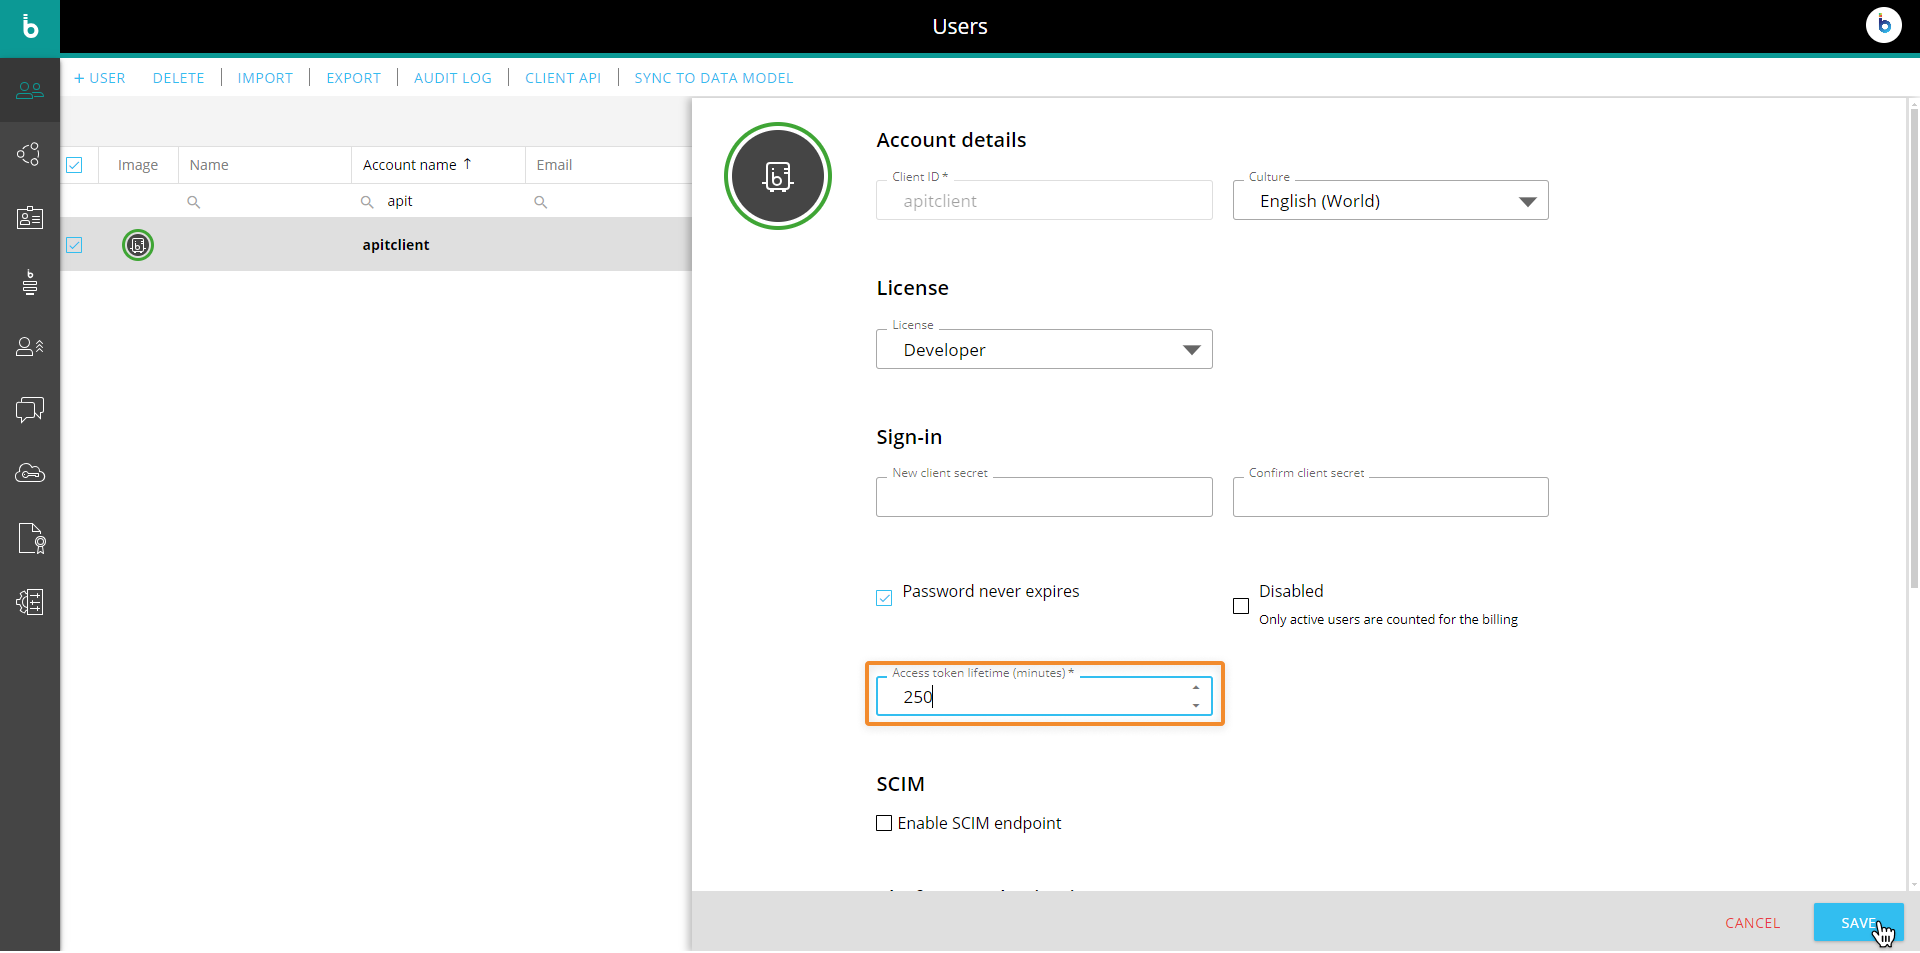
SCIM APIs. It is now possible to set a token expiration time for the API client from the User profile section of the Subscription Hub. The limit is 259,200 minutes (180 days) and must be defined by minutes.
Shortcuts. The “ESC” key now closes popups in Board, such as Drill through, Drill down, etc.
06 Aug 2024 (V 14.1.0.0.191290)
Data entry. The Data entry suggested values dropdown now has a default minimum width so that if the column width is too small, the dropdown options are visible.
Data entry. The "End" keyboard button can now be used to move cursor to the next field when using Data entry on a Text type Cube.
Data entry. The "Cube locked by" feature in Data entry now uses much less resources than before.
Drill-Procedures. When creating a Drill-Procedure, the UX of the Drill anywhere journey has been optimized in fewer steps.
23 July 2024 (V 14.1.0.0.183919)
Data entry. Data entry has been improved on a vertical Layout.
07 July 2024 (V 14.1.0.0.176915)
Calendar. The Calendar Object has been improved to display the dates in full rather than truncated.
Drill through. RAM usage has been optimized when using a large query in a Drill through protocol.
01 July 2024 (V 14.1.0.0.173411)
Broadcasting. The Broadcast box displaying recipient emails has been expanded for better visualization.
21 June 2024 (V 14.1.0.0.169877):
SVG map. The SVG map Layout has been improved to better facilitate configuration from scratch on existing Objects.
Sorting. Sorting has been optimized when Data entry is configured on suggested values.
17 June 2024 (V 14.1.0.0.166447):
Export. Page size adjustment has been improved when exporting a printable report.
Smart Import. Small improvements have been made to the Impact Analysis area.
Tooltip. Tooltip placement has been optimized, especially in Container Objects, so as not to overlap with other Screen Objects.
04 June 2024 (V 14.1.0.0.161052):
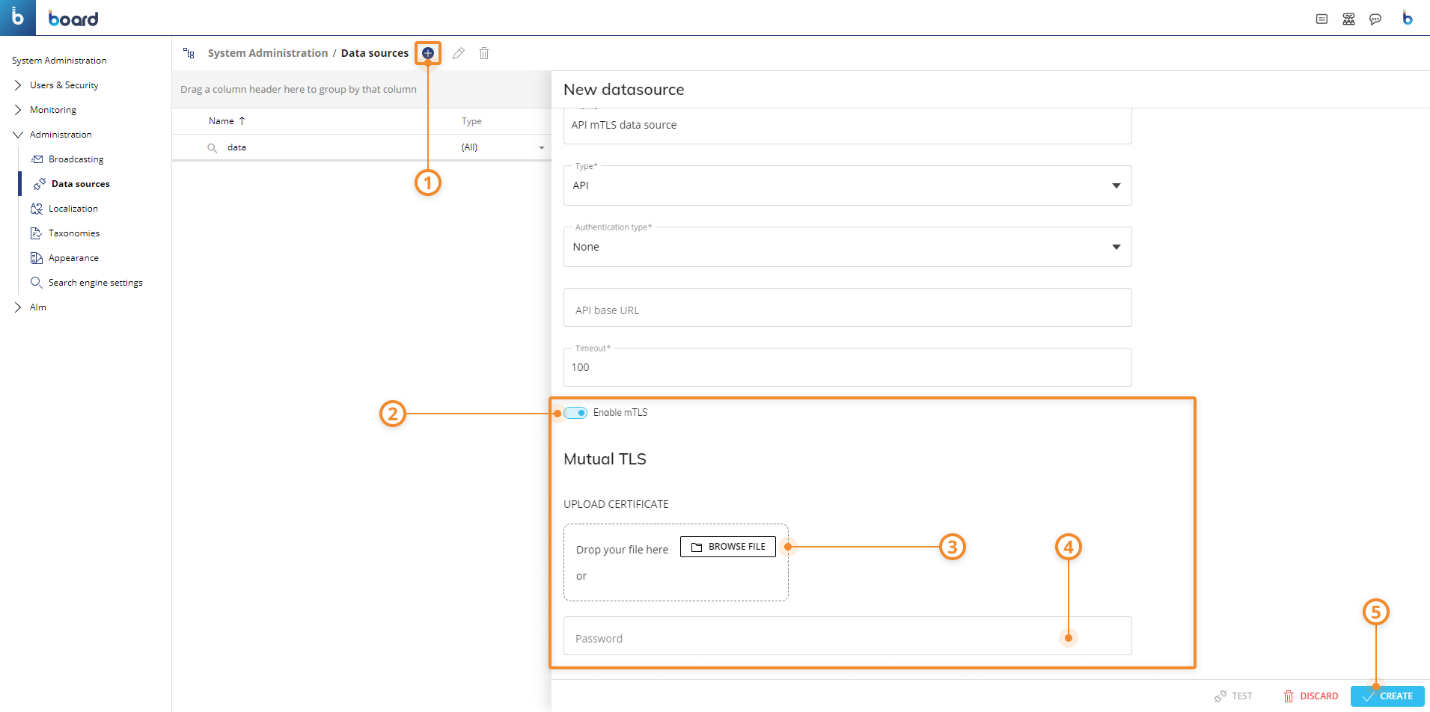
mTLS certificate for Data sources using Rest APIs. A new mTLS toggle has been added to the creation panel of an API Data Source. When activated, the Admin user can upload a certificate into the Data Source configuration. With this improvement, it is possible to use the uploaded certificate for REST API calls towards the specific Data source so that the source system will validate the requests before returning the information.
This enhancement also fixes a previous limitation whereby when changing the name of a Data source, it was necessary to re-enter sensitive information (password, client secret, etc.).
Notes: This feature is supported by API key, Basic authentication, and OAuth2. It is the same feature offered for the SAP connection type. This enhancement is only available for Cloud customers.
The adoption of the mTLS authentication ensures that traffic is secure and trusted in both directions between Board and the API: it prevents various kinds of cyberthreats, such as Brute force attacks, Spoofing attacks, Phishing attacks and many more.
The mutual TLS authentication method relies on 3 aspects:
Public key and private key. Those keys are used from both parties to encrypt and decrypt messages: anything encrypted with the public key can be decrypted only with the private key and vice versa.
TLS certificate. The TLS certificate is a file that holds required important information for verifying the identity of both parties, information on who issued the certificate and the certificate’s expiration date.
TLS handshake. The TLS handshake process verifies the TLS certificate and both communicating parties exchange messages to acknowledge each other, verify each other, establish the encryption algorithms they will use, and agree on session keys.
How to enable the mutual TLS (mTLS) authentication method for API Data sources in Board
To use the new method for connecting Board to API data sources, proceed as follows:
In the "Data sources" section under System Administration, click on the desired API connection or create a new one by clicking the blue plus icon next to Data sources.
Click on the "Enable mTLS" toggle once all other required fields are entered.
Upload the required TLS Certificate (required). The Certificate file extension must have .p12 or .pfx file extension.
Enter the Certificate password that Board will use to read the certificate during the TLS handshake process.
Click on "SAVE" to save or "CREATE" if creating a new Data source.
Azure ML. An update has been made to accommodate an update from the Azure ML Studio APIs.
In Ram. The "In Ram" flag has been removed in its entirety, marking its official deprecation in Board 14.1.
Entities. The “Is in use” column option has been added to the Column Chooser in the Entities section.
Logs. Multiple sorts and filters are now available in the Logs section.
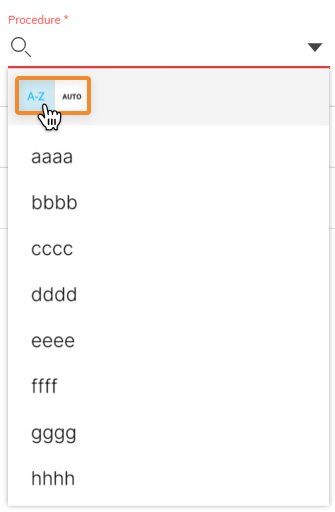
Procedures. A sorting toggle has been created where you can choose “AUTO” ordered by date created or “A-Z” ordered alphabetically when selecting a Procedure from the dropdown menu of a Button, Label, row Drill or Block Drill.
Security Profiles. User experience when selecting a checkbox in the Security Profiles section has been improved.
21 May 2024 (V 14.1.0.0.150177):
Chat. The chat feature has been improved to decrease latency.
Logs. A Warning log has been added to indicate the presence of inconsistent Relationships due to an overlap of relations, for example, if loading multiple Time Relationships that shared the same Time Entity.
6 May 2024 (V 14.1.0.0.138638):
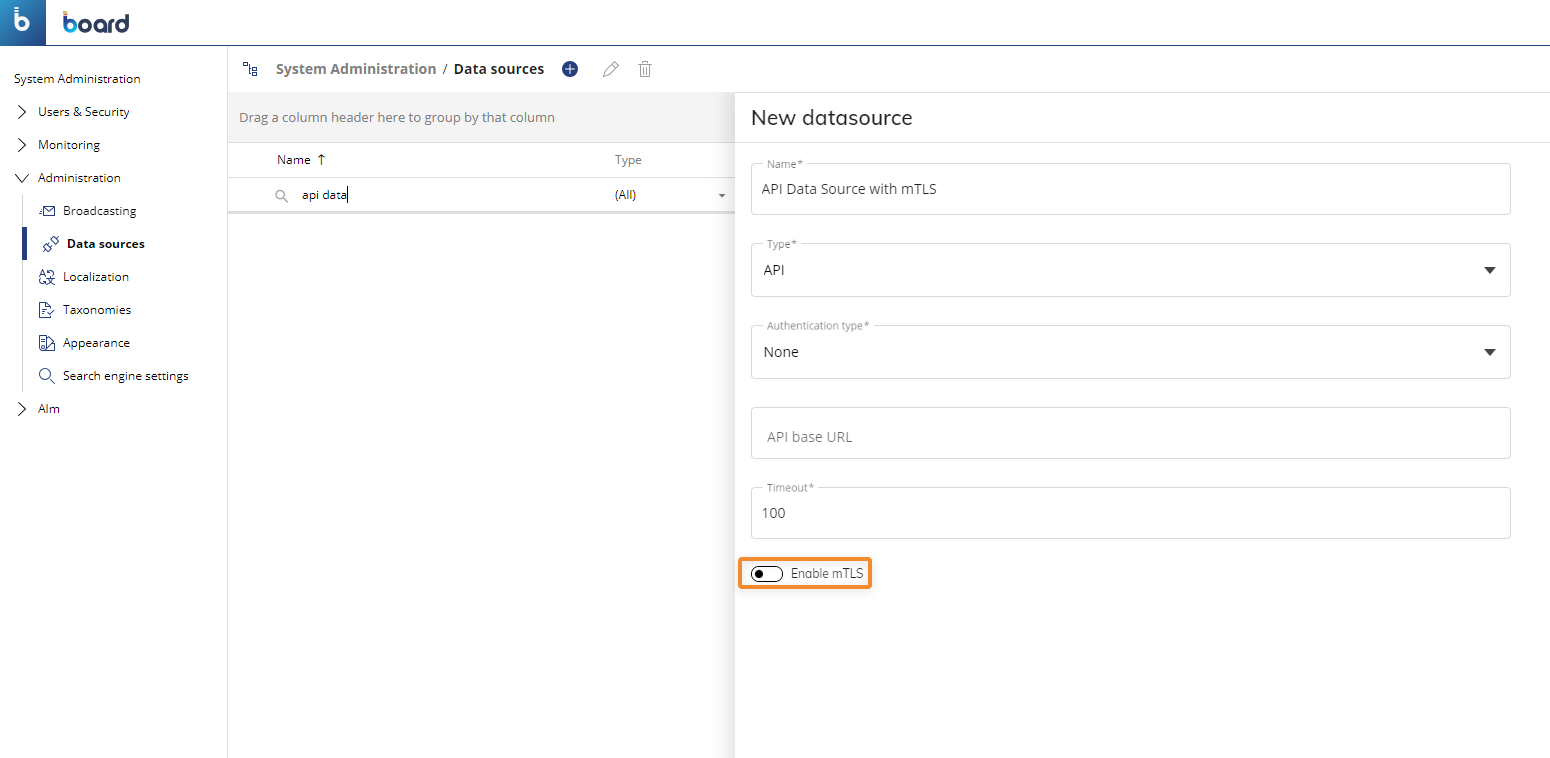
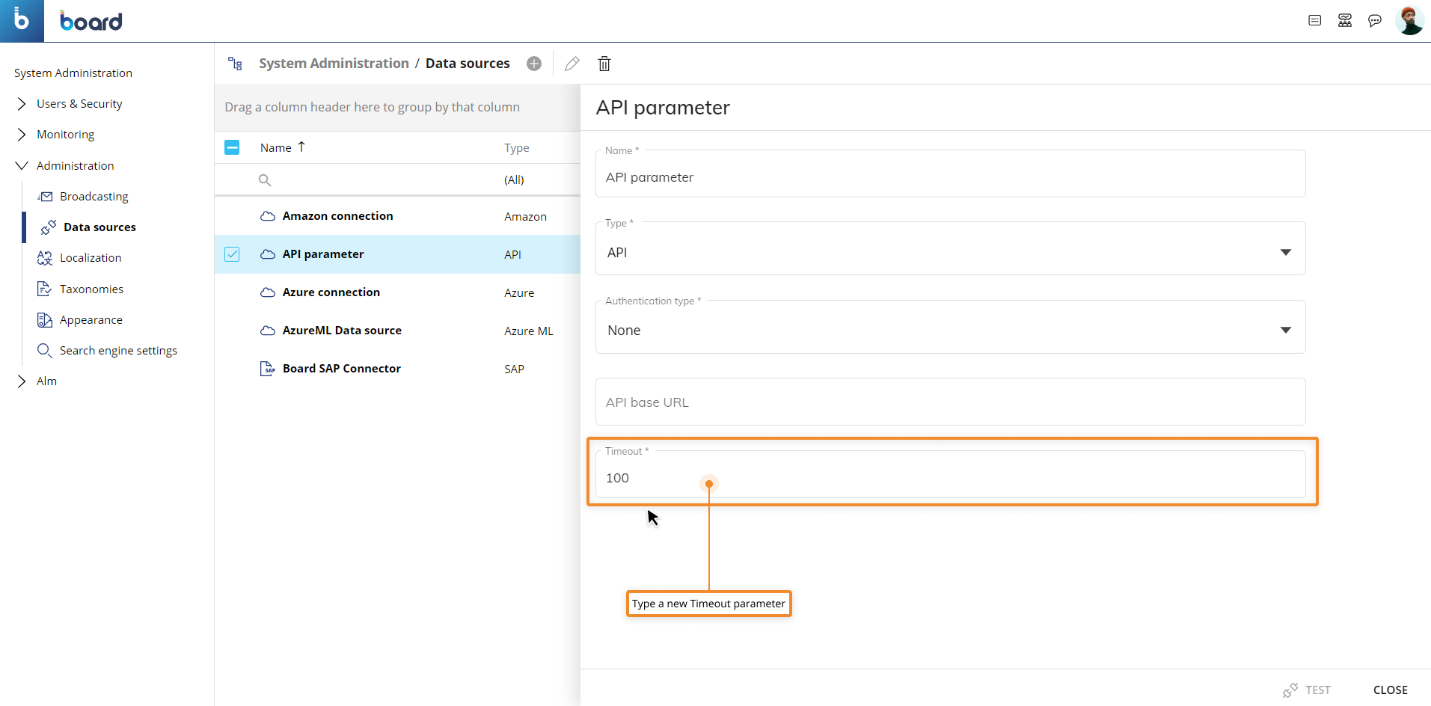
New Data source connection timeout parameter for REST APIs. A new parameter has been added to REST API calls and can be defined in the API Data source connection (as shown below) to customize the API call’s timeout period. The default timeout period is 100 seconds and remains so when this new parameter is not defined. This is helpful, for example, in the event that you anticipate a REST API call to take longer than 100 seconds.
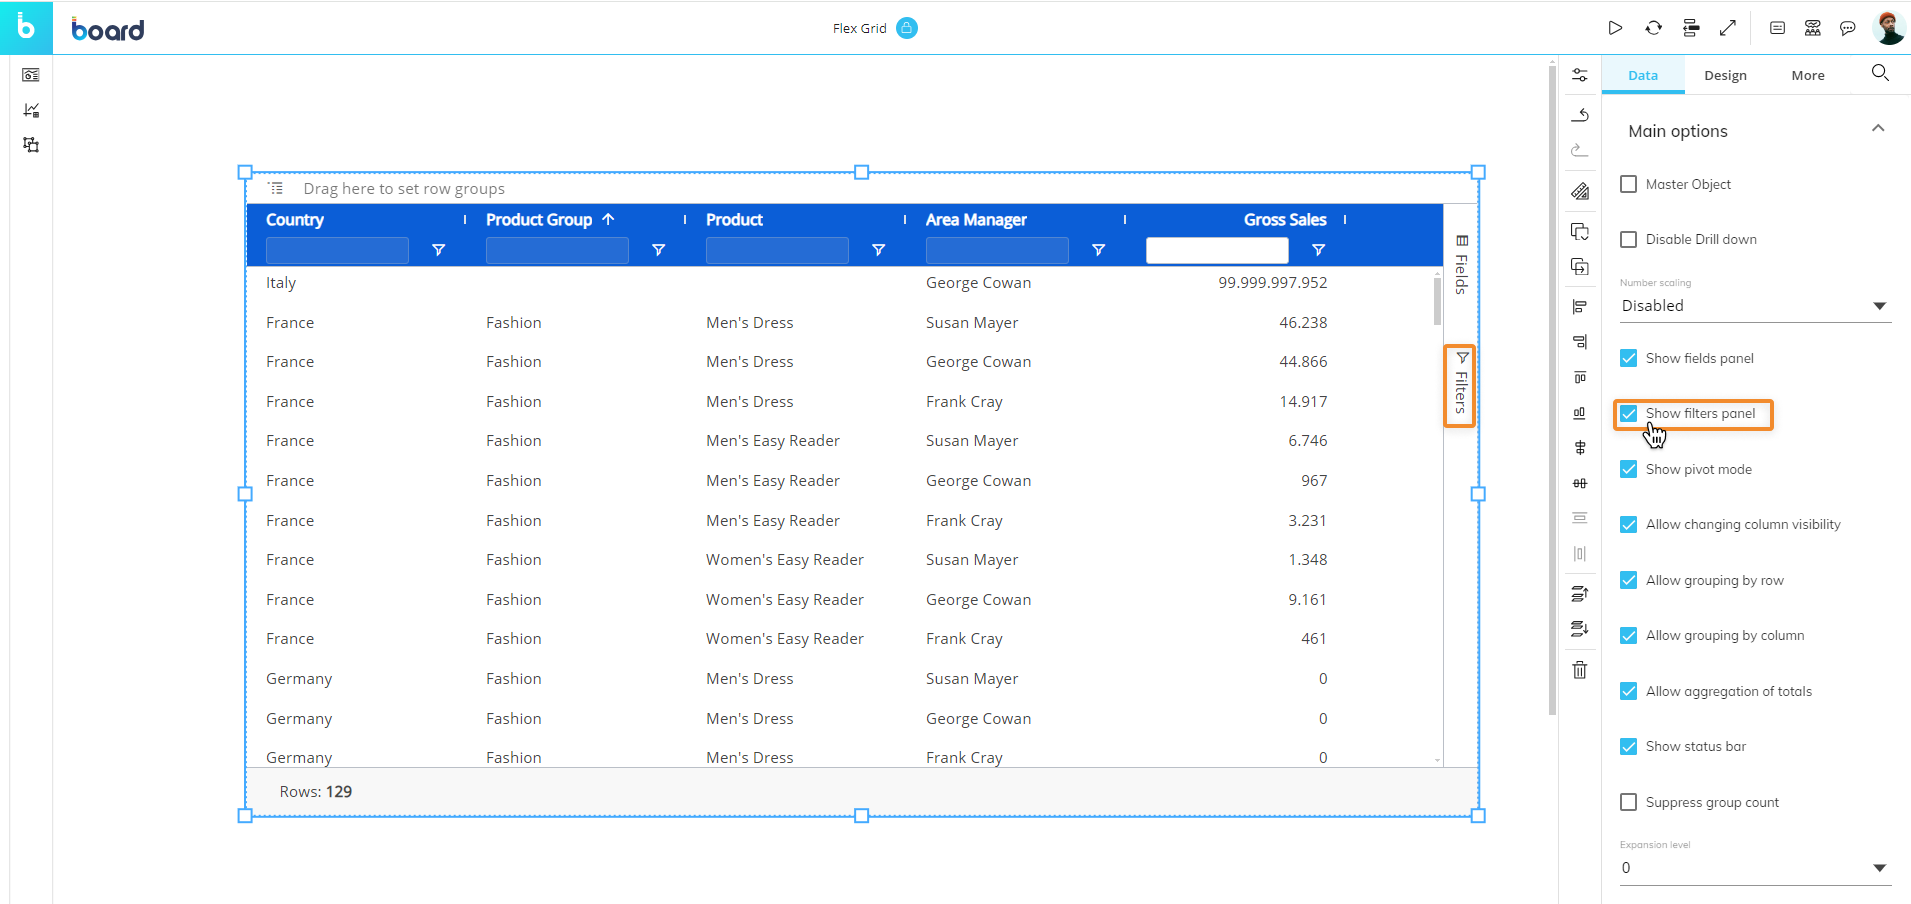
Filters panel on the Flex Grid. A filters panel has been added to the Flex Grid Object. The Filters tab is located underneath the Fields tab. When clicked, the panel opens and users can quickly and easily manage filters on the Flex Grid. It's possible to add, edit, and delete filters from this panel, in addition to doing so from each column header, if the configuration allows it. Additionally, a new setting, "Show filters panel", located in the Object Properties panel allows Developers to show or hide the Filters panel tab for end users.
Data source. When an SAP Data source was modified by editing the URL or moving the Data model from one instance to another where the SAP Data source has a different URL, all the configured Data Readers executed even if the endpoint was invalid. Data Readers will work if the Data Source URL is updated to a new valid endpoint and will not work if the URL is wrong or invalid.
Diagnostic Log. The diagnostic log has been enhanced to record information about files that may be restricting access to the Impact Analysis so the user can address it and then successfully access the Impact Analysis area.
