In the new Board 14 release, the Quick Layout has been significantly enhanced. The new Quick Layout retains the similar premise as before, but now has more capabilities to control the end user's ability to display or manipulate data. This is helpful so that the user doesn't create a complex Layout that could cause errors or slow down the Platform. The new Quick Layout has a sleek design that is intuitive to use and gives the developer better visibility on the restrictions and Layout capabilities.
From the Quick Layout option, under the “Object settings” tab, you can configure what the end user is able to change or not when interacting with the Object in Play mode and how they can display the data.
Quick layout is enabled by default.
The new Quick Layout UI and features
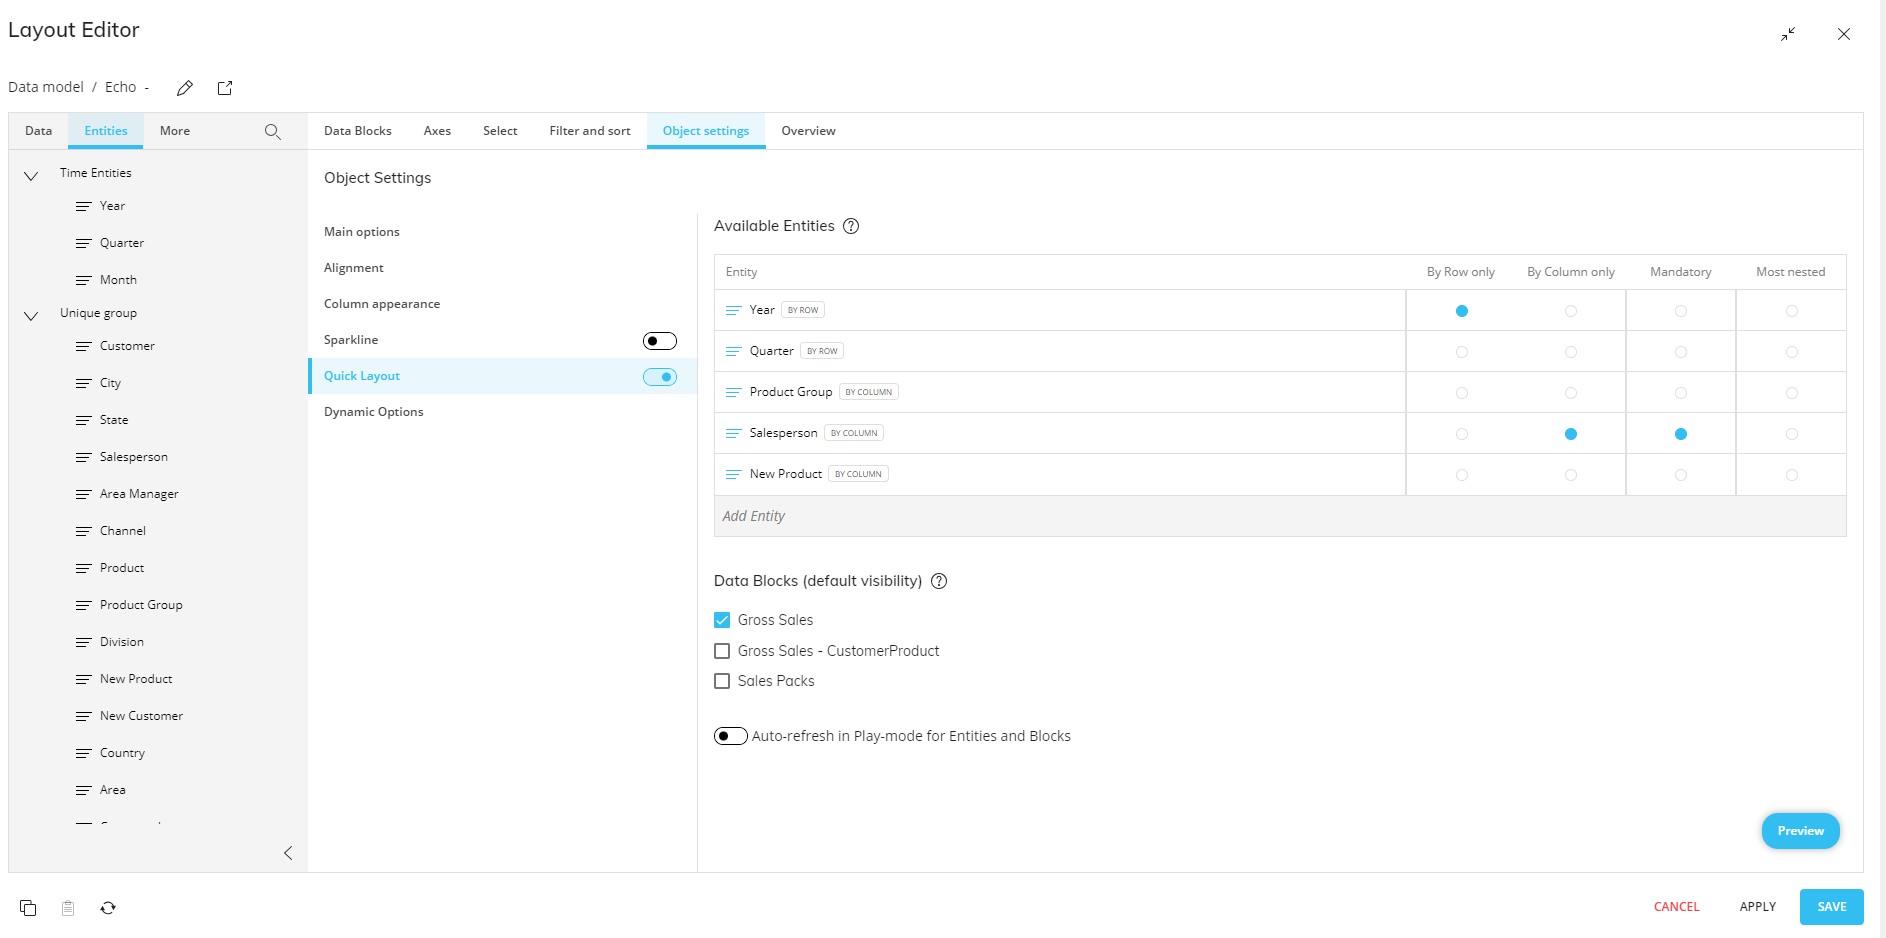
When accessing the Quick Layout configuration from the Object Settings tab, you will see the title “Available Entities” and a table below listing the Entities that were configured in the “Axes” tab.

The available options in the Quick Layout configuration table are as follows:
Entity. This column displays the Entities that were chosen in the Axes tab. Next to the Entity name is a tag indicating whether the Entity was configured by row or by column in the Axes tab. This is not exclusive for the end user unless specified, which is done so by selecting either the corresponding “By Row only” or “By Column only” radio button
By Row only. This column displays a radio button that, once selected, appears filled in blue and restricts the corresponding Entity to only be available by Row for the end user. The Entity is not allowed to be configured by Column
By Column only. This column displays a radio button that, once selected, appears filled in blue and restricts the corresponding Entity to only be available by Column for the end user. The Entity is not allowed to be configured by Row
Mandatory. This column contains a radio button that, once selected, appears filled in blue and makes the corresponding Entity a mandatory element of the Object. The Entity cannot be removed from the Axes by the end users in Play mode and must configure the Object
Most-nested. This column contains a radio button that, once selected, appears filled in blue and assigns the corresponding Entity as the most-nested Entity. The most-nested Entity is the most detailed data. Only one Entity may be configured as most-nested. This makes the Entity mandatory, and the Mandatory radio button for that Entity will also become selected and turn blue automatically. If you deselect the Entity as most-nested, the mandatory selection will not automatically deselect. To remove the Mandatory assignment of an Entity, you must deselect the Mandatory option manually
Below the table are more options to consider when configuring the Quick Layout for the end user.
Data Blocks (default visibility). This section lists the Data Blocks configured in the Data Blocks tab. These are selected by default. When selected, the Blocks are visible to the end user in Play mode by default. When unselected, the Data Blocks are not visible to the end user in Play mode by default. The end user can select/deselect Blocks while in Play mode under "Data" in the Contextual sliding menu or the Object toolbar via right click when they want to display/hide Data Blocks. Read more about the Quick Layout for the end user below
Auto-refresh in Play mode for Entities and Blocks. Below “Data Blocks (default visibility)” is a toggle for auto-refresh. This toggle is disabled by default, which is in the leftmost position. When disabled, the Object is not refreshed automatically after every change made by the end user in the Data submenus or the Quick Layout window (called Rows & Columns for the end user in Play mode). The user will only experience a refresh after applying changes, even during the configuration in Play mode, and clicking outside of the Data submenu. When enabled, the toggle is in the rightmost position. Enablement of this toggle will refresh the Object every time a change is made in the Data submenus. The auto-refresh option can be enabled or disabled again by a developer at any time
How to configure the Quick Layout
To set up possible configurations and/or restrictions to a Layout for the end user in Play mode, follow the steps below after adding Data Blocks and Entities to the Layout:
Click on the toggle of Quick Layout to enable it. The table displays all of the Entities configured in this Layout and all the possible restrictions that can be assigned to those Entities, as described above
To add or remove Entities to/from the Quick Layout and to/from the Layout, you must do so in the Axes tab. Drag and drop an Entity into the appropriate axes box to add and click on the X next to the Entity to remove them
Select the radio buttons that corresponds with the appropriate restriction for each Entity that you want to make
Deselect the checkbox(es) of each Data Block that you want to hide from the end user, if wanted
Enable the Auto-refresh toggle to avoid inconsistencies
After enabling and configuring the Quick Layout, if you change anything in the Axes or Data Blocks areas, Quick Layout will automatically become disabled.
Apart from the Data Blocks, the configuration made in Quick Layout will be available for the end user in Play mode under "Row & Columns" in the Contextual sliding menu or the Object toolbar available via the right-click function. The Data Blocks selected for default visibility will be available under "Data" in the Object toolbar or via the right-click function.
Quick Layout in Play mode (Rows & Columns):
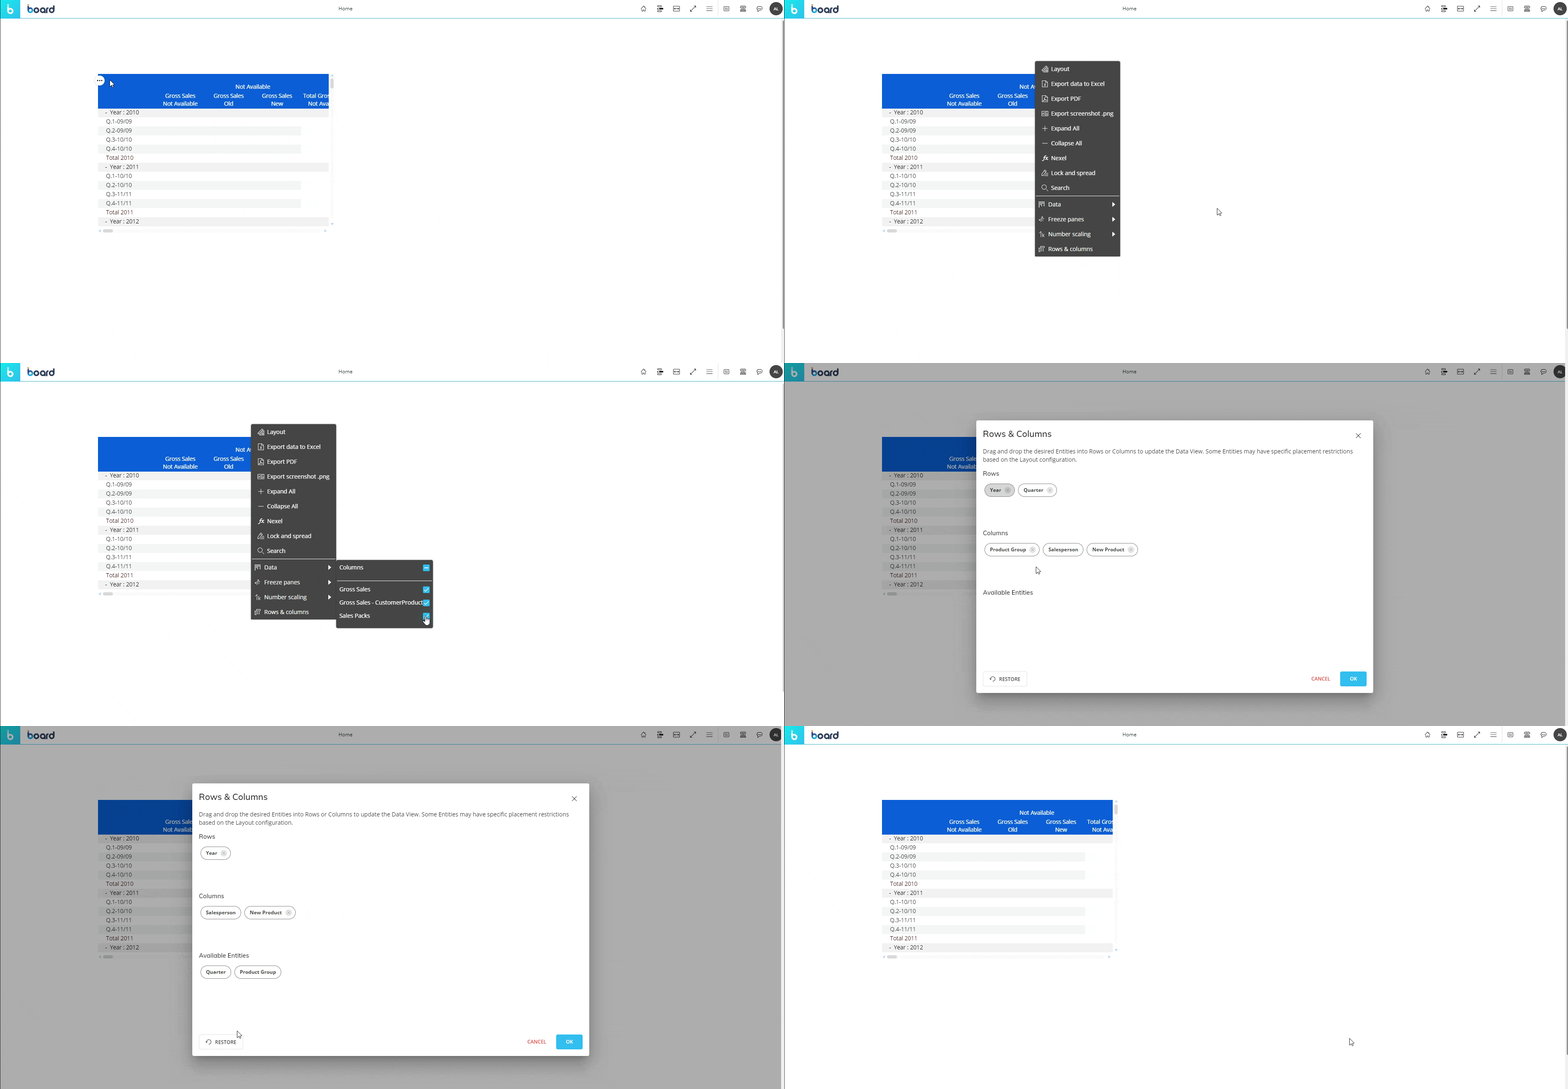
The Quick Layout can be used in addition to or to replace the general Layout Editor in Play mode (by disabling it) when the end user does not need the capabilities of using the whole Layout but should still have the possibility to view data in different ways. While in Play mode, the user can change the way data is displayed by clicking on "Rows & Columns" found in the Object toolbar via the menu icon on the Object or right clicking on the Object.
Under Rows & Columns, a window appears that contains the available Entities which can be moved to different axes or exclude completely, if the Quick Layout configuration allows it.
If the configuration restricts certain changes, for example the restriction of an Entity by Row, that Entity will not be able to move from its position in the Row field.
How to use Rows & Columns to change a Layout in Play mode
Go to the Object's contextual menu by clicking the menu icon in the top left corner. Then, click the three dots to the right of the menu that appears. Another menu will appear. At the bottom, click "Rows & Columns"
Drag and drop an Entity into an axes field "By Column" or "By Row". Please note the following behaviors:
If an Entity is required in a particular axes field, it will be greyed out and unable to move
Click on the X symbol on an Entity to exclude it from the data display
If an Entity is required, it will not have an X symbol and cannot be removed by end users.
(Optional) Though not in Rows & Columns, under "Data" in the Object toolbar, the user can choose which, if any, Blocks to add or exclude from the Object’s display of data.
