The Board 2021 Winter release introduces several new administration features and a new style for key sections of the Subscription Hub: managing all your users is now even easier and it can be done with a greater degree of efficiency and in less time.
The General Settings section now offers various settings that allow you to configure login options, a password policy and a lockout policy. You can also customize all Enrollment and Registration automatic emails to give them your unique style. See New General Settings features for more details.
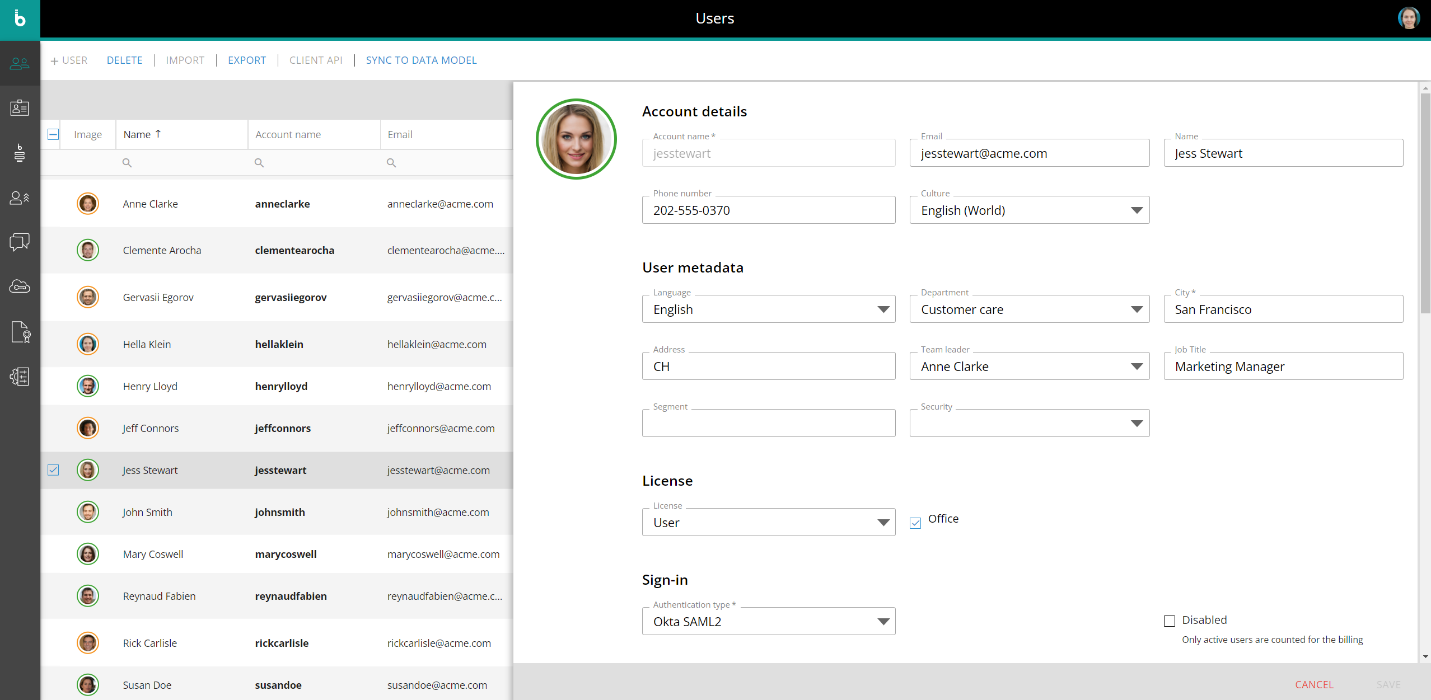
We've significantly redesigned the User Profile panel in the Users section, the User metadata configuration panel, the Request form field .configuration window and the Default Authorizations sub-page in the Enrollment section, and the User Group configuration window in the Collaboration section. Now all those pages display information much more clearly and effectively.

In the Users home page, you can now add additional columns to the Users table for each available User metadata. To do that, click the Column chooser button in the upper right corner of the table and drag additional columns onto the table. Each new column offers interactive header fields to easily search for desired values.
The Export users feature now also exports custom User metadata to the target CSV file. If a custom selection script has been entered, it will be exported under the corresponding User metadata header.
Subscription Hub Administrators now have a number of new access-control features to regulate what other Administrators can view and edit in the Subscription Hub. See New access-control features for more details.
New General Settings features
The General Settings section has been significantly improved in the Board 2021 Winter release and now it offers the various new options for configuring the users login and registration process:
Under the Board Authentication menu, the following options are now available:
In the Login submenu:
Sign-in hint text. Here you can customize the hint text appearing in the account name field of the log-in page.
Enable lost password. Enable this option to display a "Lost password" link in the log-in page. Clicking on that link will initiate the password recovery flow.
Max forgot password daily requests (required field). Specify a maximum total number of lost password requests in a 24-hour period. When the maximum total number of lost password requests is exceeded, users will not be able to send any more requests until the next day.
In the Password policy submenu, the following options are now available:
Min. password length (required field). Specify the minimum length of the password.
Unique chars (required field). Specify the minimum number of unique characters in the password. For example, if the entered value is 3, the password must have at least 3 unique characters, such as "qwertyqwe".
Require special character. Select this option to require at least one non-alphanumeric character in the password, such as: ! ” # $ % & ’ ( ) * + , - . / : ; < = > ? @ [ ] ^ _ ` { | } ~
Require lowercase. Select this option to require at least one lowercase character in the password.
Require uppercase. Select this option to require at least one uppercase character in the password.
Require digit. Select this option to require at least one number character in the password.
Password expiration days. Specify the minimum number of days that must pass between password changes (default value: 365 days).
In the Lockout policy submenu, the following options are now available:
Enable lockout. Enable this option to activate the account lockout policy.
Max failed attempts. Set the number of failed sign-in attempts that will cause a user account to be locked. Once an account is locked, the user will have click the "Lost password" link to unlock it by completing the password recovery flow.
Lockout time. Set the minimum period (in seconds) before a new login attempt can be made after exceeding the maximum number of failed attempts.
Under the User registration emails menu, you can customize the automatic emails sent to the user for confirming his/her identity when he/she is registering for the first time or changing his password.
For each email, you can edit:
The subject line
The body. You can apply predefined text styles, change the font color and add links. Words in square brackets are placeholders which will be replaced with the appropriate values, such as the user's account name or a unique URL during sending.
Placeholder | Description |
[accountname] | The user's account name as seen in the Account name field in the User Profile panel. |
[accountemail] | The email associated with the user's account as seen in the Email field in the User Profile panel.. |
[link] | An automatically generated temporary link that the user can copy and paste in the browser's address bar for account activation, email verification or password confirmation and reset |
[message] | All user information (Name, Email, custom user metadata) retrieved from a custom request form configured in a manual approval enrollment process. |
It is recommended not to delete any placeholder to avoid missing information in the emails sent to the user.
Included links expiration time. If an email includes a temporary link, here you can define its expiration period (in hours).
The "Reset Default" button in the lower left corner allows you to restore the default configuration.
Under the User Enrollment emails menu, you can customize the automatic emails sent to the user during the Enrollment process as described in the previous paragraph.
New access-control features for Administrators
A new set of authorizations specifically designed for Administrators has been released with the Board 2021 Winter release.
Now you can grant or deny access to specific sections of the Subscription Hub to other Administrators, thus enforcing a deeper level of security and access control.
For example, users from the Marketing team may need to access only the Sign-in page section, while the IT team probably won't need access to that area. Instead, they may need to configure and manage external identity providers in the Identity Provider Federation section, and with these new features you can restrict their access to that section only.
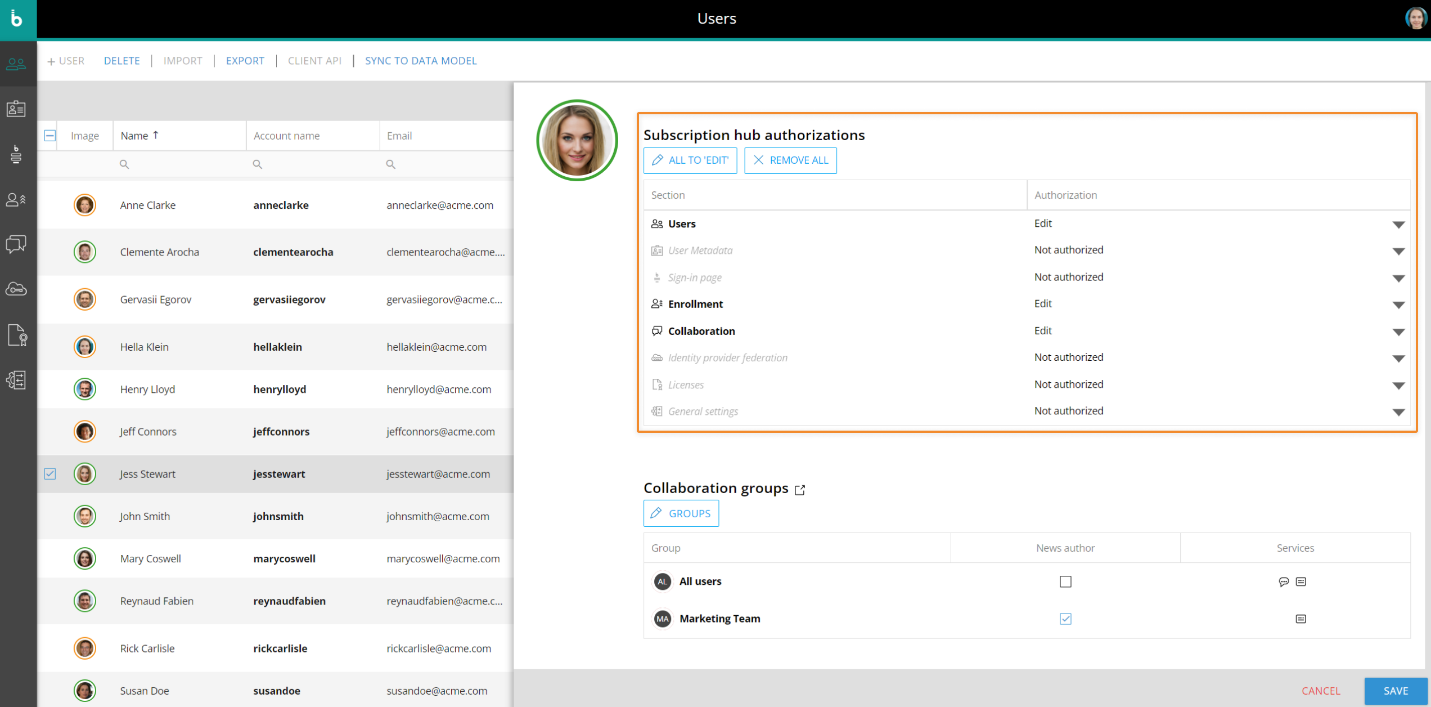
In the new "Subscription Hub authorizations" table in the User Profile panel, you can manage authorization levels for each Administrator.
The amount of information displayed and the ability to edit it is defined by two authorization levels:
Edit - The user can access the corresponding sections and make changes.
Not authorized - The user cannot access the corresponding sections.

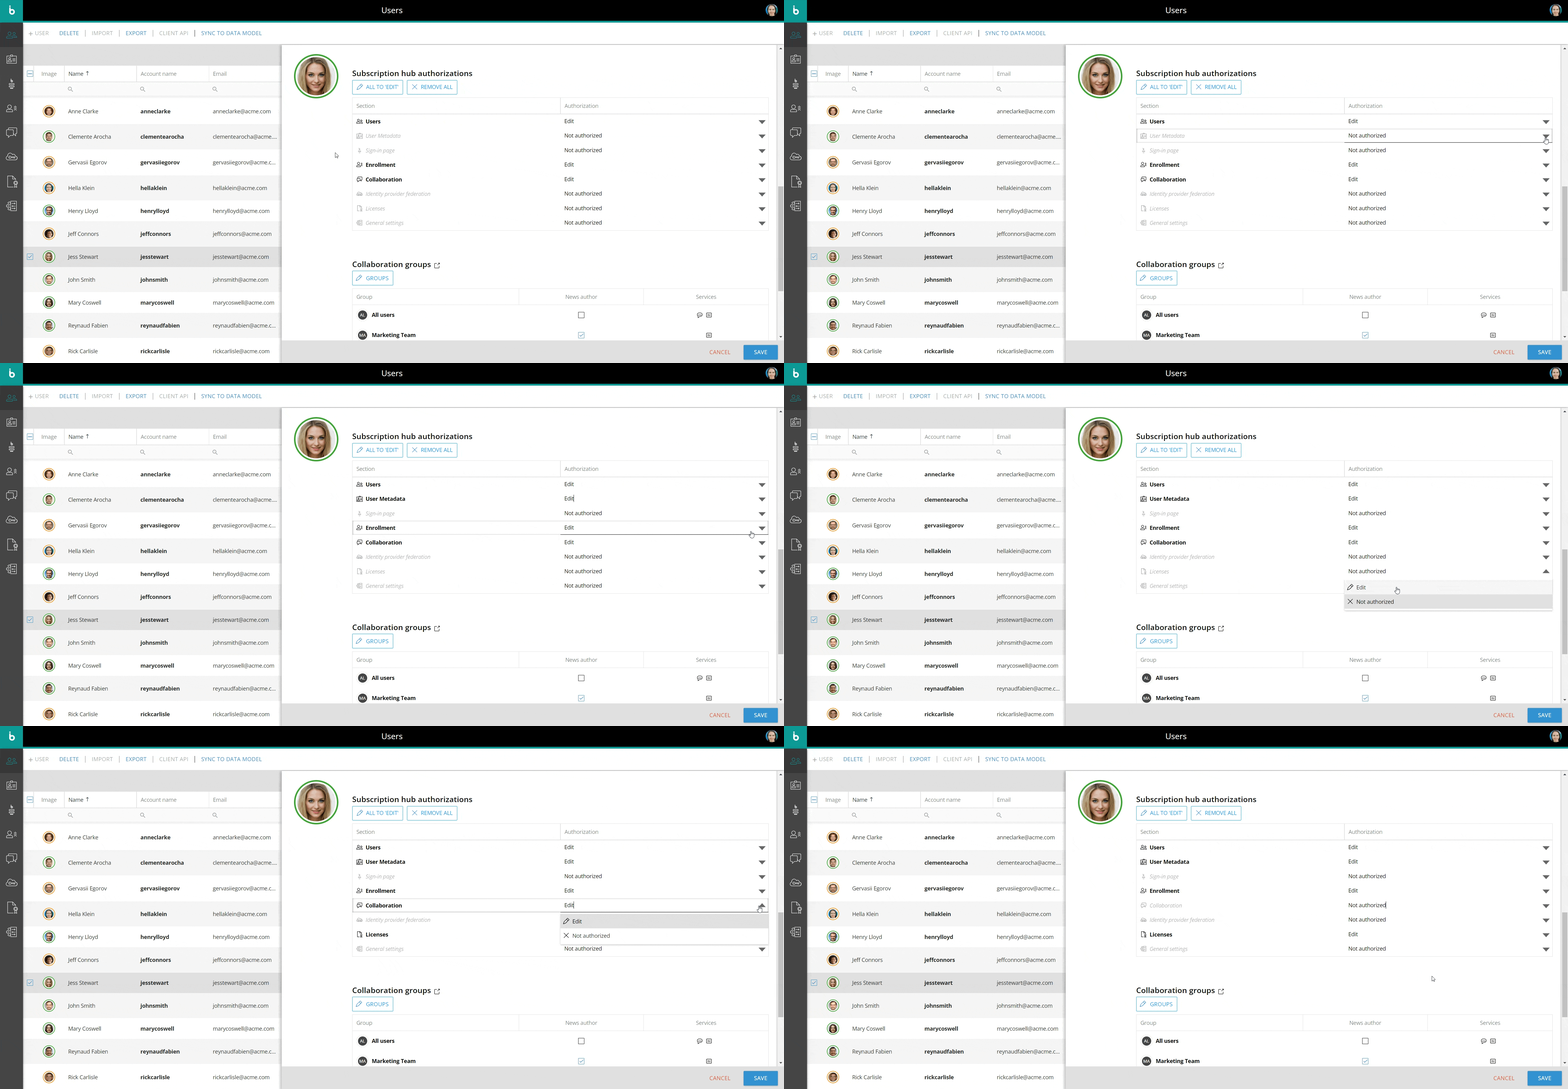
To edit authorizations, click the downfacing arrow at the end of each row and select the desired setting.

The "ALL TO EDIT" button sets all authorizations to "Edit", while the "REMOVE ALL" button sets all authorizations to "Not authorized".
When a user has at least one authorization level set to "Edit", he/she will automatically be considered a Subscription Hub Administrator, regardless of his/her Board license and Platform-specific permissions. Consequently, he/she will be eligible to become an approver in a manual approval enrollment process. When an Administrator logs into the Subscription Hub, the side menu and the administration tiles will reflect his/her authorization settings: sections set to "Not authorized" won't be visible and won't be reachable, even using a direct URL.