This topic describes the Procedure Actions included in the Broadcasting Action group and their specific properties.
The Broadcasting Actions allow you to send Presentations via email to a specified list of recipients, in different file formats. The Presentations can also be exported to specific paths within your Board environment.
When Broadcasting is part of a Procedure, it can only be launched from the Procedures menu by a Developer or by a Planner from a button configured with a Capsule Procedure. When Broadcasting is part of a Procedure, it cannot be launched or scheduled from the Task Scheduler nor from a Board Public API. This will throw an error.
The Broadcasting Action group offers the following steps:
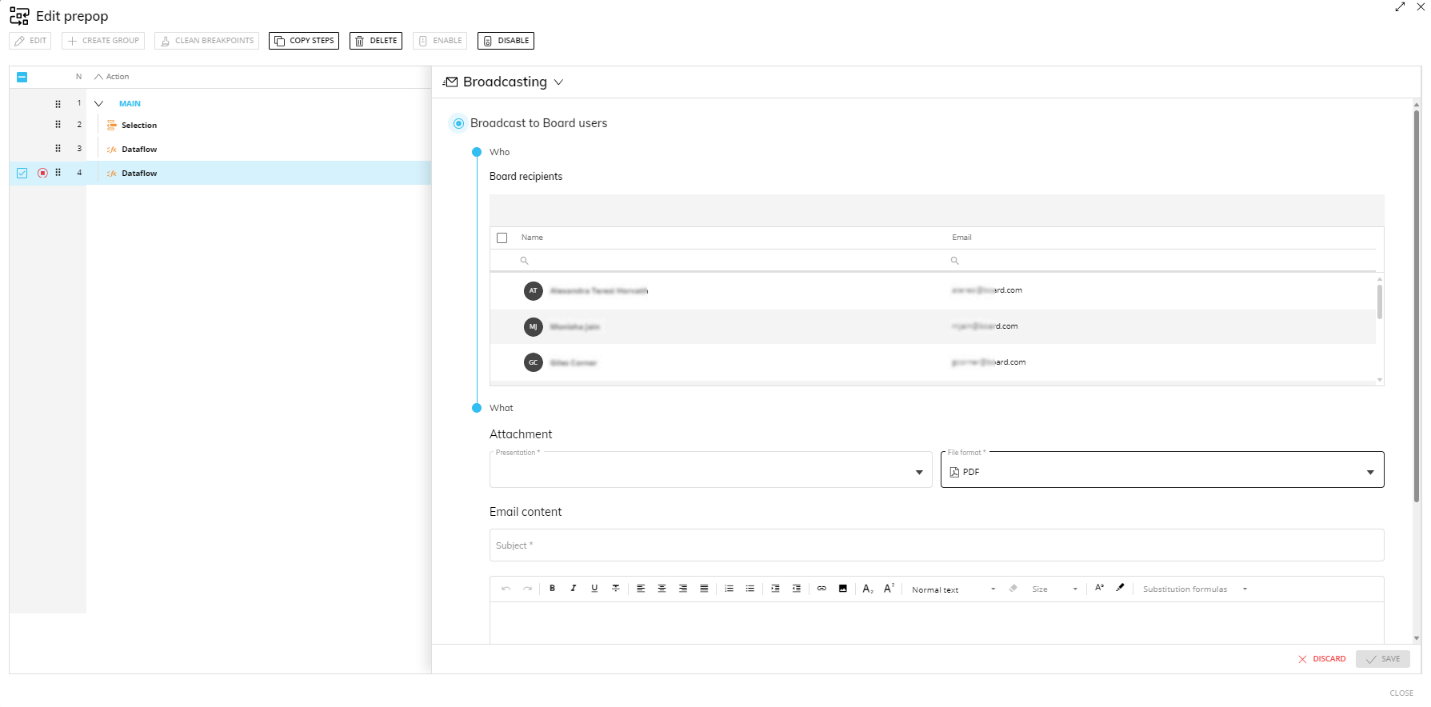
Broadcast to Board users
This step allows you to send an existing Presentation to a list of manually-selected Board users.
To configure this step:
Choose the Board users to whom you want to send the Presentation in the "Board recipients" section. You can select or deselect them by clicking on the checkbox to the left of each user’s name.
Please note that only users with an email associated with their Board account will be shown. See this page for more information about configuring Board users.
Choose the desired Presentation from the "Presentation" dropdown list.
Choose the desired format for the attached Presentation (PDF, MS Word, MS Excel, MS PowerPoint) from the "File format" dropdown list.
Enter the subject of the Broadcast email in the "Subject" field.
Enter the email body in the "Message body" section (optional).
Click "ADD" to save the step.
This step also supports Substitution Formulas and Metadata variables in the "Subject" and "Message body" fields.
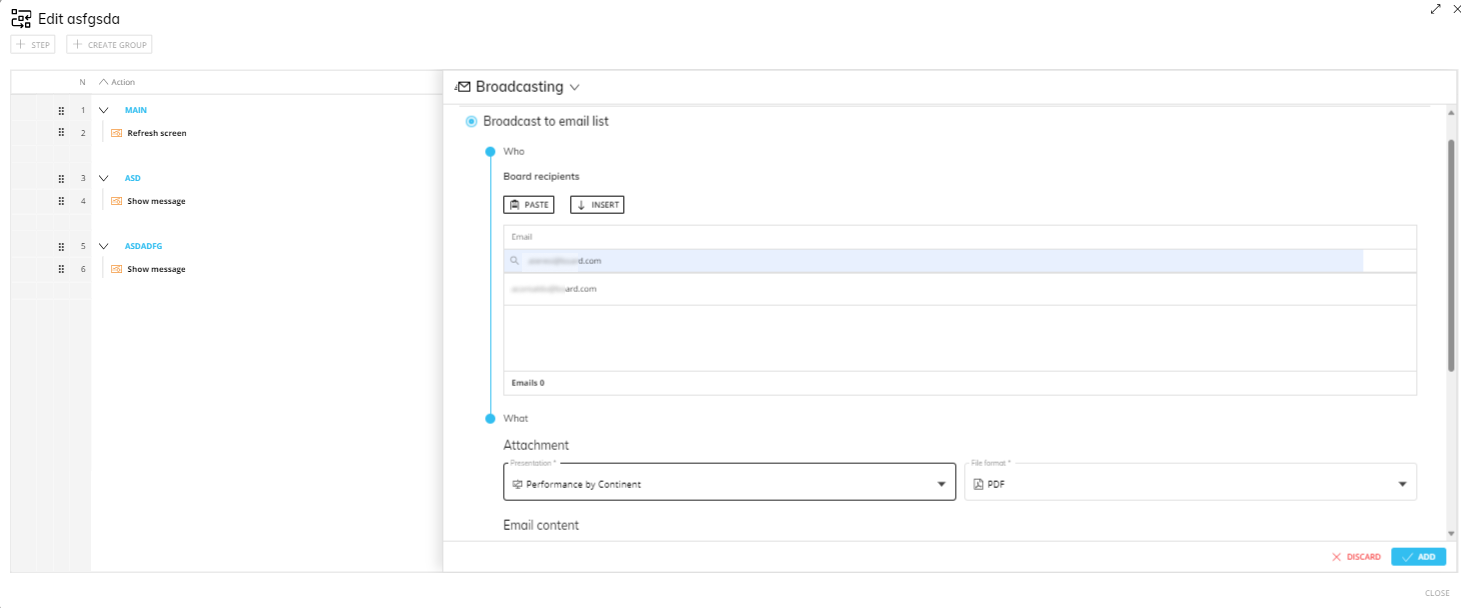
Broadcast to email list
This step allows you to send an existing Presentation to a list of manually entered email addresses.
To configure this step:
Enter the email addresses of the recipients you want to send the Presentation to in the "Recipients" section.
To add an email, click the INSERT button and enter the email address in the text field and click "Enter" on your keyboard. You can add only one email address at a time.
To remove an email address, hover over it and click the "X" icon at the end of the row.Choose the desired Presentation from the "Presentation" dropdown list.
Choose the desired Presentation format (PDF, MS Word, MS Excel, MS PowerPoint) from the "File format" dropdown list.
Enter the subject of the Presentation email in the "Subject" field.
Enter the body of the email in the "Message body" section (optional).
Click "ADD" to save the step.
This step also supports Substitution Formulas and Metadata variables in the "Subject" and "Message body" fields.
Advanced broadcast rule
This step allows you to send emails using a Board Layout to extract all information to compose the email message: email addresses, message bodies, and email subjects will be retrieved from the Data Blocks configured in the associated Layout.
Unlike the steps described above, this step does not require a Presentation attached, so you can use it to automatically send emails without attachments.
To configure this step:
Click on CONFIGURE LAYOUT to configure the Layout with Data Blocks (usually text Cubes) containing the information needed to compose the email message, then associate them to the correct field as described below:
Address Block (required). Select the Data Block that contains the email addresses of the recipients.
CC Block (optional): Click on "+CC BLOCK" to add a dropdown menu where you can add a Data Block that contains the email addresses of people you want to send a copy of the email ( CC, "carbon copy") to, apart from the recipients identified through the "Address Block" field. Click the trash icon next to it to delete this field.
BCC Block (optional). Click on "+BCC BLOCK" to add a dropdown menu where you can add a Data Block that contains the email addresses of people you want to send a "hidden" copy of the email (BCC, "blind carbon copy") to, without allowing other recipients to see that someone else has been sent a copy of the email. Click the trash icon next to it to delete this field.
Subject Block (optional). A Data Block that contains the subject of the email in which you can select from the dropdown menu in step #3, unless you choose to write a custom subject line. If you choose "Custom subject", the "Subject" field to the right of the dropdown menu will be required to fill in manually.
Message body Block (optional). A Data Block that contains the message body of the email in which you can select from the dropdown menu in step #4, unless you choose to write a custom message body. If you choose "Custom body", the message field below the dropdown menu will appear for a custom message.
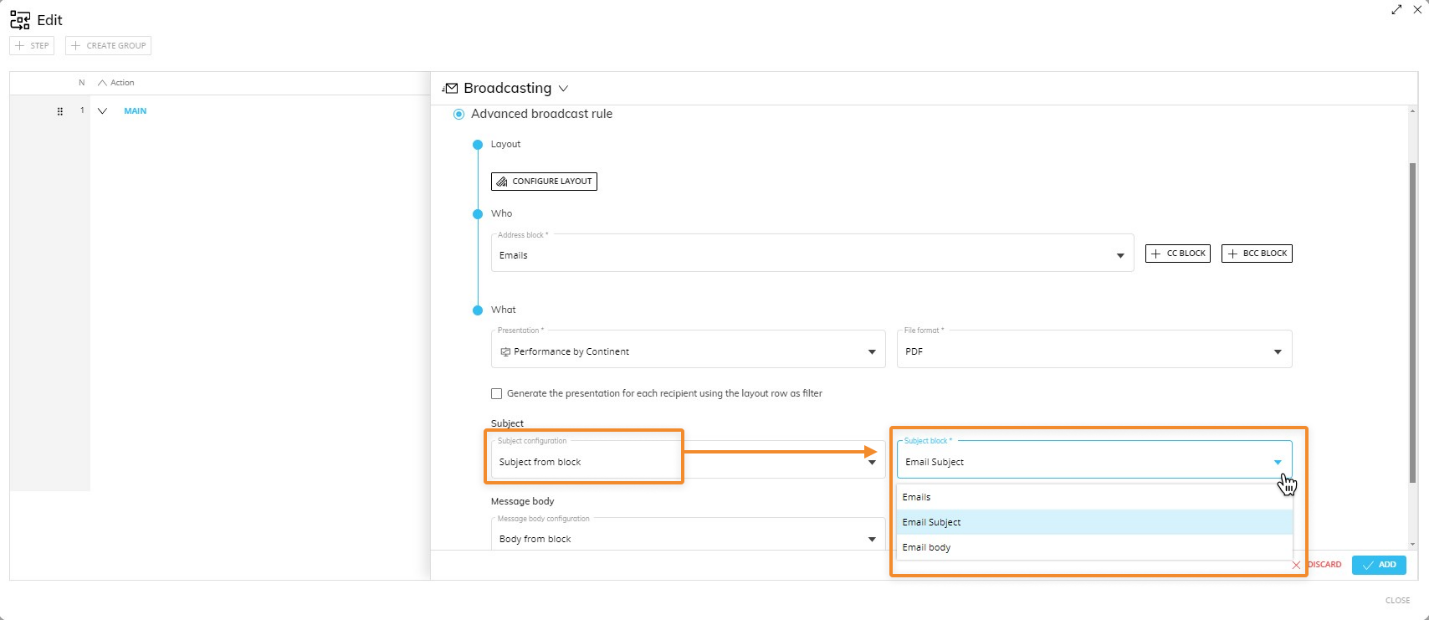
To add a custom subject and message, choose the option from the dropdown menu to reveal the text fields.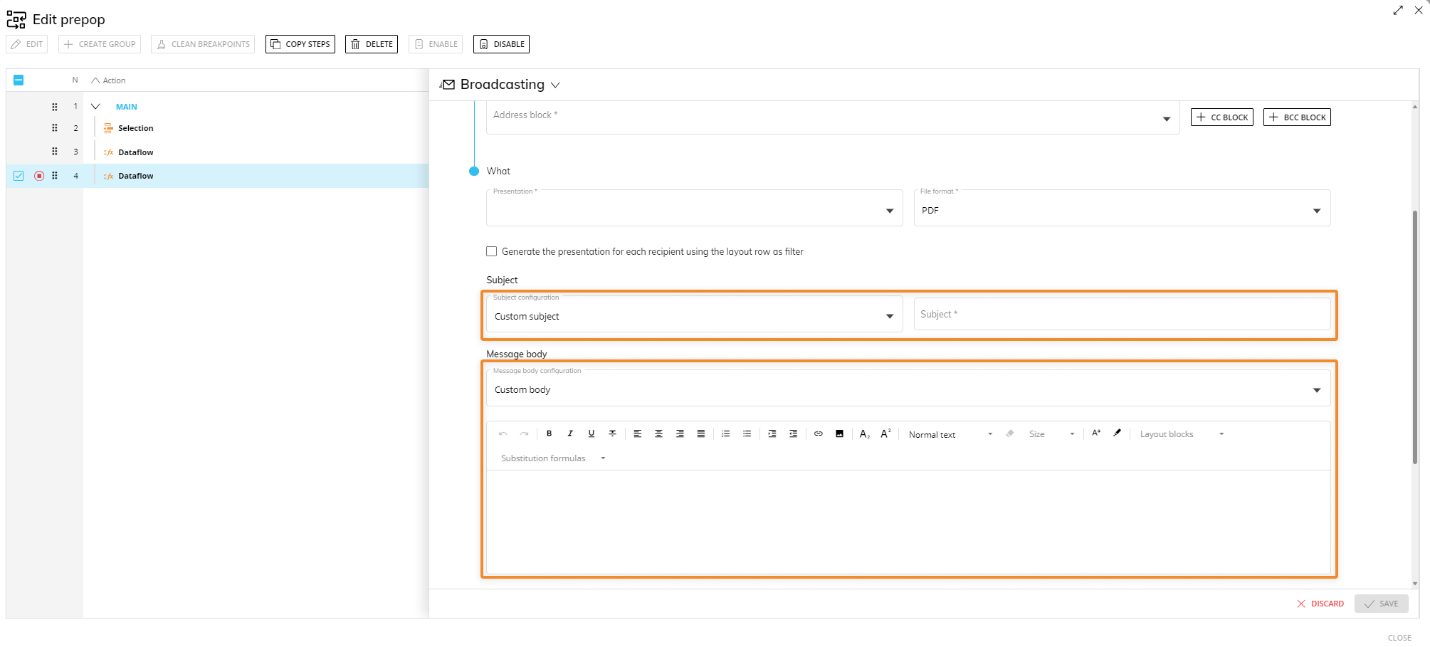
Enable the "Generate the presentation for each recipient using the layout row as filter" option and insert the desired Entity in the row axis of the configured Layout to filter the Presentation: the data shown in the attached Presentation will be related to each member of the Entity (as if using a Pager for each Slide of the Presentation). Therefore, each recipient will receive a Presentation with data only related to the members of the Entity set By Row that are in the active selection.
For example, in the case where different area managers need reports of the countries they manage, you can dimension the Cube containing email addresses with a "Country" Entity and fill in the email of the Area Manager for each country. When configuring the Layout of the Procedure step, insert the address data Block (Cube containing email addresses) and insert the "Country" Entity in the row axis.
You should see a similar Layout: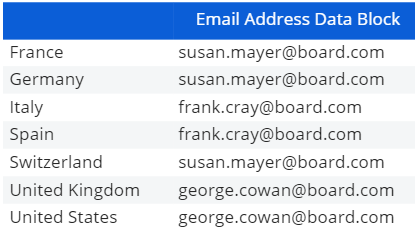
The result of this Layout is that each Area Manager will receive an email with a Presentation attached for each country he or she manages. Every attached Presentation will be filtered by showing data only related to each member of the "Country" Entity: Susan Meyer will receive three Presentations about France, Germany, and Switzerland, while Frank Cray and George Cowan will receive two Presentations each, about Italy and Spain and about the United Kingdom and the United States, respectively.
For this option to work, the Layouts in the Presentation must also contain data related to the Entity set as a filter (i.e. the "Country" Entity in the example above).The option is disabled by default and, in this case, the Presentation attached to the email will be the same for all recipients.
For the three steps described above, Board Substitution Formulas and Layout Blocks can also be included in the message body (provided a Layout has been configured in the "Advanced broadcast rule" step or in the "Export presentation to file" step). You can either choose them from the "Layout Blocks" and "Substitution Formulas" menus on the top right of the message body field or you can manually enter them into the message body. This step also supports Metadata variables in the “Subject” and "Message body" fields.
Choose the desired Presentation you want to send from the "Presentation" dropdown list and the desired format: Excel (.xlsx), PDF, Word (.docx), PowerPoint (.pptx).
Configure a subject line. Choose either "Custom subject" or "Subject from Block" from the dropdown menu where you will either write the subject in the field to the right or choose a Block that was configured in the Layout configuration of step #1 from the dropdown menu that appears to the right, respectively.
Configure a message body. Choose either "Custom body" or "Body from Block" from the dropdown menu where you will either write a custom message in the field below or choose a Block that was configure in the Layout configuration of step #1 from the dropdown menu that appears to the right, respectively.
Click "ADD" to save the step.
Export presentation to file
This step allows you to export a Presentation to a file, in a specified directory.
To configure this step:
Choose the Presentation you want to export from the "Presentation" dropdown list.
Choose the desired Presentation format from the "File format" dropdown list. The available formats are: Excel (.xlsx), PDF, Word (.docx), PowerPoint (.pptx).
Choose the directory where the Presentation will be exported from the "Output folder" dropdown list. The "Board\Export" path is the default.
If needed, you can enter the path of a subfolder in the "Subfolder" field. That subfolder must be a valid subfolder of the output folder defined in the previous field.
Enable the ”Multiple files" option to generate multiple files using the Layout row as a filter. Next, click on "CONFIGURE LAYOUT" and insert the desired Entity in the row axis to filter the Presentation for each member of that Entity (as if using a Pager for each Slide of the Presentation): the Presentation will be exported into multiple files with the same name as each Member related to the Entity chosen as a filter, and each file will contain data only related to each Member of that Entity.For this option to work, the Layouts in the Presentation must also contain data related to the Entity set as a filter.
The exported filename will have the following format: PresentationTitle_Member.xxx, where "Member" is the member code, description, or both, depending on the "Display" property of the Entity chosen as a filter (for example, "Monthly report_June").
Click "ADD" to save the step.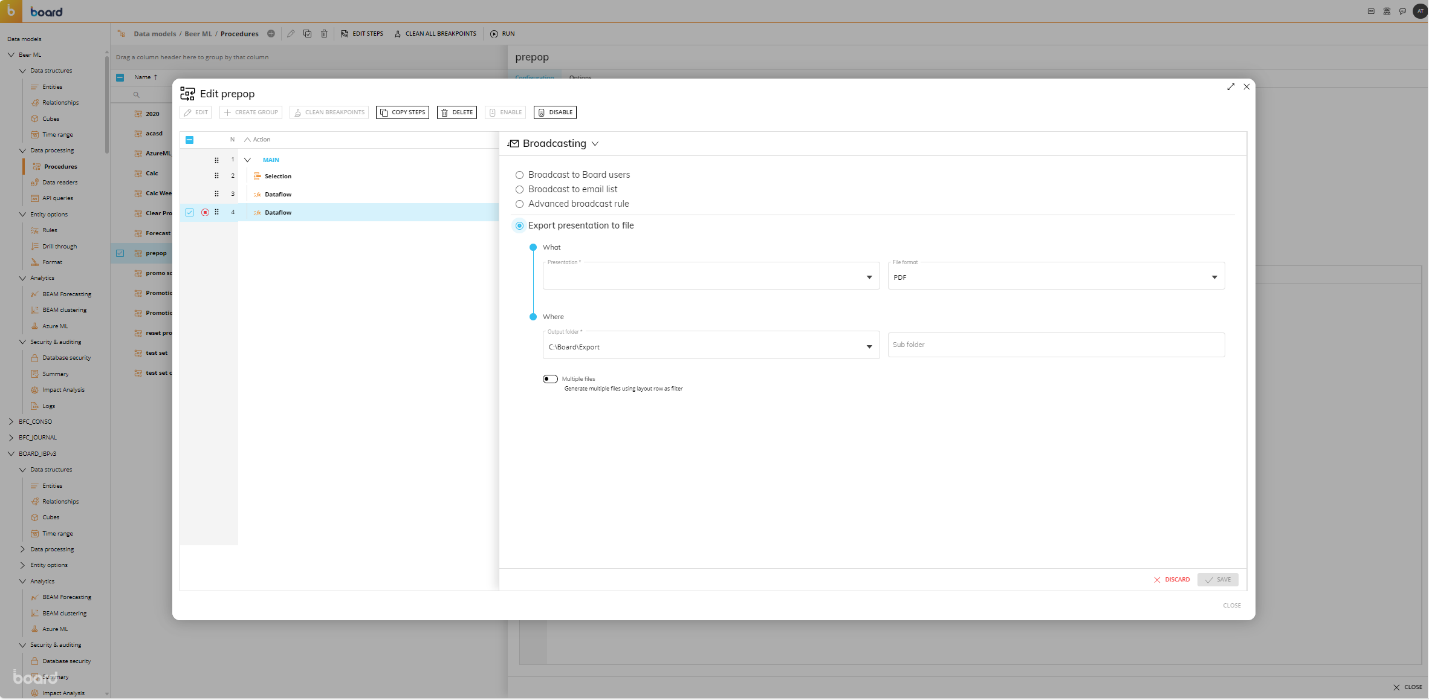
This step supports the following Substitution Formulas in the "Subfolder" field: @User, @UserName, @Database, and all the @Date variants except @Datetime. In addition, environment variables such as %bss% can also be used in the "Subfolder" field.
By design, when multiple "Export presentation to file" Procedure steps are configured with the same target folder, each subsequent step always replaces the last exported file in the target folder with the new one. To save multiple files, use a different target folder for each step.
In the case of a Capsule Procedure, the Data Model dropdown menu allows you to select the Data Model on which the Procedure step will be executed, except in cases where the Procedure step has specific options that act on other Data Models (for example, the "Save Pending Changes to Disk" step in the "Advanced Action Group" can be configured to act on all Data Models or only on the Data Model where the Procedure resides).