This topic describes how to create a new Cube and all available options.
Creating a new MDB (MOLAP) Cube
An MDB Cube is a Cube whose data is physically stored into the Board multidimensional Data Model.
To create a new MDB Cube, click on the orange plus icon  in the top left corner next to "Cubes" to open the Cube creation wizard.
Once the Cube creation wizard is open, proceed as follows:
Step 1 - Properties. Fill in all fields and enable options as required.
Name. The Cube name that will be shown in the Capsule environment and in the Procedure designer.
Group. The logical group in which the Cube will be added. To create a new Group, type its name in the field and click "Enter": the group will be created and will be available for other Cubes once the new Cube has been saved.
When your Data Model includes a large amount of Cubes it might be difficult locating a specific Cube or understanding the purpose of all Cubes listed in the Cubes table. Just like with Entities, we strongly recommend that you logically group Cubes using the Group field in the Cube metadata panel. Groups are not part of the multidimensional Data Model (i.e. they cannot be used in reports or Procedures): the only purpose of groups is to improve viewing and searching through the list of Cubes.
Data Type. The Cube data type. Depending on the data type selected, additional fields will appear:
for Text Cubes, you can choose between two possible Text Sub Group settings: Rich Text format, to store text information in Rich Text Format, and None.
for BLOB Cubes (Picture, Excel, Word, PowerPoint, Custom, or PDF), you can specify the file format that the Cube will accept. If you upload a file type that’s not allowed, an error message will display.
Your title goes here
Choosing "Custom" allows you to define any desired file extension in the "Blob extension" field.
Delete the pre-filled text in the "Blob extension" field for the option "Custom" to allow the BLOB Cube to load any type of file of different heterogeneous formats.
Cube type. The Cube type, in our case "MDB".
Copy an Existing Cube
Another way to create a Cube is to copy an existing one. This allows you to clone an existing Cube definition and import all its settings, including its structure and the dense/sparse configuration. To do so when creating a new Cube, select an existing Cube in which you want to copy its structure from the Cubes page and click the copy icon
 at the top of the page. Rename the new Cube.
When done, click on the "NEXT" button to go to step 2.
Copying a Cube’s structure can also be done after a Cube is created. To do so, select an existing Cube, go to the "Structure" tab within the properties panel and click on the "COPY EXISTING CUBE" button at the bottom. Choose the Cube that has the structure you would like to use to replace the Cube you are editing.
Step 2 - Structure. Select the Entities that will be used as dimensions of the Cube: this is usually the most detailed version of the Cube, also called "primary version" or "structure".
This is a key aspect, as it will affect how the data is stored and aggregated, as well as allowing for "drilling" into the data from a more-aggregated view (at a lower level of detail) to a less-aggregated view (at a higher level of detail).Selected Entities are automatically set as dense or sparse by the system. If needed, you can configure the sparsity manually by clicking on the "EDIT SPARSITY" button in the bottom left of the window: once you're in the sparsity configuration page, click on the circle next to the selected Entities to cycle through the available configuration settings (green/sparse, blue/dense, or unselected). You can also change the Cube structure, if needed.
Learn more about Cube sparsity and how it works.
From this step you can only define the main Cube structure: to create different Cube versions, complete the Cube creation wizard, select the Cube again and click on the "Versions" tab.
It is possible to define a Cube whose structure consists only of a Time Entity (single dimension Cube), such as Month or Year. In this case, all time functions (Previous Period, Yearly Cumulated Value etc.) and the Replace option of the Data Reader are ignored. For this reason, it is recommended that Cubes having a time dimension in their structure have at least one other dimension.
By default, Board automatically puts all Entities in sparse mode as long as the product of Max item numbers stays below the 64-bit limit.
In case of automatic Max item numbers, affected Entities will be considered as having a corresponding Max item number greater than the current one while keeping the value below the 64-bit limit.
If the 64-bit pointer is not sufficient, Board will scale up to a 128-bit pointer. For Entities set as dense, however, there are no such limits.
When done, click on the "NEXT" button to go to step 3.
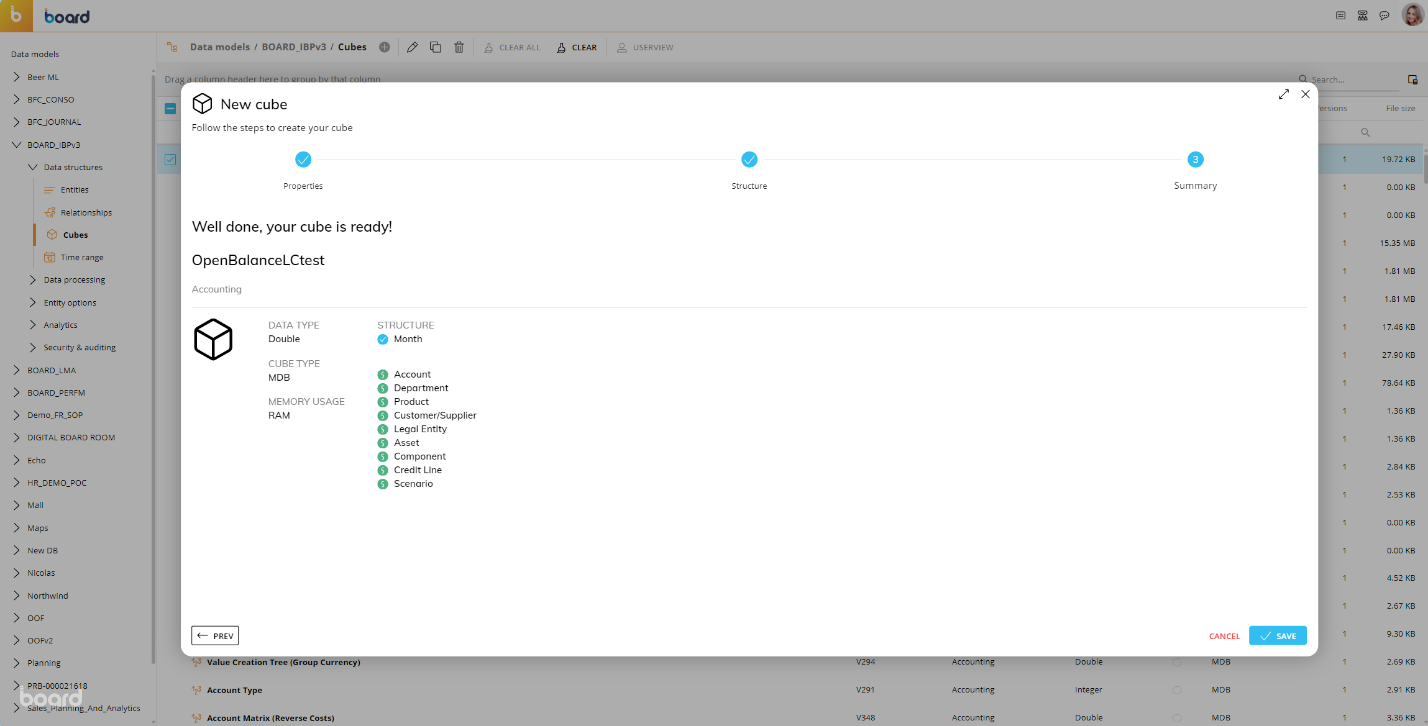
Step 3 - Summary. The last step provides a summary of the Cube attributes and configuration. Click on the "SAVE CHANGES" button to create the Cube and close the wizard.

In the Cube creation wizard, you can always return to previous steps by clicking on the "
 PREV" button on the bottom left.
A MOLAP Cube must have at least 1 Entity set to Sparse. If you set all as dense, the Entity with the most members will automatically be set to Sparse.
Creating a new RDB (ROLAP) Cube
An RDB Cube is a Cube whose data is physically stored in a table of an external relational database and not into the Board multidimensional Data Model. The RDB Cube definition is a Data Reader protocol that maps fields of an external relational table to the dimensions of the Cube.
Whenever a user views data coming from an RDB Cube in a report, an ODBC or an OLE DB connection to the external relational database is established and data is retrieved on the fly from the relational table through a SQL statement.
Before you can create a new RDB Cube, you must first set up the relational database with a Data Reader. Read more about creating a Data Reader for an RDB Cube.
To create a new RDB Cube, click on "+ CUBE" to access the Cube creation wizard.
Once you're in the Cube creation wizard, proceed as follows:
Step 1 - Properties. Fill in all fields and enable options as required.
Name. The Cube name that will be shown in the Capsule environment and in the Procedure designer.
Group. The logical group in which the Cube will be added. To create a new Group, type its name in the field: the group will be created and will be available for other Cubes once the new Cube is saved.
When your Data Model includes a large amount of Cubes, it might be difficult locating a specific Cube or understanding the purpose of all Cubes listed in the Cubes table. Just like with Entities, we strongly recommend that you logically group Cubes using the Group field in the Cube metadata panel. Groups are not part of the multidimensional Data Model (i.e. they cannot be used in reports or Procedures): the only purpose of groups is to improve reading and searching through the list of Cubes.
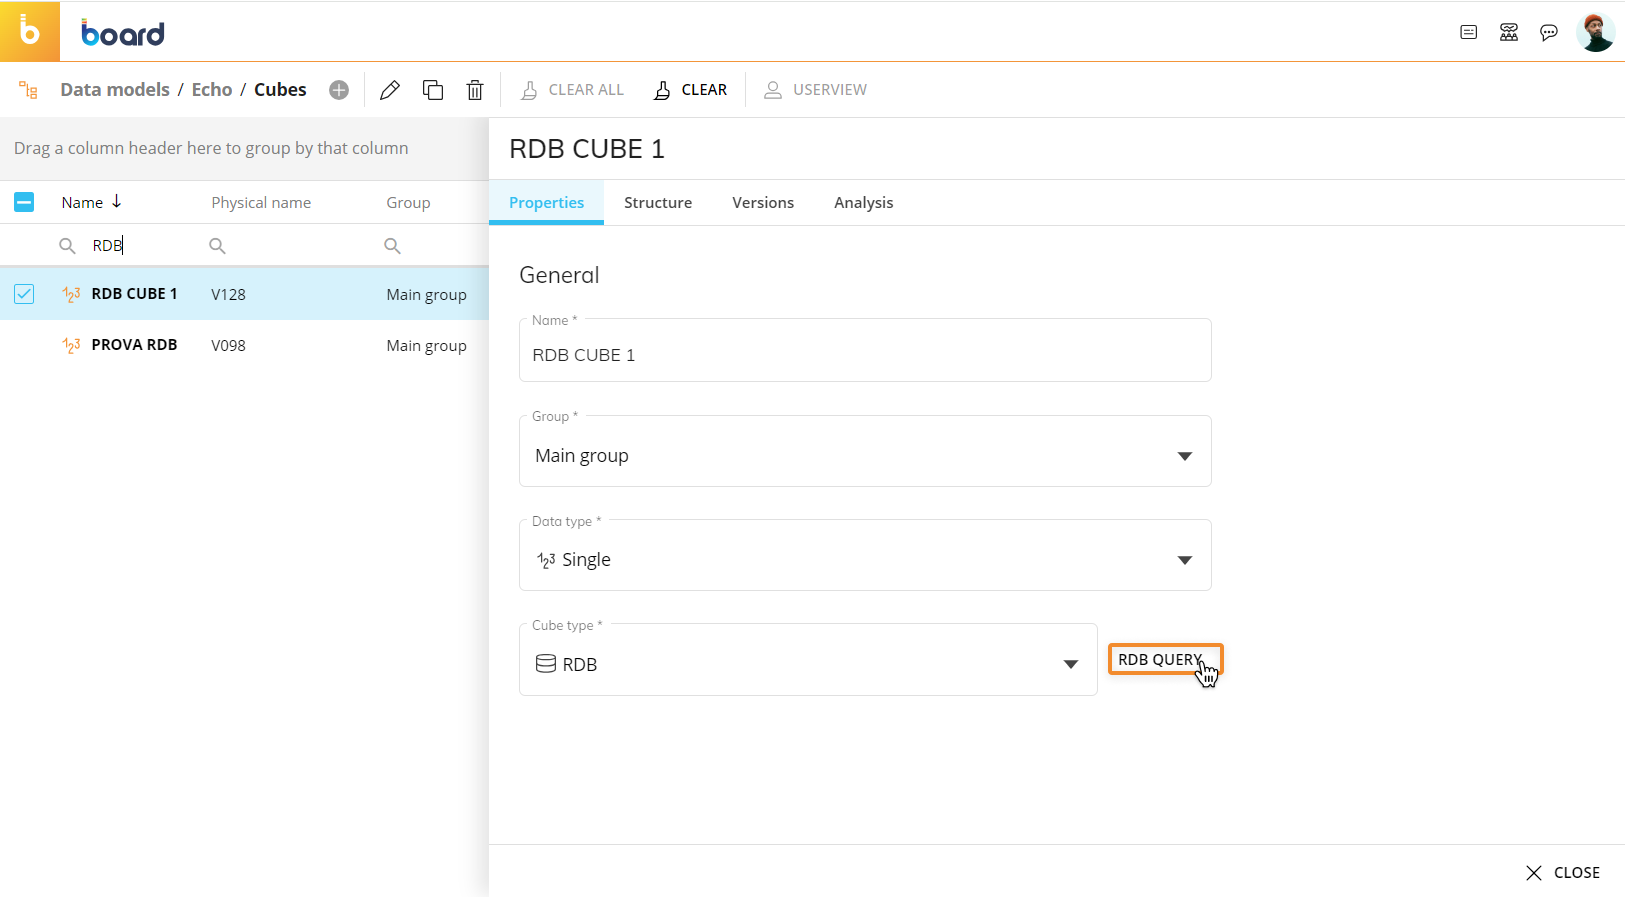
Data Type. The Cube data type.
Cube type. The Cube type, in our case RDB.
Click "SAVE" to continue to step 2.
Copy an Existing Cube
Another way to create a Cube is to copy an existing one. This allows you to clone an existing Cube definition and import all its settings, including its structure and the dense/sparse configuration. To do so when creating a new Cube, select an existing Cube in which you want to copy its structure from the Cubes page and click the copy icon
at the top of the page. Rename the new Cube.When done, click on the "NEXT" button to go to step 2.
Copying a Cube’s structure can also be done after a Cube is created. To do so, select an existing Cube, go to the "Structure" tab within the properties panel and click on the "COPY EXISTING CUBE" button at the bottom. Choose the Cube that has the structure you would like to use to replace the Cube you are editing.
Step 2 - Structure. Select the Entities that will be used as dimensions of the "primary version" (also called "structure") of the Cube. RDB Cubes can only have one version.
This is a key aspect, as it will affect how the data is stored and aggregated, as well as allowing for "drilling" into the data from a more aggregated view (at a lower level of detail) to a less aggregated view (at a higher level of detail).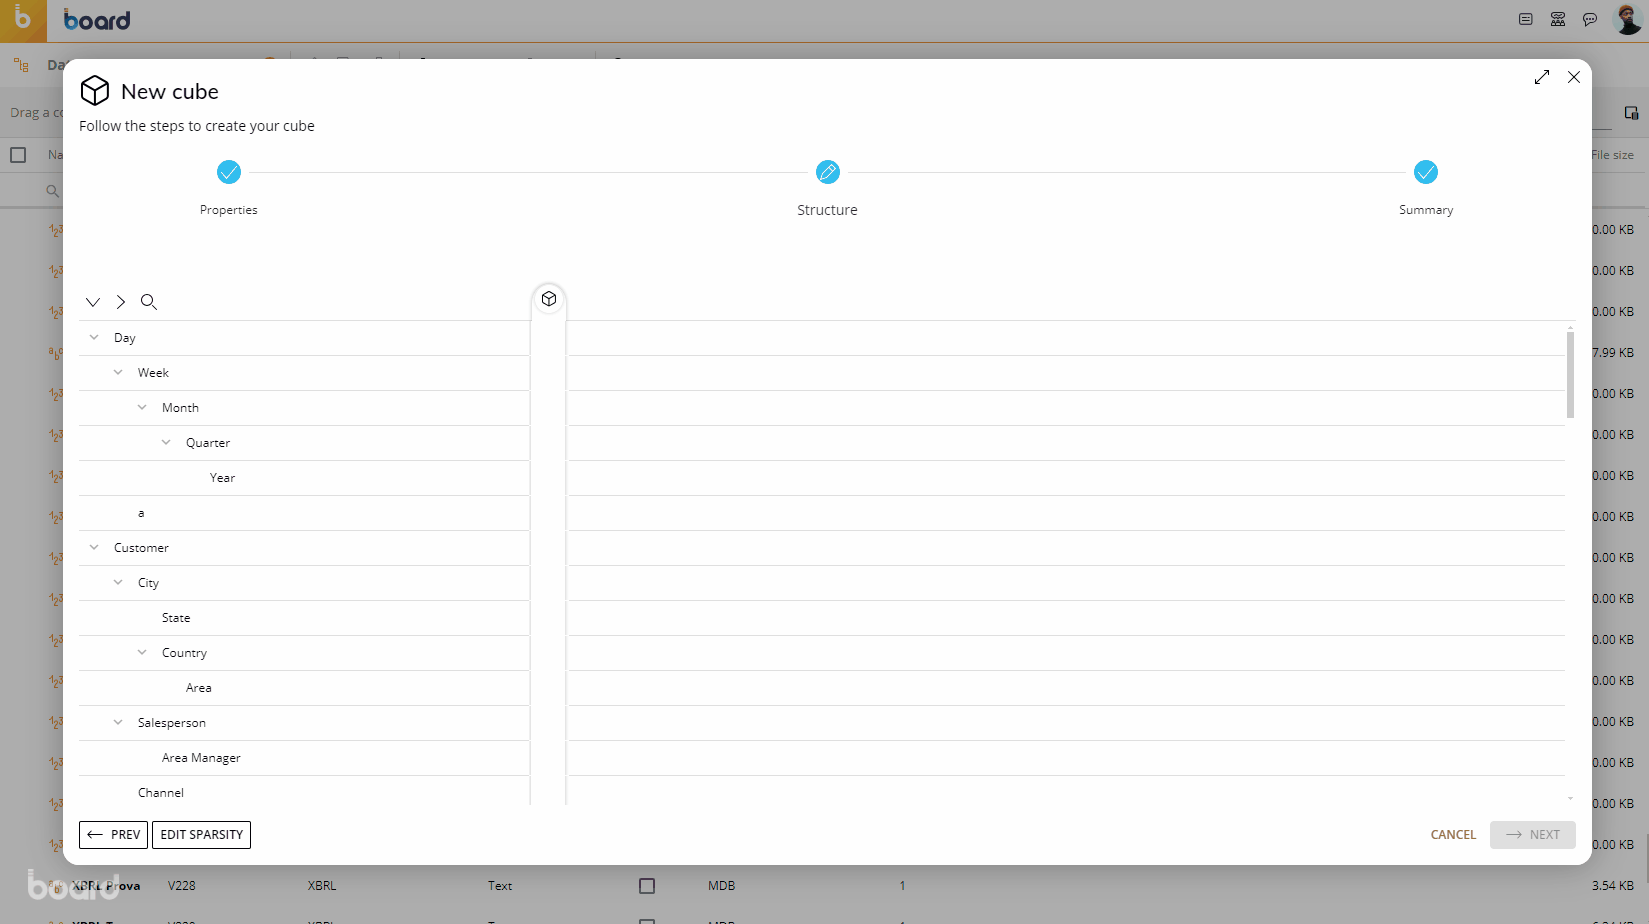
It is possible to define a Cube whose structure consists only of a Time Entity (single dimension Cube), such as Month or Year. In this case, all time functions (Previous Period, Yearly Cumulated Value etc.) and the Replace option of the Data Reader are ignored. For this reason, it is recommended that Cubes having a time dimension in their structure have at least one other dimension.
RDB Cubes can only have one version.
RDB Cubes can only have dense Entities in their structure.
Once the Cube structure has been defined, click on the "RDB QUERY" button to set up a new Data Reader protocol (if not already done so in step 1) that will be used to retrieve data from the external database on the fly: create a new data source connection or select an existing one, then map the fields of the external database table to the dimensions of the Cube.
See Creating a Data Reader protocol for more details.When done, click on "Next" to go to step 3.
Step 3 - Summary. The last step provides a summary of the Cube attributes and configuration. Click on the "SAVE CHANGES" button to create the Cube and close the wizard.
In the Cube creation wizard, you can always return to previous steps by clicking on the "
 PREV" button on the bottom left.
Cube creation guidelines
When creating a new Cube, please consider the following points:
A Cube can have a structure from one to 32 dimensions. Typically, the number of dimensions of a Cube should not exceed 7 or 8. A Cube with more than 8 dimensions can be difficult for end users to understand and use. Before creating a Cube with more than 8 dimensions, consider revising your Data Model to reduce the number of dimensions.
A Cube can have up to 256 versions. Generally most Cubes have only one version. You should add other versions only when you really need them: if that is the case, usually four or five versions are sufficient. Only very rarely are more than 12 versions needed. If you have more than 12 versions of a Cube, analyze if each version is really needed or not.
Each version of a Cube must include at least one Entity set as sparse.
The product of the Max item number of dense Entities has no limits while the product of the Max item number of sparse Entities must be less than 7.8x10^28 (please note that those numbers are approximations).
Newly created Cubes and Entities will always be assigned new identifiers (Physical name and IDX for Cubes, and Physical name and Export name for Entities), instead of being assigned those that were previously associated with Cubes and Entities that had been deleted. For example, if you create Cube 1, Cube 2, and Cube 3, their Physical names would be V0001, V0002, and V0003, respectively. If you delete Cube 2 and then create a new Cube 4, the Physical name assigned to it would be V0004, instead of V0002.