This section is about the Excel Add-in Sheet Selection, Workbook Selection, and Pagers; how to configure, edit, and reset them; and how to use Dynamic Selections directly from your Excel application with the Board Add-in.

Sheet Selection. Creates a Select only on the current Sheet opened.
Workbook Selection. Creates a Select on the whole Workbook, meaning the Select will apply to all the Sheets created in the Workbook.
Dynamic Selections. Allows users to dynamically filter data based on the current period or based on data contained in other Cubes.
Pagers. Allows users to easily apply a Sheet Selection based on a single member of a given Entity.
Select Settings. Additional settings for the Select.
To configure a selection, click on the menu button for "Sheet Selection" or "Workbook Selection" and a popup window will appear.
The popup window consists of Data Model tabs and a chart of Entities within each tab.
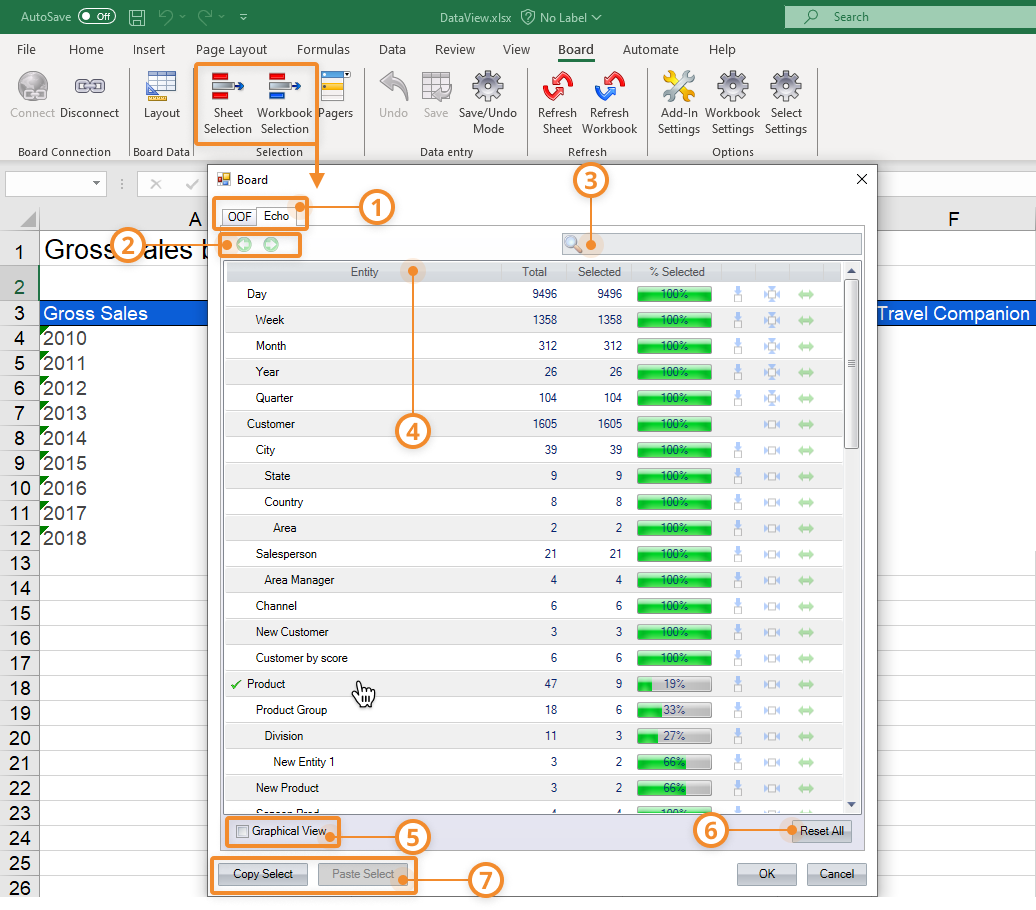
Below is what you see in the Selection window:
Data model tabs. A tab for each Data Model used in the Sheet for Sheet Selections or the Workbook for Workbook Selections is displayed at the top.
Left and right arrows. Below the tabs, you will see green left and right arrows to initiate an undo or redo.
Left arrow. Undo the Select action.
Right arrow. Redo the Select action.
Search bar. Search for an Entity in the list below.
Entity table. In the Entity table, you can select the Entities and their members to configure a selection.
Entity. Lists the available Entities of the selected Data Model. When you make a select on a particular Entity, a green checkmark will appear to the left of the Entity name in this column.
Total. Reports the number of members the Entity has in total.
Selected. Reports the number of members selected on that Entity if selected. If the Entity is not selected, the default is to show the same number as the Total column.
% Selected. Show the percentage of the members selected for each Entity in number and bar format. If the Entity is not selected, the default is show the "% Selected" at 100%.
Select Options. On the right of the "% Selected" column are three symbols to provide specific Select actions .
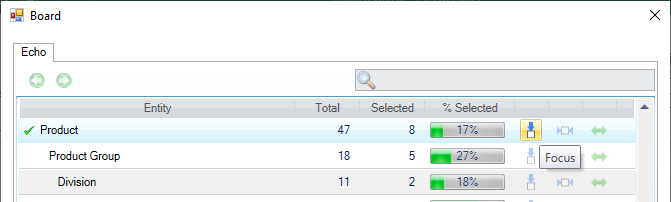
Focus. Allows you to reset the selection in the hierarchy, while the contents of the selected Entity remain fixed. Read the Focus function for more details.
Dynamic. Allows a dynamic selection based on the current period or based on data contained in Cubes. As the period and data changes over time, the selection will adapt accordingly. The function behaves differently depending on whether the Entity to which it is applied is a Time Entity or a Non-Time Entity. Read about how to configure a Dynamic Entity selection.

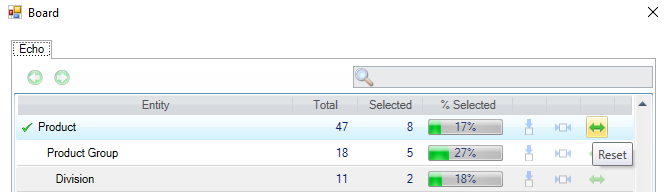
Reset. Resets the Entity selection.
Graphical View. View the Entities in graphical view. Select the Entity you want to apply a select on in the same way you would in the regular view. You cannot use the "Focus" or "Dynamic" selection features in this view.
Reset All. Resets any selections made to current Data Model tab open.
Copy/Paste Select. Copies a selection made or pastes the selection. When pasting a selection, the selection can only be pasted within the same Data Model. If you are working with multiple Data models, you can switch Data Models by selecting the correct Data Model tab for the selection above the Entity table (refer to number 1 in this list and image).
How to make a Selection
To make a selection:
Open the Selection window (for Sheet or Workbook).
Select the correct Data model tab in which you would like to apply a selection.
Make a selection: either a selection, a focus selection, or a Dynamic Selection.
Selection. Click on the Entity name in which you would like to apply a selection. When hovering over the name, the cell will highlight in yellow. A new popup window will appear. Choose all the members you would like to select or exclude and then click "Select" to select and "Exclude" to exclude.
The Entities available to a user to select in the Selection window can be regulated in the Select settings.
Focus. Allows you to reset the selection in the hierarchy, while the contents of the selected Entity remain fixed. See The Focus function for more details.
Dynamic selection. Read below how to make Dynamic Selections.
Click "OK" to apply the selection.
When both a Workbook Selection and a Sheet Selection are applied to the same Entity, the Sheet Selection takes precedence and overrides the Workbook Selection. The Sheet Selection is not nested within the Workbook Selection; once a Sheet Selection is defined, the Workbook Selection is completely replaced.
How to make Dynamic Selections
Non-time Entities
To apply a Dynamic Selection to Non-Time Entities:
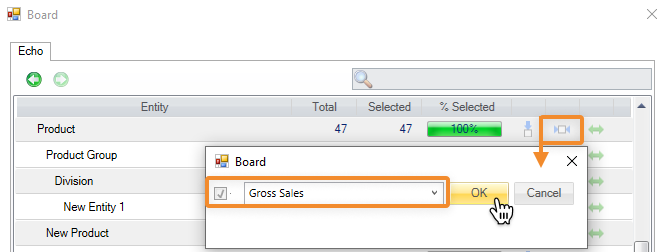
Click on the Dynamic Selection icon corresponding with the Entity in which you would like to apply it. Another popup window appears.
Select the checkbox to the left of the dropdown menu.
Choose the desired Cube you'd like to apply the Dynamic Selection on. A selection based on all Entity members that have nonzero value on the chosen Cube will be applied.
Click "OK" to apply.
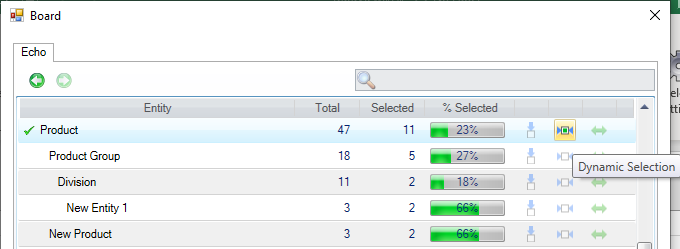
When a Dynamic Selection is made, the center of the Dynamic Selection icon will be filled in with blue like the image shows below.
Read more about Dynamic Selections here.
Time Entities
To apply a Dynamic selection to Time Entities:
Click on the Dynamic selection icon corresponding with the Entity in which you would like to apply it. Another popup window appears.
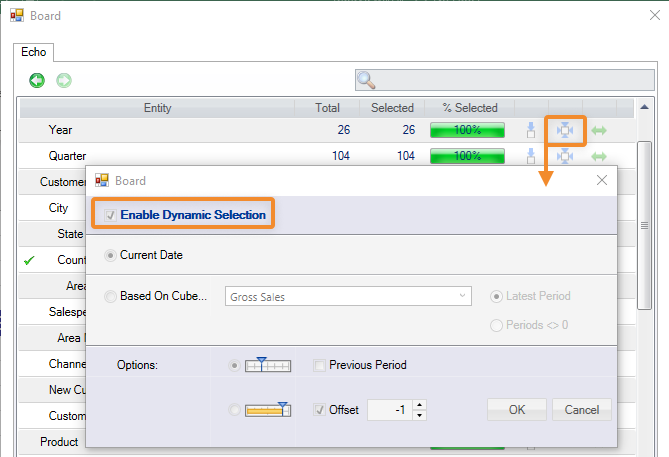
Select the checkbox labeled "Enable Dynamic Selection" to enable. The following options are available:
Current date (default). Selects the time period (day/weekday/week/month/quarter/fiscal year/year) based on the system date.
Based on Cube. Selects the time period based on the contents of a Cube, called driver Cube.
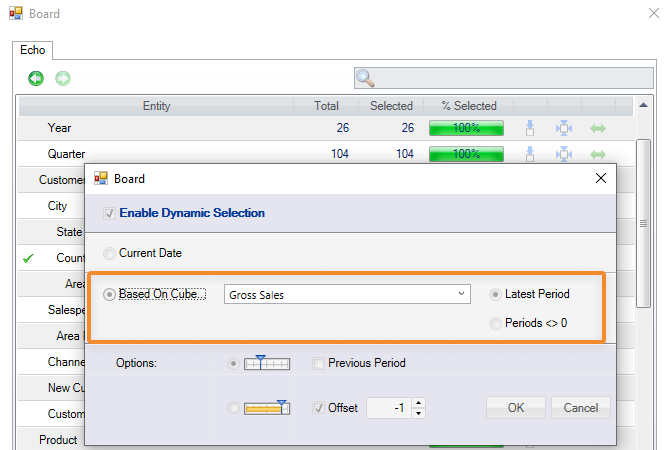
When "Based on Cube" is enabled, a Cube must be chosen in the dropdown menu and the following related configuration options become available:
Latest Period (default). Selects the latest available period with values in the Cube.
Options. For both "Current Date" and "Based On Cube", the following options are available:
Period (default). Selects only the period returned in the Latest Period.
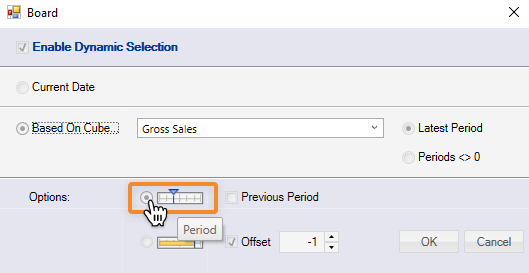
Year to date. Selects all the previous periods of the year the latest period is part of, including the period returned in Latest Period.

For both the "Period" and "Year to date" options the following optional settings are available:Previous period. Selects the period prior to the latest period with values in the Cube.
For example, if you're configuring the selection on the Month Entity based on a Cube whose latest data pertain to July 2021, the June-2021 member will be selected.Offset. Shifts the selection by "n" periods, where "n" is an integer number.
When the offset value is positive, the selection will be shifted forward in time. When the offset value is negative, the selection will be shifted back in time
Click OK to apply
Read more about Dynamic Selections here.
How to use Pagers
Pagers can be used in Excel Add-in similarly to how they are used in the Board Platform, providing a quick access to the Select function on a single Entity member, directly from an Excel Worksheet: typically, it's configured on an Entity whose members are the likely selection filters a user may want to apply to a dashboard. Pagers allow users to easily apply a Sheet Selection based on a single member of a given Entity: when you select a member, all all other Objects on the Sheet are immediately updated in order to show only data relating to the selected member.
To use Pagers:
Click on the Pagers button in the top menu of the Board Add-in. A side panel to the right of the Excel Sheet with the header "Pagers" appears.

Click the button "New Pager".
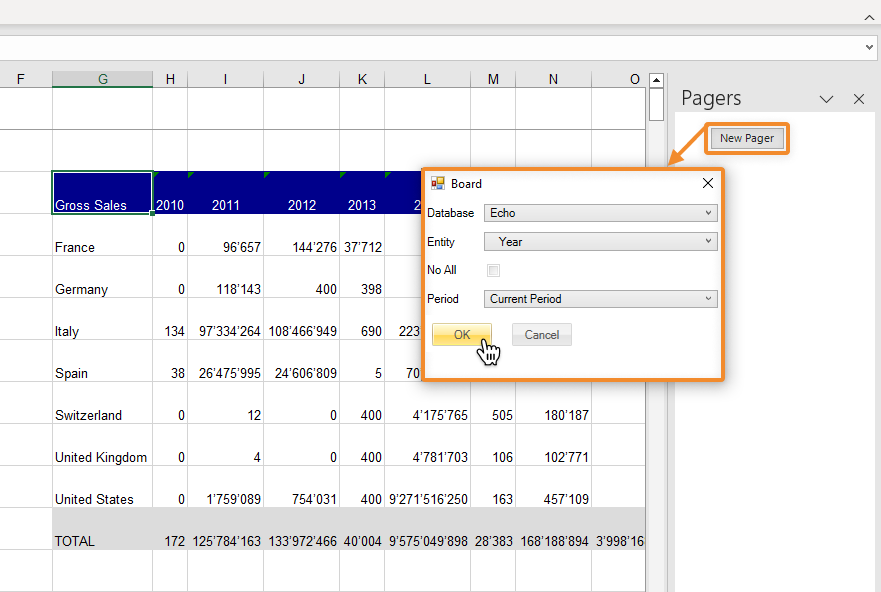
A popup window appears and the following options are available:Database. Lists the available Data Models. Choose the one you want to choose an Entity to associate with a Pager.
Entity. Lists the available Entities of the chosen Data Model. Choose one to apply to a Pager.
No All. If enabled, forces a Pager to have at least one item selected at any time. If no default member is defined, the member that occurs first in alphabetical or numerical order is automatically selected based on its code or description.
Period. Only available for Time Entities are the following options:
Current period. Sets the current time period (day/weekday/week/month/quarter/fiscal year/year) as default, based on the system date.
For example, if you're configuring the selection on the Month Entity and the current date is January 7, 2022, the "January 2022" member will be selected.Previous period. Sets the time period prior to the current one (day/weekday/week/month/quarter/fiscal year/year) as default, based on the system date.
For example, if you're configuring the selection on the Month Entity and the current date is January 7, 2022, the "December 2021" member will be selected.Last period. Sets the last time period (day/weekday/week/month/quarter/fiscal year/year) in the Time Entity as default.
For example, if you're configuring the selection on the Month Entity and the last member in it is "December 2022", that member will be selected by default
Click "OK" and the Pager will appear in the right-hand panel along with 2 buttons:
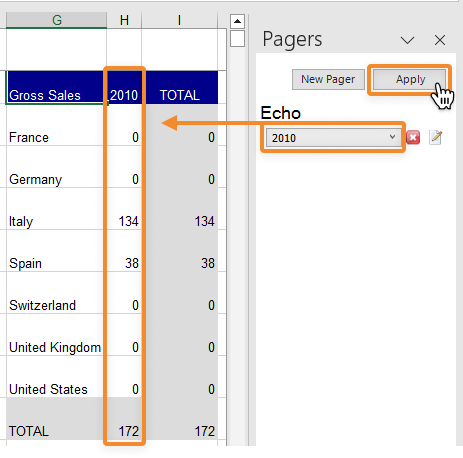
New Pager. Add a new Pager.
Apply. Apply the Pager selection, as described in the next step.
Select an Entity from the dropdown menu of the Pager and click "Apply" to apply it to the Sheet.
The Pager has 3 icons to the right of of the dropdown menu, which are as follows
Reset. Resets the current Pager selection, if one exists.
Remove
 . Deletes the Pager.
Edit
 . Edits the current configuration of the Pager.
Read more about Pagers here.
Select Settings
Select Settings offers Power Users and Developers the ability to manage the visibility of Entities in the Select window. Select Settings offers are only accessible by Power Users and Developers.
To restrict the visibility of Entities available for Planners when making a Select:
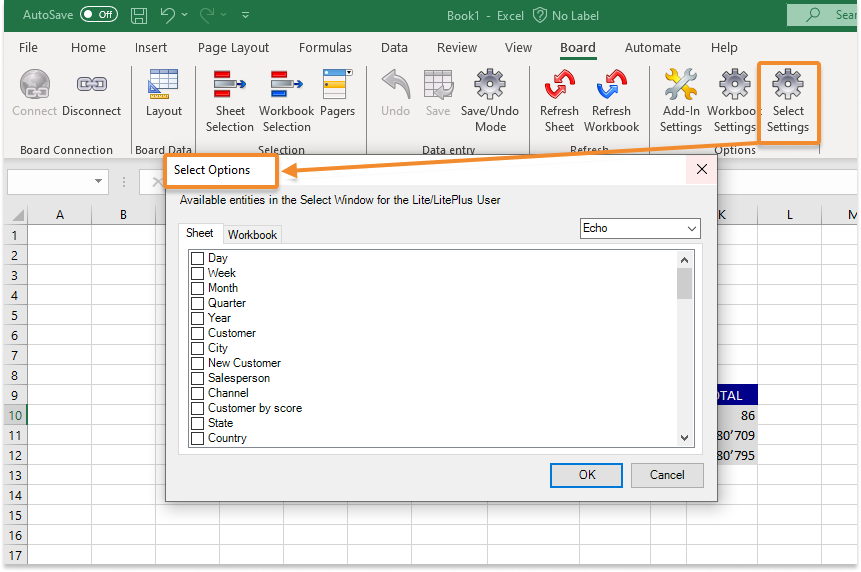
Click on "Select Settings" and the Select Options window opens which displays a restricted list of Entities showing only Entities which are relevant in that Sheet (i.e. in other words the Select Window can now be configured like a list of Selectors for Planners).
Select the Entities you would like to be visible to the Planners, excluding the ones you would like to hide, in both the Sheet tab and the Workbook tab, depending on your desired configurations.
Click "OK" to save the visibility configurations.
These visibility settings are only applied if a Planner (Lite and User license) connects to the workbook. To learn more, read the About Select settings section.
Select settings are saved at the "Sheet" level for each Data Model in use.
If these settings are activated, the Dynamic Selection options and the "Graphical view" representation are disabled in the Select window for the Planners.