The Drill Down and Drill Anywhere features are now available in the Flex Grid and enable users to interactively explore data at deeper levels of granularity. With these features, users can interactively drill into specific Entities and gain actionable insights directly from the grid, much like the functionality available in the Data View Object. The "Drill Anywhere" option provides the flexibility to drill into any Entity, and users can configure specific Entities and filters for a more granular exploration, ensuring a customizable and efficient data analysis process.
These features integrate smoothly with the spreadsheet-like experience of the Flex Grid, offering an intuitive interface for analyzing data in greater depth.
Much like in the Data View Object, the Drill Down feature allows you to see data at a different aggregation level than what is exposed in the Flex Grid table. To use a drill down, you must configure it in the Drill Anywhere window.
Drill Anywhere for Flex Grid
Drill Anywhere is now available on a Flex Grid to configure Drill Downs on Entities, Drill-to-Screens, Drill-to-Procedures, and Drill Throughs.
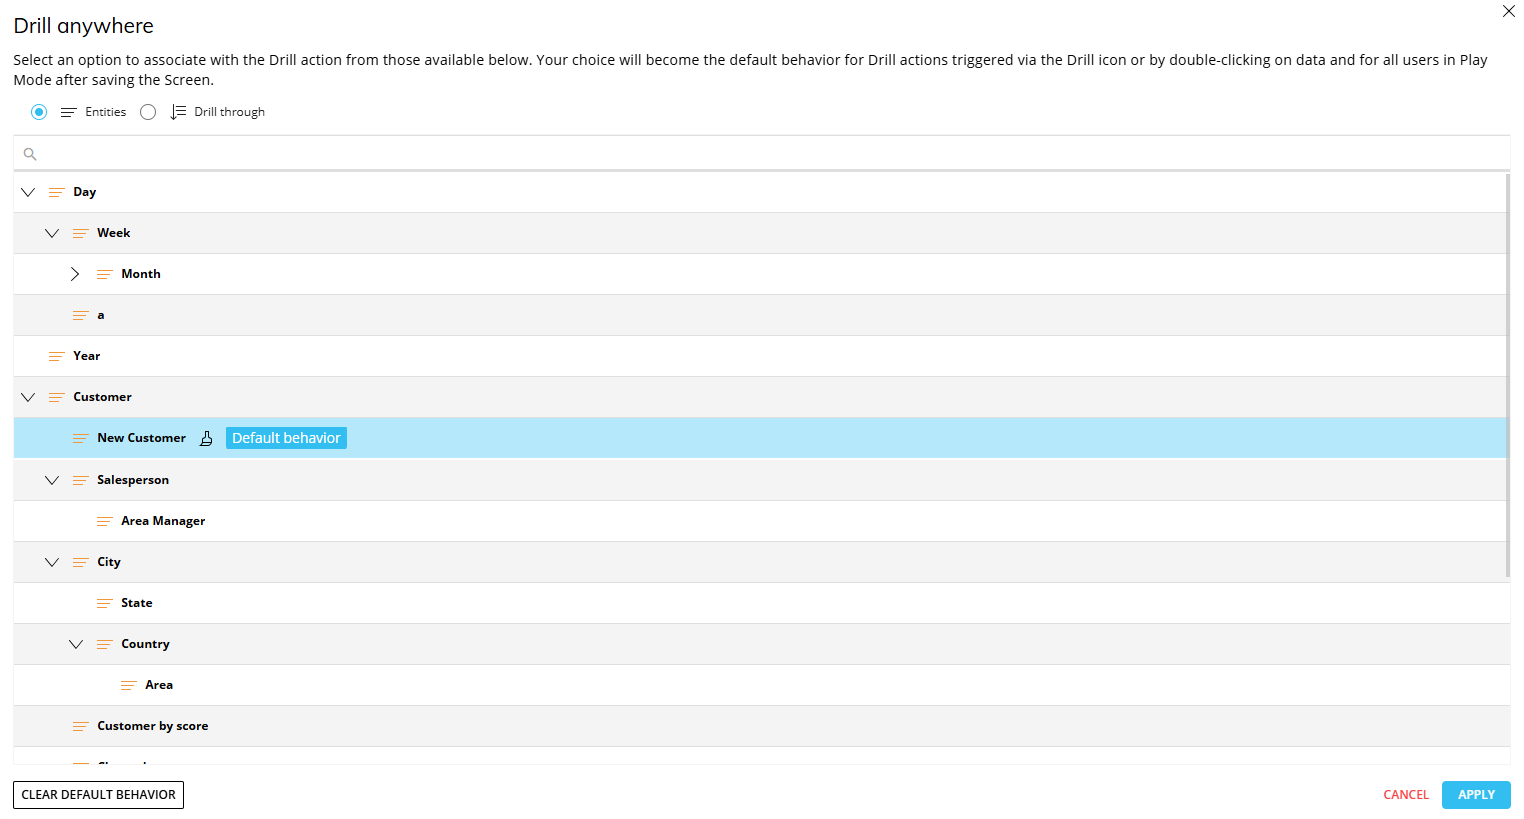
In Design Mode, Builders can configure default drills on Entities, Drill-to-Screens, Drill-Procedures, or configure Drill Throughs on Row Headers. Configuration of Drill Anywhere also includes the limitation of Entities for users to create drills on in Play Mode, like in a Data View.
From Play Mode, Planners can drill down on individual cells by double clicking them. The default configuration will apply. They can also configure their own Drill Anywhere behavior for Drill Downs and Drill Throughs.
How to Configure an Entity Drill Down for Builders in Design Mode
To configure the default drill on an Entity as a Builder in Design Mode for Planners in Play Mode, proceed as follows:
Click on the Drill Anywhere icon (
 ).
).From the popup window, select the Entity to drill down on and click "APPLY". The configured drill is performed.
Close the Drill down window and save the Screen. The configured drill is now the default drill, both in Design and Play Modes.
Planners will still be able to configure other drill-down paths in Play Mode, if the configuration allows.
Screen selections and selections made by the user using Selector Objects (if any) also apply to data in Drill down windows.
The Drill down configuration process can also be started by double-clicking on a cell or a row header (a member of the Entity set By Row).
All Entities are enabled for Drill down by default.
Only one default drill can be configured at a time. To set a default Drill-to-Screen, Drill-to-Procedure, or Drill Through, see the following paragraphs.
Limit Drill Down Entities
You can limit drill-down paths that end users are allowed to configure by selecting the Entities that a user can drill down on.
To limit Drill Down Entities from the "Drill Anywhere" window:
Click on the "CONFIGURE" button to enter the "Drill Anywhere configuration" window.
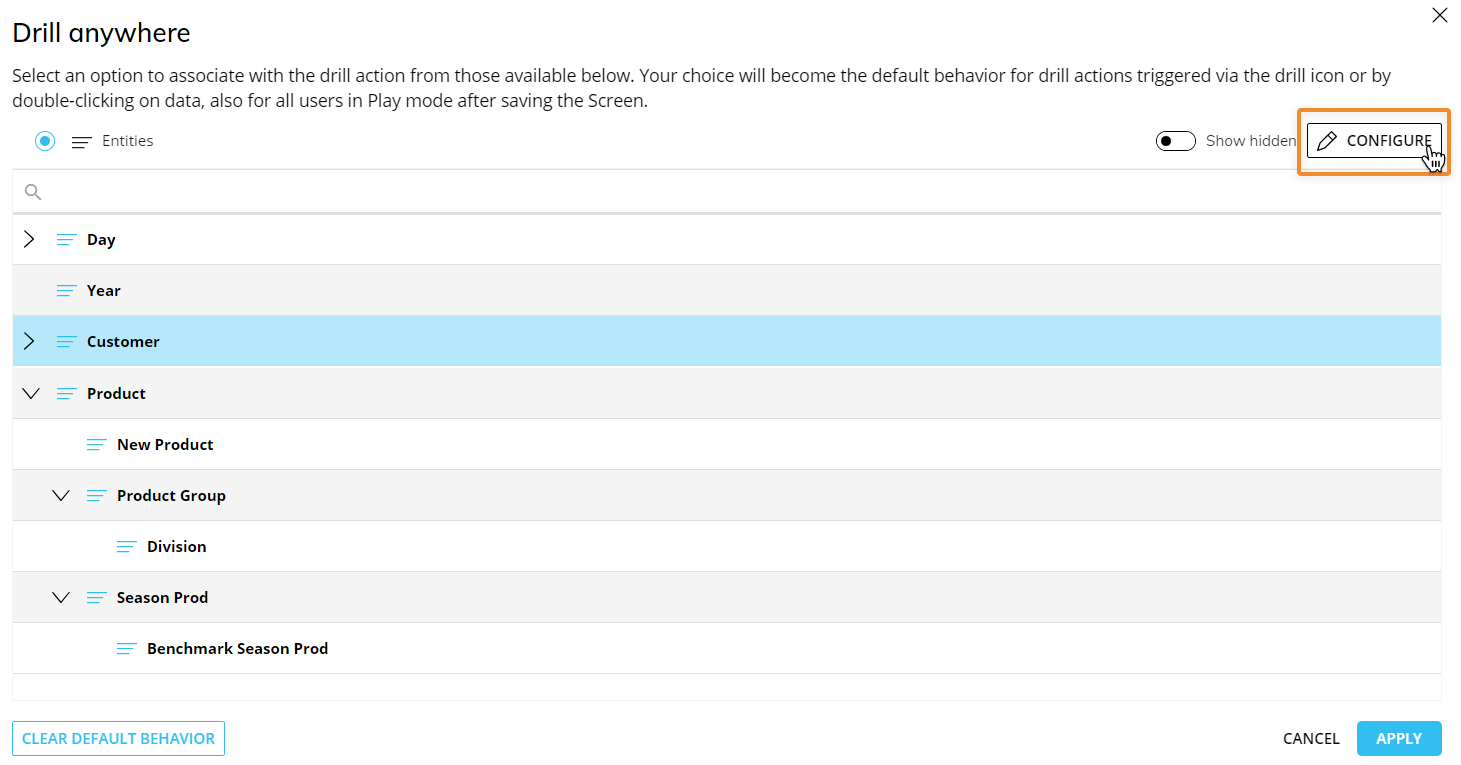
Select the Entities you want to show to the end user. These Entities will be the only ones available during the Drill Anywhere configuration in Play Mode.
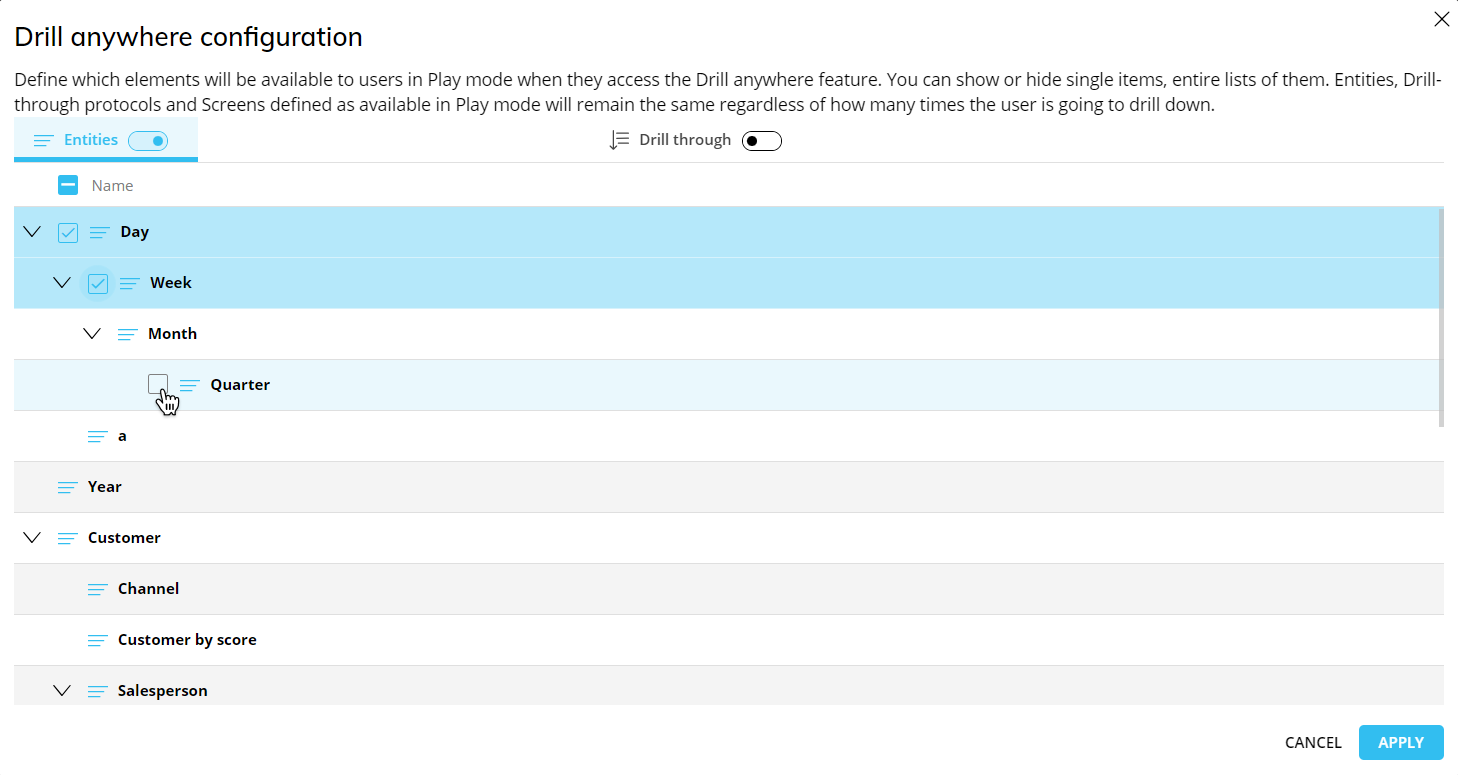
You can eliminate drill downs on any Entity all together by switching the toggle for Entities (next to the Entities tab) to "Off". The end user will not be able to perform drill downs.
The Entity toggle is enabled by default.
Default Drill Down with selection filter
You can also configure a default drill-down path with a selection filter applied based on the row (Entity member by row) from the Layout editor.
To configure a default drill-down path with a selection filter applied based on the row, proceed as follows:
Select the Flex Grid and open the Layout editor.
Go to Object settings.
Go to the Column appearance menu. You can also change the cell appearance by selecting one of the options listed in the dropdown menu. Click on the "CONFIGURE DRILL" button to configure a Drill on one or more Data Blocks.
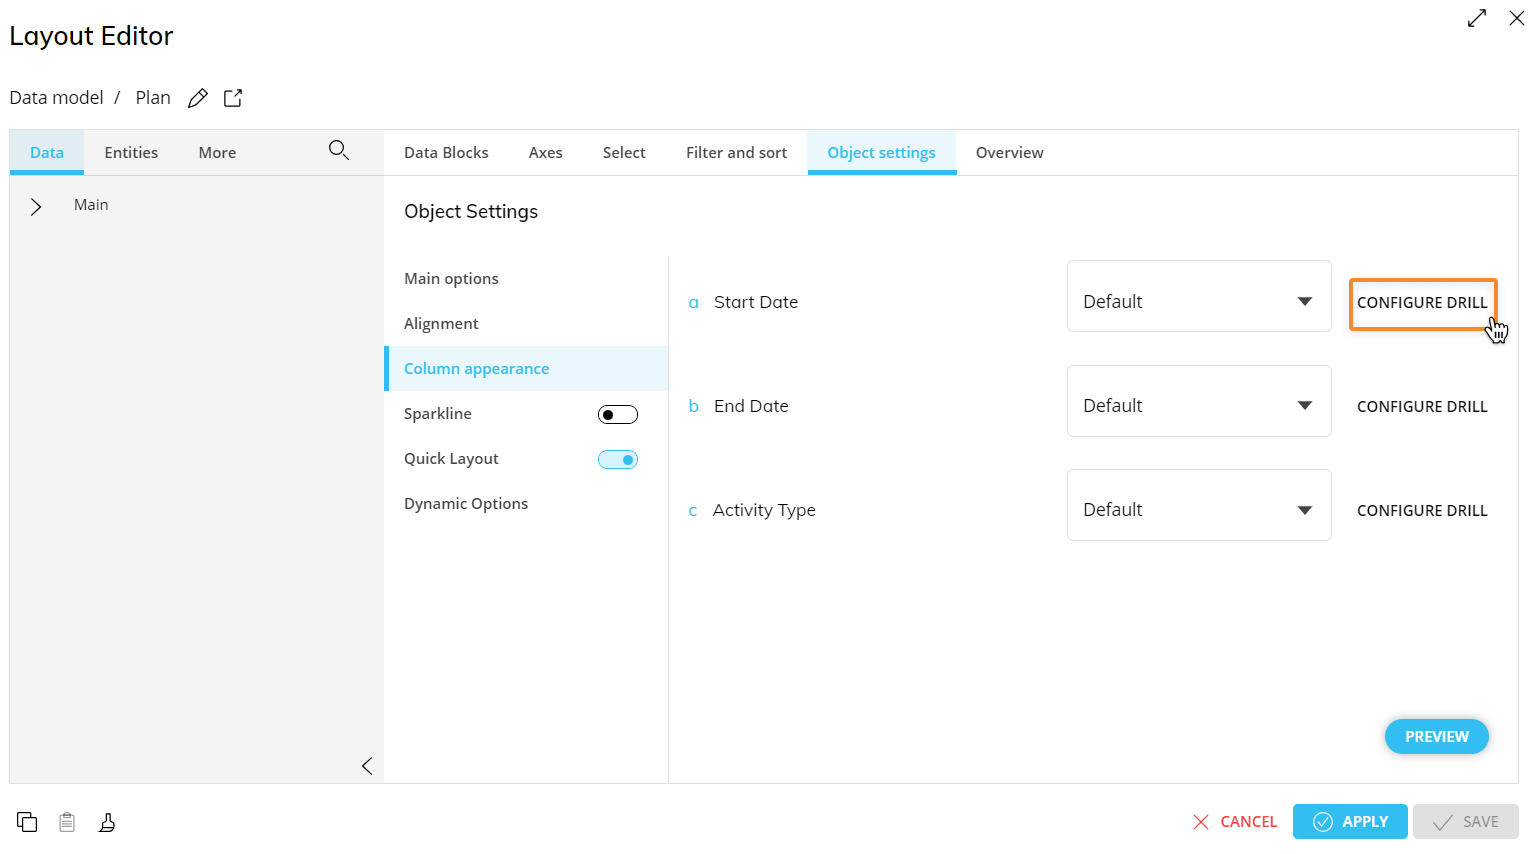
Select the "Entities" subpage and select the Entity you want to create a default drill for and click "APPLY" or double click the Entity to save the default drill.
Save the Layout.
Drill Down configuration in Play Mode
Once a drill is configured in the Drill Anywhere window, it is possible to perform a Drill Down in Play Mode.
The drill Entity is displayed on rows and filters that are automatically applied because of the drilled number’s coordinates.
The resulting Layout retains the same structure with the pivoted fields by row/column, maintaining the same point of view of the original Flex Grid but focused on the drilled Entity in Axes with all configured Blocks and applied selections on the drilled member.
Drill-to-Screen Configuration for Flex Grid
It is possible to allow users to drill down from one Flex Grid to another Screen within the same Capsule with a selection on the row header selected by the end user (Entity member by row). To do so, follow the same instructions as configuring a Drill-to-Screen on a Data View.
Drill-to-Procedure Configuration for Flex Grid
It is possible to trigger a Procedure from a cell of a Data View when the user double-clicks on a row header (Entity member set by row) or on a cell. The Procedure is launched with a selection filter applied that is based on the Entity member or the row and column item corresponding to the cell clicked by the Planner.
If a Drill-Procedure containing two or more Procedures is configured, when the user double-clicks on a cell, a popup window allows the user to select the Procedure to run from a configured list.
Procedures are configured through the Procedures section of a Data Model or Capsule.
To configure a Drill-Procedure on a row header (Entity member by row), follow the same instructions as configuring a Drill-to-Procedure on a Data View.
Drill Through Configuration for Flex Grid
It is possible to execute a Drill Through from a cell of a Flex Grid when the user double-clicks on a row header (Entity member set by row) or a cell. The Drill Through is executed with a selection filter applied based on the clicked Entity member or the row and column item corresponding to the clicked cell.
Drill Throughs are configured in the Drill Through section of the Data Model.
To configure a Drill Through on a row header, follow the same instructions as configuring a Drill Through on a Data View.
How to Configure a Drill Down or Drill Through for Planners in Play Mode
If the configuration allows it, the "Drill Anywhere" button allows Planners to configure a default drill that will be available for all cells of the Flex Grid, except for the column headers.
Clicking on the Drill Anywhere icon (  ) (if it is available to end users from the configuration) in the sliding toolbar will open a window where you can choose, depending on the configuration, which kind of drill you want to deploy: Entity or Drill Through. Select a type from the available tabs and then choose an Entity, Screen, Procedure or Drill Through from the list available to drill down on. Then click "APPLY" or double-click on the Entity, Screen, Procedure or Drill Through to save the default drill, close the window, and perform it.
Once the drill is saved, it can be easily performed by clicking on the Drill Down icon (  ).
).
The Drill Anywhere function is available also in the Drill Down windows where you can create your own drill down paths at various levels of granularity.
Drill Down or Drill Through in Play Mode
Once you have configured a drill using the Drill Anywhere function, double click a cell/row header or click the Drill Down icon (  ) to perform it on the selected cell of the Flex Grid.