It is possible to export data represented on a single Capsule Screen in various print-ready file formats.
There are two methods to export data: through the Object Toolbar which appears when hovering over an Object on a Screen, or by selecting options from the sliding menu, accessed via the burger icon in the Top Menu. The Object toolbar allows you to export data for the specific Object, while the sliding menu enables you to export either the entire Screen or select one or more areas of the Screen.
This article covers:
Export printable report
This option will export the current Screen in the following formats:
PDF file.
Microsoft Word document. Creates a .docx document to be opened with Microsoft Word (version 2007 and newer) containing the selected Screen Objects.
Microsoft PowerPoint presentation. Creates a .pptx document to be opened with Microsoft PowerPoint (version 2007 and newer) containing the selected Screen Objects.
Screenshot (.png file).
When you select PDF, Word, or PowerPoint outputs, you will be taken to to a configuration page before exporting. In that page, you can define and save a template that will apply to the Screen and configure its properties.
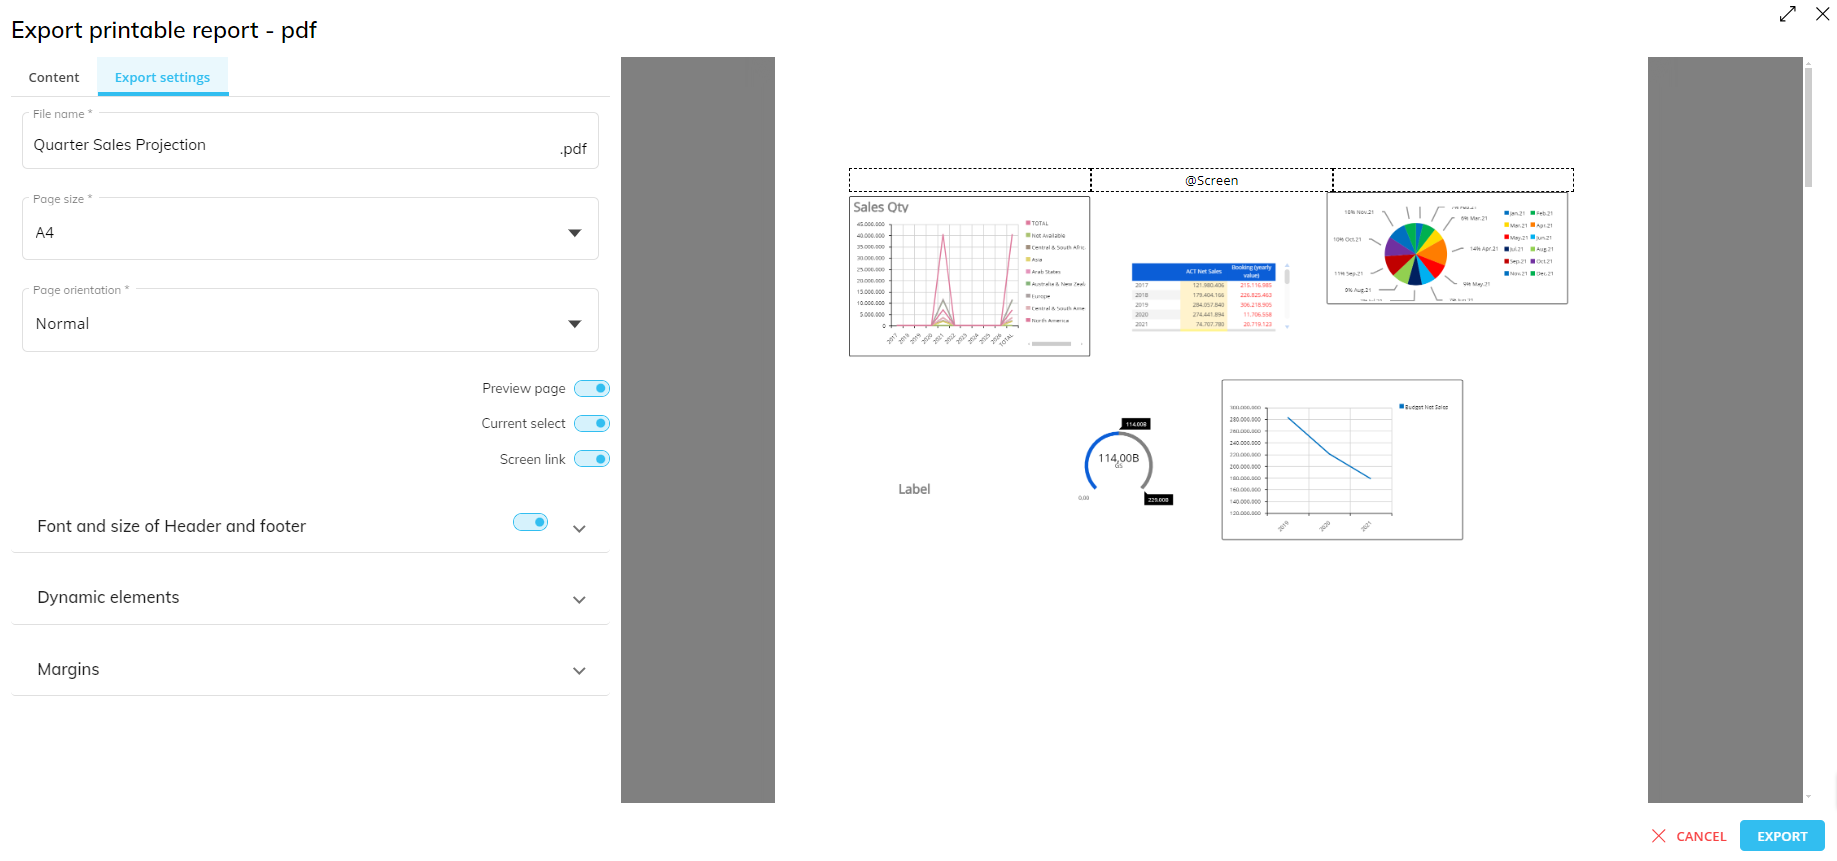
Export printable report configuration window
In the export printable report configuration window, you can customize and generate reports that meet your specific needs. This chapter will guide you through the essential configuration options, customization features, and the process of exporting reports.
Content tab
File. Displays the name and type of export file you're configuring. To change the file name, click the configuration icon and edit the name under the "File name" field. This icon takes you to the Export settings tab.
Print areas. Displays the one or more areas selected for the export.
If you export a printable report from the Object toolbar, only one area will display.
When you export a printable report from the sliding menu, you can select multiple areas of the Screen to print separately in the output file. To add an area, press the "+ ADD AREA" button. To move a selected area to a different position, drag and drop it anywhere in the areas list. To delete a print area, hover over its name and click the recycle bin icon that appears on the right side of it.
Preview page. Displays the entire Screen as a preview in the first page of the exported report. The preview page is hidden by default. To display the preview page, enable the toggle.
Summary page. Displays the current selections and the Screen URL on the last page of the printable report. To delete the Summary page hover over its name and click the recycle bin icon that appears on the right side of it.
Repeat by Entity. Repeats the report on the selected Object by each of the selected Entity’s members, each page showing the specific data for each member (see Configure Repeat by Entity mode below how to configure it).
.png "image(8).png")
This option is only available when a single Object is exported and a Selector or Pager is on the same Screen as the Object being exported.
To use the "Repeat by Entity" feature, after configuration, you must go to Export settings and drag and drop the "Page by display name" into the header or footer.
Member display mode. Displays the selected Entity’s members by Description, Code, or both on the printable report:
Default
Description
Code
Code and description
The member display mode option is required when using the "Repeat by Entity" feature.
Filter Repeat by Entity (optional to "Repeat by Entity"). Reduces the amount of pages exported in the report or focuses on more specific parameters in the report with the following settings:
Cube. Choose a Cube to filter the repeat by Entity configuration.
Condition. Choose a condition to filter the repeat by Entity configuration by selecting between the following settings:
Is 0. Filters data from the chosen Cube meeting the condition "is 0".
Is not 0. Filters data from the chosen Cube meeting the condition "is not 0".
You must choose a condition if you choose to filter the repeat by Entity with a Cube.
Configure "Repeat by Entity" mode
To use the "Repeat by Entity" feature, expand the options for the Print area listed in the Content tab of the Export printable report window and continue as follows:
Define a single Entity associated with a Pager or Selector from the "Repeat by Entity" dropdown.
Choose the display mode for which each member be displayed as in the printable report.
This is required when using the “Repeat by Entity” feature.
(Optional) Filter the "Repeat by Entity" configuration by Cube and Condition to reduce the amount of pages exported in the report or focus on more specific parameters in the report.
Access the Export settings tab to incorporate this function into your exported report.
Drag and drop "Page by display name" from the "Dynamic Elements" section into the header or footer area outlined by dotted lines.
Click "Export".
Export settings tab
The Export settings tab, located to the right of the Content tab or accessed by clicking the configure icon next to the file name, allows you to configure various export settings.
The Export settings contain the following options:
File name. Rename the output file.
Page size. Define the page size.
Page orientation. Change the page orientation (landscape or portrait).
Preview page. Includes a preview of the entire Screen as the first page of the output file when enabled.
Current select. This option will include the Select applied at the Screen level in the recap page in the output file.
Screen link. This option will include a link to the Screen in the recap page in the output file.
Font and size of Header and footer. This option allows you to configure the header and footer font style and size.
Dynamic elements. By dragging and dropping the icons from this menu into the header or footer, you can customize the information printed into your final document. You can also write the Substitution Formulas (syntax in parentheses below) into the header or footer of your document. The @Selection_Ex and @[Entity] Substitution Formulas are not currently supported in this particular context.
All Substitution Formulas are case insensitive.
It is possible to use the following formulas and their information:
(@Capsule) → adds the Capsule name to your document.
Page number (@PageNumber) → adds the page number to your document.
Total pages (@TotalPageNumber) → adds the page number and the total number of pages to your document.
Date (@Date) → adds the export date to your document.
Time (@Time) → adds the export time to your document.
Screen (@Screen) → adds the Screen name to your document.
@Screen is already added to the header by default. To remove it, delete the formula from the header in the preview.
Data model (@DataBase) → adds the Data model name to your document.
Selection (@Selection) → adds any selection applied to the Screen to your document, for example: "Year: 2015".
Username (@UserName) → adds the username of whoever did the export to your document.
Page by display name (@PageByDisplayName) → enables the use of the "Repeat by Entity" function configured in the Content tab.
Logo (@Logo) → adds a logo image to the header or footer of a printable report, which will automatically resize to the margins. To manually accommodate the image size, define the margin height and width in the "Margins" section.
Once added, a menu will open to configure the Logo source and settings. Developers and Planners have different options available and are described below.
To remove a logo, press the "del"/ "delete" or "cancel" key on your keyboard.
Logo source. Add a logo image using the default Capsule image or an external link.
Only users with Developer licenses will have the option to select either Default or External.
Planners only have the option to use an external link, see below.
Default. The default image is configured in the Capsule Images section of Board. To configure the default image, click on the open browser icon next to "Configure default" to open the page and upload an image or edit an already existing image and select "Default printable report logo".
This option is only available to Developers. Developers will see the following menu:
.png "image(18).png")
.png "image(13).png")
There can only be one default image per Capsule saved at a time and only one default image logo used per report.
Supported image file types are .jpg, .png, and .gif.
External Link. Add an external link in the "Load logo from link" field.
Load logo from link. Add the external link address here.
The external URL must specify the file type, for e.g. https://testurl.com/image.png and not https://testurl.com/image.
This is the only option for Planners, who will see the following menu:

Logo settings. Customize the display settings of the logo. These options are the same for both Developer and Planner.
Fill. Choose how the logo image should fill the header/footer section:
None. The image appears according to its dimensions. If its dimensions are smaller than the logo fill area, white space appears surrounding the image.
Fill. Fills the area with the image. The image is stretched to fit the Screen's dimensions regardless of its dimensions.
Uniform. Expands the image’s size accordingly with its dimensions until one side fits to the Screen's dimensions.
Uniform to fill. Expands the image to fill the area without stretching the image. This means that the image could appear cropped.
.png "image(15).png")
Alignment. Aligns the image accordingly:
Vertical. Aligns the image vertically from top, middle, or bottom alignment vertically.
Horizontal. Aligns the image horizontally left, middle, or right alignment horizontally.
Margins. This option allows you to customize the margin configurations.
When exporting a printable report of a Tab Container Object, only the Tab opened on the Screen will display in the preview and export in the printable report.
Export data to Excel (.xlsx)
This option will export all Screen Objects defined by a Layout in the following formats:
Standard Microsoft Excel Workbook
This option exports data from all Objects defined by a Layout in the active Screen to a Microsoft Excel file (.xlsx). The data of each Object is placed on a different sheet of the exported workbook. Graphical formatting, is preserved, including the font and cell colors, borders, and images.
Exporting a Microsoft Excel Workbook from the Object toolbar provides different configuration options than exporting from the sliding menu even when there is only one Object on the Screen.
When exporting the .xlsx report from the Object toolbar, you will be presented with the following options:
Export selections. Export selections made.
Page by. This feature organizes each page based on the display name chosen for a specific Entity and is only available when a single Object is exported and a Selector or Pager is on the same Screen as the Object being exported.
Not available when exporting to Board Add-in.
Member display mode. Displays the selected Entity’s members by Description, Code, or both on the printable report:
Default
Description
Code
Code and description
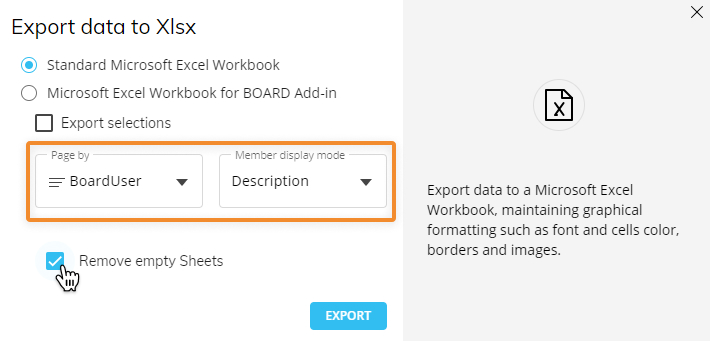
Remove Empty Sheets. Removes empty sheets that would normally display. This reduces excess pages in the report.
This flag is enabled by default. It can only be disabled when the Page by display mode dropdowns are configured.
These Page by Display mode settings are only available when exporting to Excel from the Object toolbar.
Microsoft Excel Workbook for Board Add-in
This option exports data to a Microsoft Excel Workbook with a supporting Board Add-in function (an appropriate Board License and a Board connection is needed), such as change Select filters, Drill Down, refresh, or change data. This option has the following sub options:
Use Excel formulas for calculated Blocks, column, totals, and row totals. You can use Excel formulas for calculated blocks, column totals and row totals by ticking the appropriate checkbox: if the option isn't selected, results of calculations are exported as numeric values.
Export formatting. Graphical formatting, such as font and cell colors, borders, and images, is preserved. Custom graphic formatting on Data Views and images are not preserved.
Export selections. Export selections made.
When exporting to Excel, PowerPoint, or Word, not only the data but also the Layout definitions are exported. This allows you to work on that data from your favorite Microsoft Office application, using the Board Office Add-In: for example, it is possible to refresh reports, execute Drill Downs, or even modify Layout definitions, even if you're outside the Board workspace.
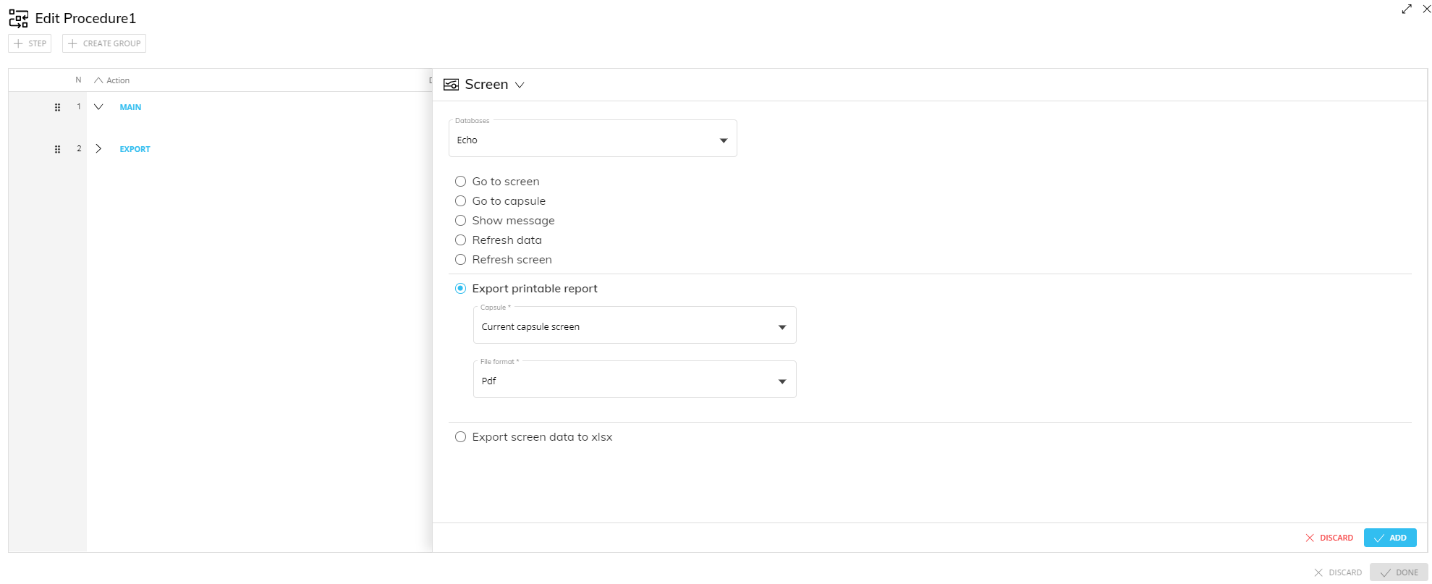
Export using a Procedure
It is possible to export data represented on a single Capsule Screen also using a Procedure.
When creating a new Procedure step, you will find all the export functions mentioned above under the Screen Action group.
Export printable report (available only for Capsule Procedures when creating a procedure from within a Capsule). This step allows you to export a specific Screen based on a previously configured print template saved in the Screen.
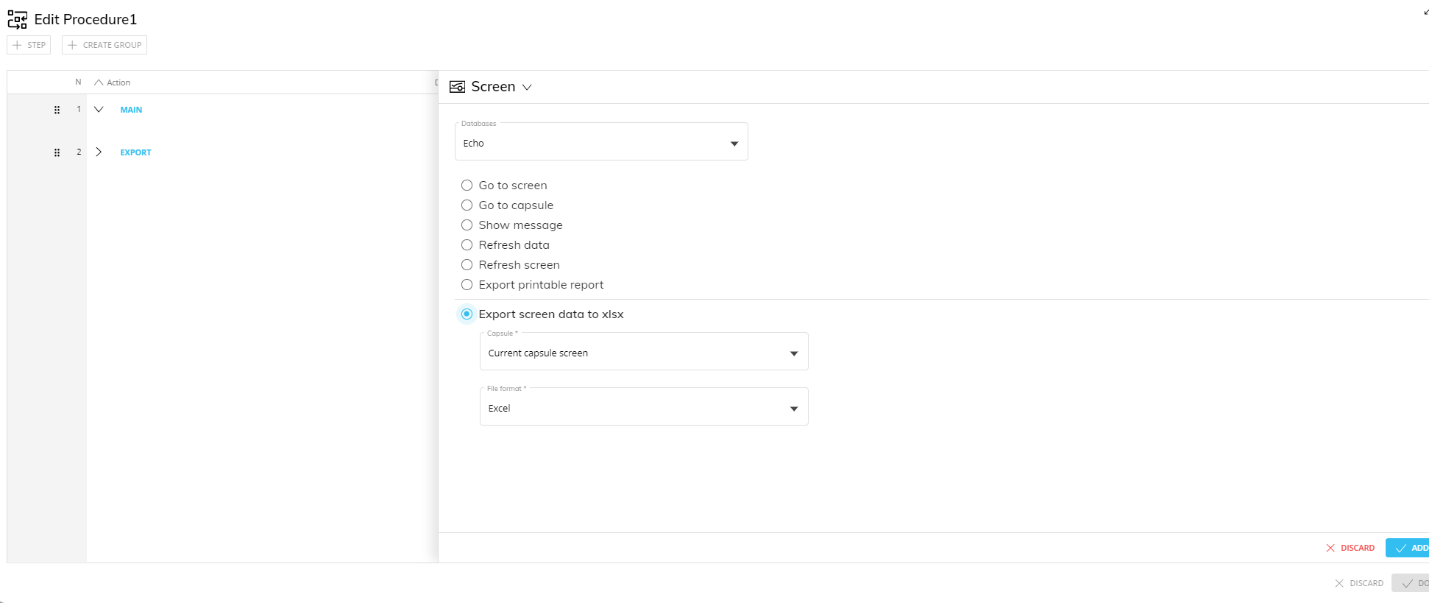
Export Screen data to xlsx (available only for Capsule Procedures when creating a procedure from within a Capsule). This step allows you to export all Screen Objects defined by a Layout from a specific Screen to a Microsoft Excel Workbook where data of each Object is placed on a different sheet.
To configure the step, choose a Screen from the "Capsule" menu (the Current Capsule Screen option will export the Objects in the Screen that the user is viewing when the step is executed), then choose the export file format.
For more information on exporting data using a Procedure, see Screen actions.