Applies to: All Board Cloud subscriptions
Introduction to the Users section
The Users section allows you to create and manage users on your Board Cloud platforms, import users from external files, export users to a CSV file, and set up the authentication data retrieval from Board to external applications and services. You can also configure automatic users synchronization between the Subscription Hub and individual Board Cloud platforms.
From the User section, you can assign roles and access permissions in a granular way for each Board Platform, diversifying the permissions at the level of individual user, or you can assign authorizations through a Permission Group. Thus, you can allow some users to develop and modify the structure of Capsules and Screens, while others can only consult and interact with data in Play mode.
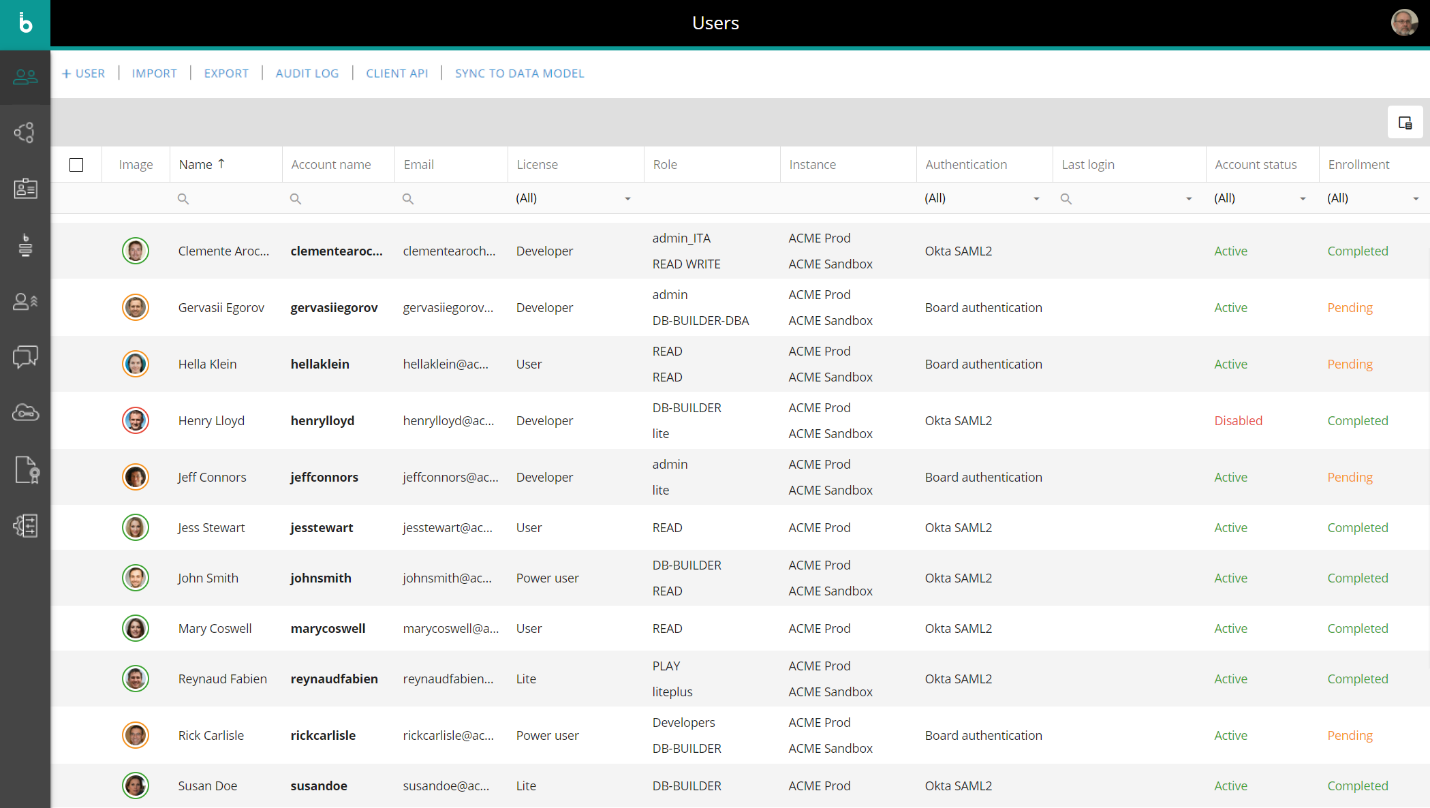
The users list
In the Users home page, you can see all users of each platform and their main information: the table is sortable and searchable using the interactive header fields. You can also show or hide columns to your liking, by clicking the Column chooser button in the upper right corner of the table.
By default, you can view:
The user’s image
The user’s name
The user’s account name
The user’s email address
The user’s license
The user’s role for each associated platform
The platforms the user has been granted access to
The user’s authentication method
The last time the user logged in
The user’s account status (Active or Disabled)
The user’s enrollment status (Completed, Imported, Pending or New Request)
The enrollment status is marked as Completed in the following cases:
The user's authentication type is "Board authentication" and his/her email address has been successfully validated.
The user has successfully logged into Board through an enrollment process (with direct approval or with manual approval).
The user account has been manually created by an administrator and the selected authentication type is an external identity provider (IDP).
The enrollment status is marked as Imported when the user has been imported from a newly associated platform or a CSV file, his/her authentication type is "Board authentication" and an administrator has not yet sent him/her the invitation email to continue the registration process.
The enrollment status is marked as Pending when the user's authentication type is "Board authentication" and his/her email address hasn't been successfully validated.
The enrollment status is marked as New Request when the user has completed the manual approval enrollment process and his/her account is still to be approved by an approver or an administrator.
You can perform different actions on one or more user accounts by selecting them and by clicking on the different buttons above the users list.
Once you have created a new Board authenticated user account in the Subscription Hub, the user needs to verify the associated email address and set a password.
All the necessary instructions will be sent to the user through the email notification see Send / Resend Email below.You can modify multiple user accounts at once, by selecting the checkboxes at the beginning of each row. This option is available for Authentication type, License and Culture attributes, along with Office, Mobile and Disabled checkboxes. You can also bulk assign roles and licenses for each individual platform in the Platform authorization table (see View user details below).
Please remember that the platform license count must be equal to or less than the main user license count for all selected users: the system only shows platform licenses that you can actually assign to selected users.
By clicking on the "SAVE" button, all the changes will be applied to all selected user accounts: all unchanged information will be retained.You can delete multiple user accounts at once, by selecting the checkboxes at the beginning of each row and by clicking the "DELETE" button: this button will appear when at least one row is selected.
You can export multiple users at once, by selecting the checkboxes at the beginning of each row and by clicking the "EXPORT" button. See Export users for more details.
You can download an Audit log file which keeps track of events related to users accounts managed through Board's Subscription Hub of a customized date range by clicking the "AUDIT LOG" button. See Audit log for more details.
If you edit a user's Name field and that user is associated with one or more platforms affected by a Sync rule, the new value is automatically synced between the Subscription Hub and the associated Databases and Entities. User synchronization is also performed whenever you associate a user with one or more platforms affected by a Sync rule.
If you delete one or more user accounts associated with one or more platforms affected by a Sync rule, the prefix "#del#" is added in the corresponding entity members' description to retain the historical data.
If an Enrollment process is in place, users will be able to register directly in Board or request access to Board right from the sign-in page. If the request is accepted, a new account will be automatically created. See The Enrollment section for more information.
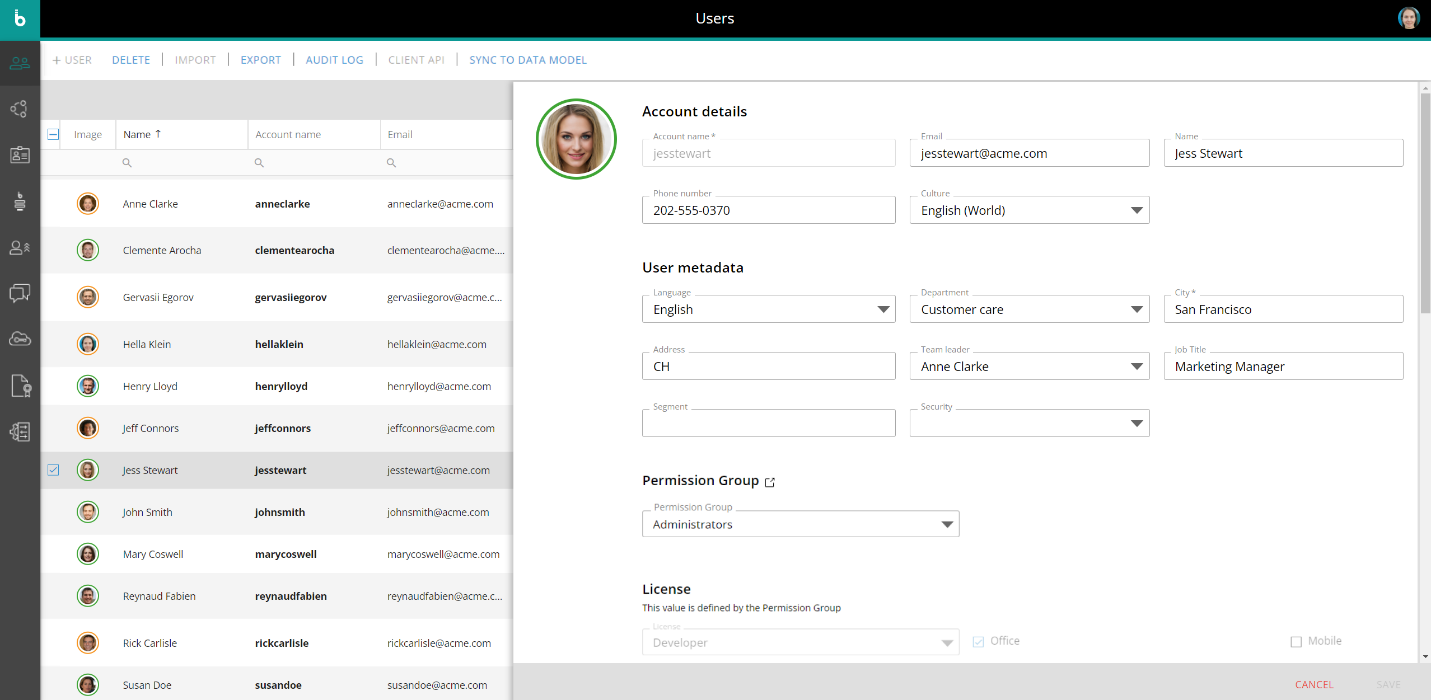
View user details
From the Users home page, click anywhere on the corresponding row to view that user details. A User profile panel on the right-hand side of the page will appear, showing the complete user information.
Send / Resend Email
If a user's enrollment status is marked as Imported and his/her authentication type is "Board authentication", you will see a "SEND EMAIL" button in the lower right corner of the User profile panel: click on it to send the user an invitation email to continue the registration process. If a user hasn't received the first invitation email, you can always send him/her another by clicking the "RESEND EMAIL" button in the lower right corner of his/her User profile panel. You can also bulk send invitation emails by clicking the "SEND EMAIL" button that appears in the upper left corner on the page when there are users with enrollment status marked as Imported.
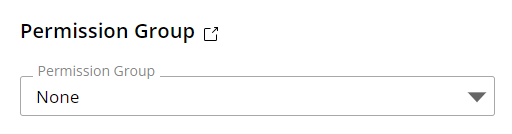
Permission Group
The "Permission Group" dropdown menu allows you to manually assign a Permission Group to the user. See The Permission Groups section for more details.
Click the link icon  to open the Permission Groups home page.
Licenses
The “Licenses” dropdown allows you to manually assign a license to a user. The amount of licenses you have and can assign depends on the individual client agreement.
Read more about the different permissions of each license.
Office. Check this box to grant access for the specific user to use the Board MS Office Add-in.
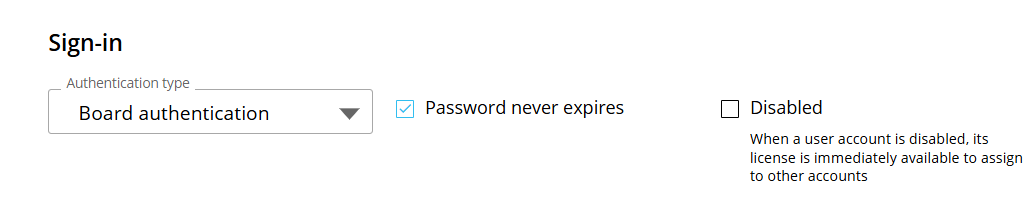
Sign in
The authentication dropdown allows you to assign a specific IDP for verifying the identity of the user before logging into Board. The "Board Authentication" authentication type is always available, while other external identity providers have to be configured in the Identity Provider Federation section.
The following are additional Sign-in options for configuration:
Password never expires. Check if you want to override the default password expiration policy which is 365 days.
This option only applies to the "Board Authentication" authentication type.Disabled. Check if you would like to disable the users ability to sign in. This action unassigns the current license, making it available to reassign to another user.
Board supports identity provider based on SAML2 and OIDC standards.
Subscription Hub authorizations
In the "Subscription Hub authorizations" table, you can manage authorization levels for each Administrator: you can grant or deny access to specific sections of the Subscription Hub to other Administrators, thus enforcing a deeper level of security and access control.
The amount of information displayed and the ability to edit it is defined by two authorization levels:
Edit. The user can access the corresponding sections and make changes.
Not authorized. The user cannot access the corresponding sections.

To edit authorizations, click the downward-facing arrow at the end of each row and select the desired setting.
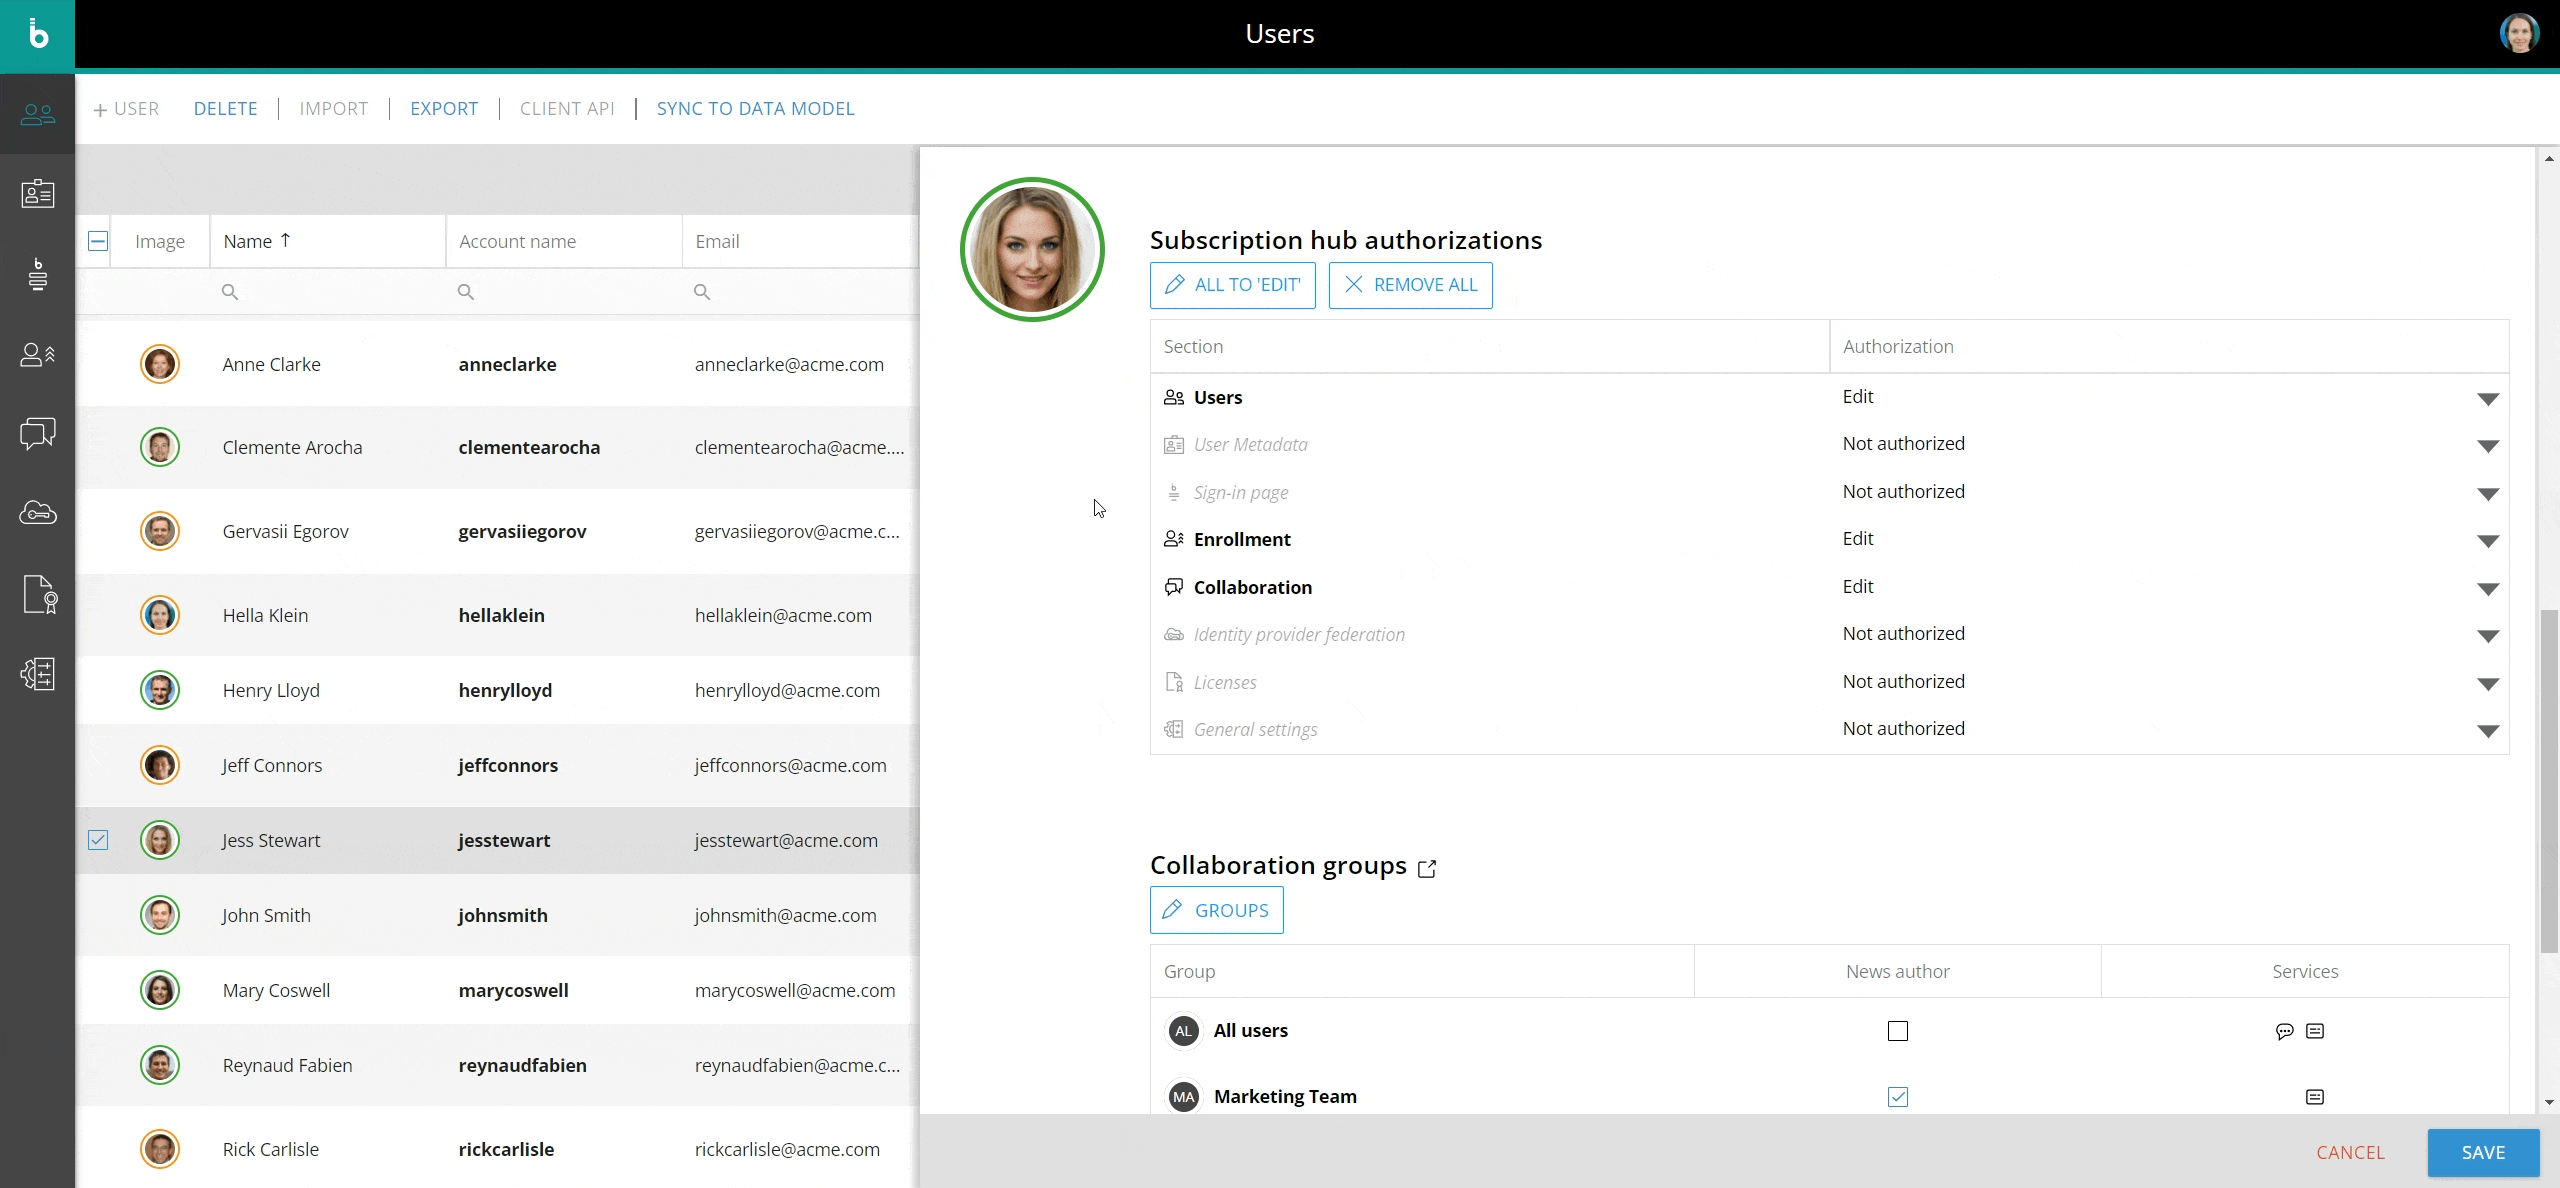
The "ALL TO EDIT" button sets all authorizations to "Edit", while the "REMOVE ALL" button sets all authorizations to "Not authorized".
When a user has at least one authorization level set to "Edit", they are automatically considered to be a Subscription Hub Administrator, regardless of their Board license and Platform-specific permissions. Consequently, they will be eligible to become an approver in a manual approval enrollment process. When an Administrator logs into the Subscription Hub, the side menu and the administration tiles reflect their authorization settings; sections set to "Not authorized" will not be visible and will not be reachable, even using a direct URL.
Collaboration Groups
In the "Collaboration groups" table, you can review all User groups the user is a member of. Checked checkboxes in the "Feed author" column indicate in which groups the user has been granted the "News author" role. Two icons at the end of the row indicate which Collaboration feature is enabled for each group (Feed and/or Chat).
The Collaboration groups section displays which collaboration groups a user is assigned to. The table has the following table headers:
Group. Displays the Collaboration group names assigned to the user.
Feed author. Displays a checkbox where the user may be assigned as a Feed author.
Services. Displays the icons of the services enabled in the Collaboration group assigned to the user.
To add a user to a Collaboration group, select the button labeled "GROUPS" with the pencil icon within the user's profile whom you want to assign the group to and select all that apply from the list of options that appear in the table. Click the "DONE" button when you've finished editing and click "SAVE" in the bottom right corner of the page to update the user information.
Read more about Collaboration groups in the Collaboration feature.
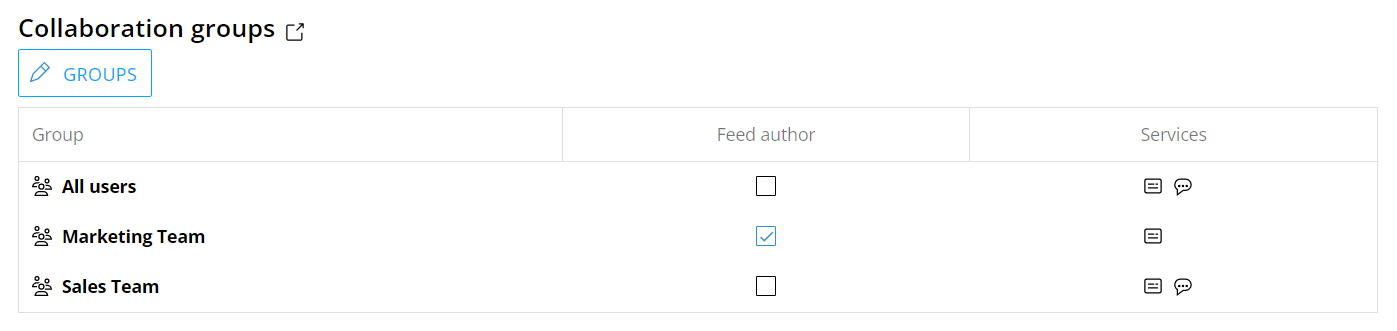
The list of groups can be created and configured in the Collaboration services area accessed by the icon (  ) "Go to Groups" next to the Collaboration groups title.
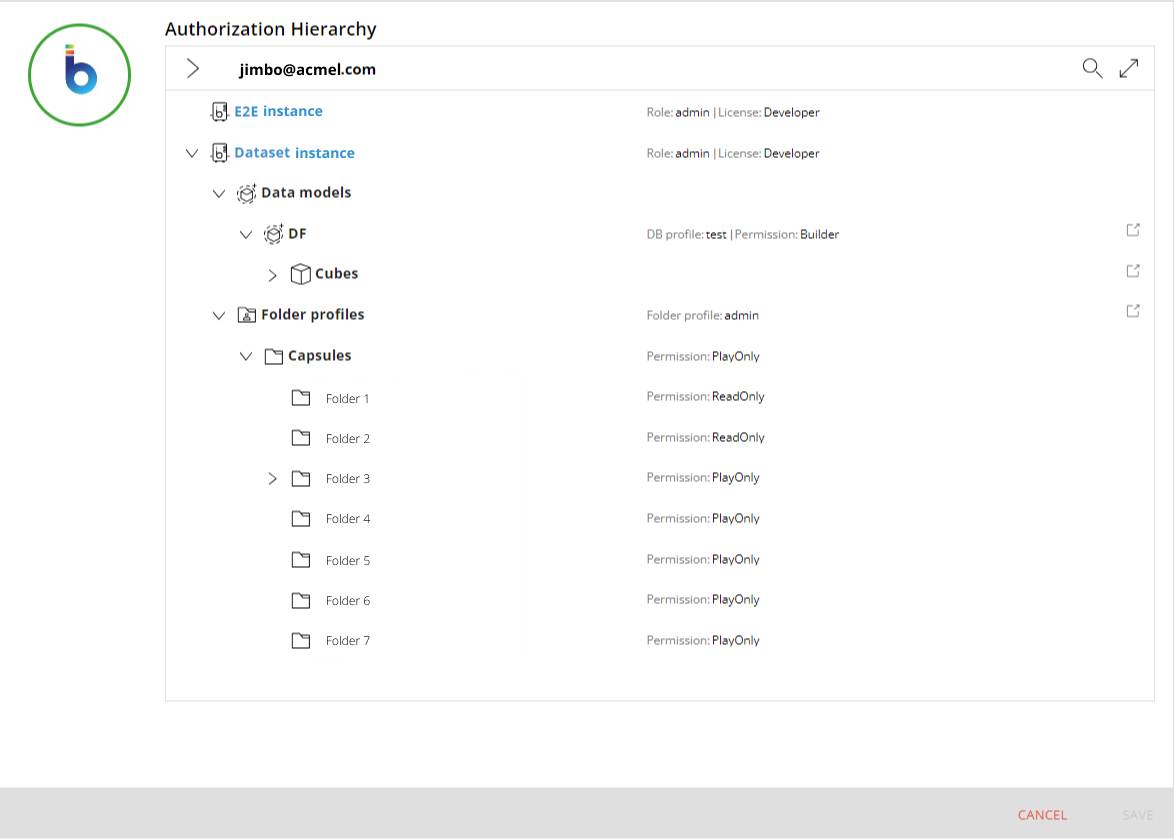
Authorization hierarchy
The Authorization hierarchy section displays an overview of the user's authority access. This includes every instance for which a user has access to in terms of the role and license assigned to them. If the user has full access to every area of the instance, only the name of the environment will display. If the user has a Data model-specific Security profile or Folder security profile assigned to their role, a drop down appears underneath the instance name with the corresponding information for that security filter assigned role.
The dropdown displays the access the user has to Data Models, Cubes, Folder profiles, and Capsules. The following information can display in the Authorization hierarchy section of a user's profile:
Instance. The instance name that the user has access to will display in the Authorization hierarchy box with the following information:
Role. Displays the Role assigned to the user of the instance.
License. Displays the type of license the user has for the instance.
Data models. If a Data model-specific security profile is assigned to a user's role, the Data models in which a user has access to will display with the following information:
DB profile. Displays the name of the Data Model Security profile assigned to the user's role.
Permission. Displays the Security system Access level assigned to the Database security profile that is assigned to the user.
Cubes. If a Data model-specific security profile with a Cube visibility security filter is assigned to a user's role, the Cubes in which a user has access to will display with the following information:
Access mode. Displays the Cube visibility Access level of a Database security profile assigned to the user.
Folder profiles. If a Data model-specific Folder security profile is assigned to a user's role, the Capsule folders in which a user has access to will display with the following information:
Folder profile. Displays the Folder security profile assigned to the user.
Capsules
Permission. Displays the Access level configured in the Folder security profile assigned to the user (ReadOnly, PlayOnly, or Read & Write).
Fields formats and information
Field name | Description | Examples |
|---|---|---|
Account name |
| jbarry |
| jbarry@acme.com | |
Name | John Barry | |
Phone number |
| 111-111-1111 |
Culture |
| English (India) |
[Custom fields] (User metadata section) |
| - |
Permission Group |
| - |
License |
| Developer |
Office (Checkbox) |
| - |
Authentication type (Sign-in section) |
| Board Authentication |
Password never expires (Checkbox) |
| - |
Disabled (Checkbox) |
| - |
Role (Platform authorization table) |
| Admin |
License (Platform authorization table) |
| Power user |
Admin (Platform authorization table - checkbox) |
| - |
Authorization (Subscription Hub authorizations table) |
| Edit |
Feed author (Collaboration groups table - checkbox) |
| - |