This topic describes the BEAM Clustering section of the Data Model.
The BEAM Clustering feature allows you to define clusters of similar Entity members, by utilizing the k-means methodology. You can do this by configuring clustering scenarios that will automatically populate a target parent Entity with new members and set a Relationship between them and the members of the source child Entity that is being observed in the scenario.
To access the BEAM Clustering section, access the designer space of the desired Data Model and click on the BEAM Clustering tile to open the BEAM Clustering page.
The user must have an appropriate Board license to be able to view and access the BEAM Clustering tile.
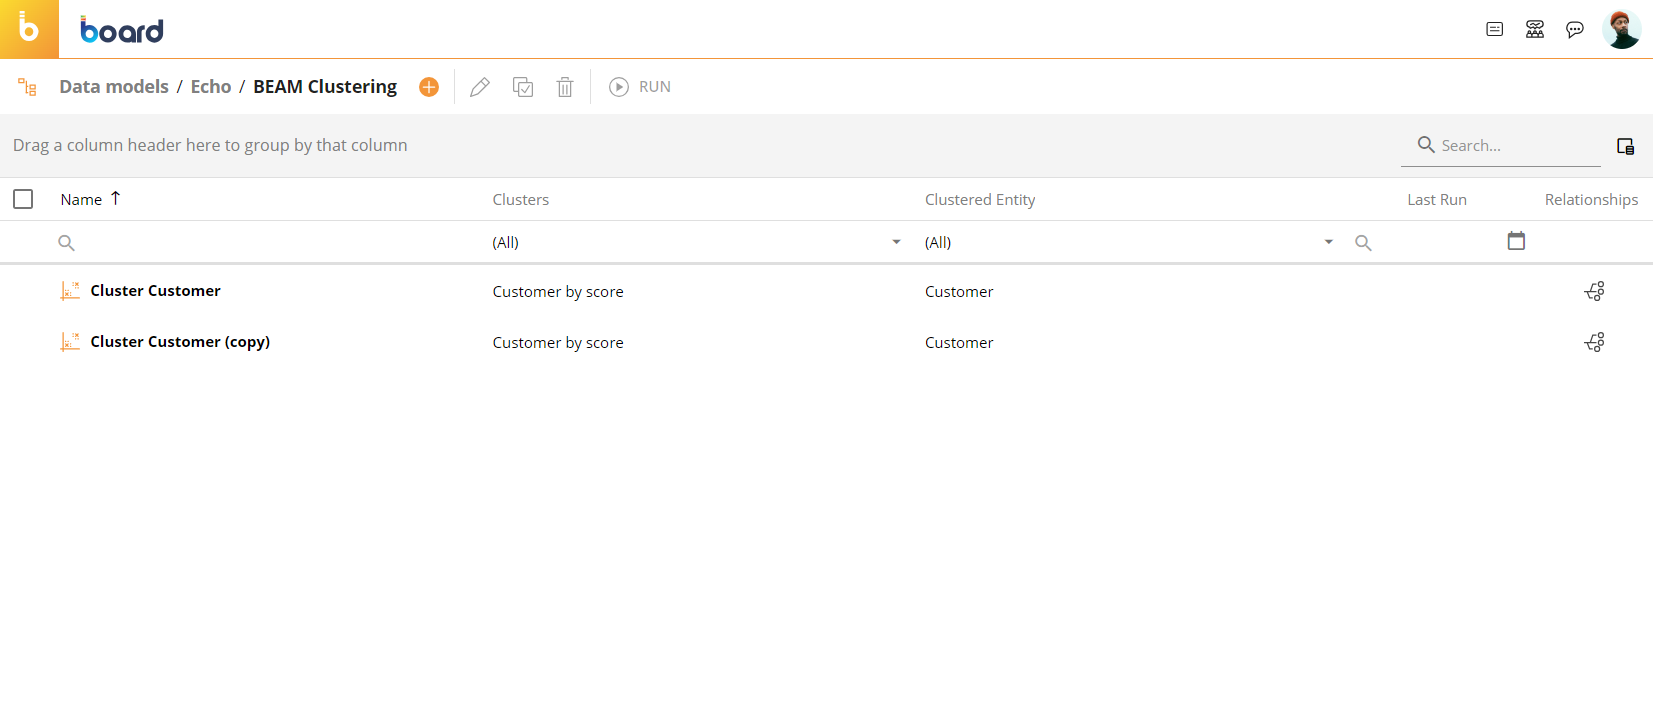
In the BEAM Clustering page, you can see all existing scenarios and their main information; the table is sortable and searchable using the interactive header fields. You can also show or hide columns to your liking by clicking the Column chooser button in the upper right corner of the table.
The BEAM Clustering table contains the following information:
Name. This column displays the name of each clustering scenario.
Clusters. This column displays the name of the target Entity for each clustering scenario. This Entity will contain the new members (clusters) created by the scenario.
Clustered Entity. This column displays the name of the source Entity of each clustering scenario. The scenario creates the clusters by observing the members of this Entity.
Last run. This column displays the date and time of the last run of each clustering scenario in the following format: DD/MM/YYYY HH:MM.
Relationships. This column displays a tree icon (
 ) that you can click to open the results of a clustering scenario after it has been run. The dialog will show the code and description of the target Entity members created by the scenario and the number of members of the source Entity they are related to. In addition, you can click on any row to open the Select window where you can see the detailed list of the related members and also add or remove them from the Relationship.
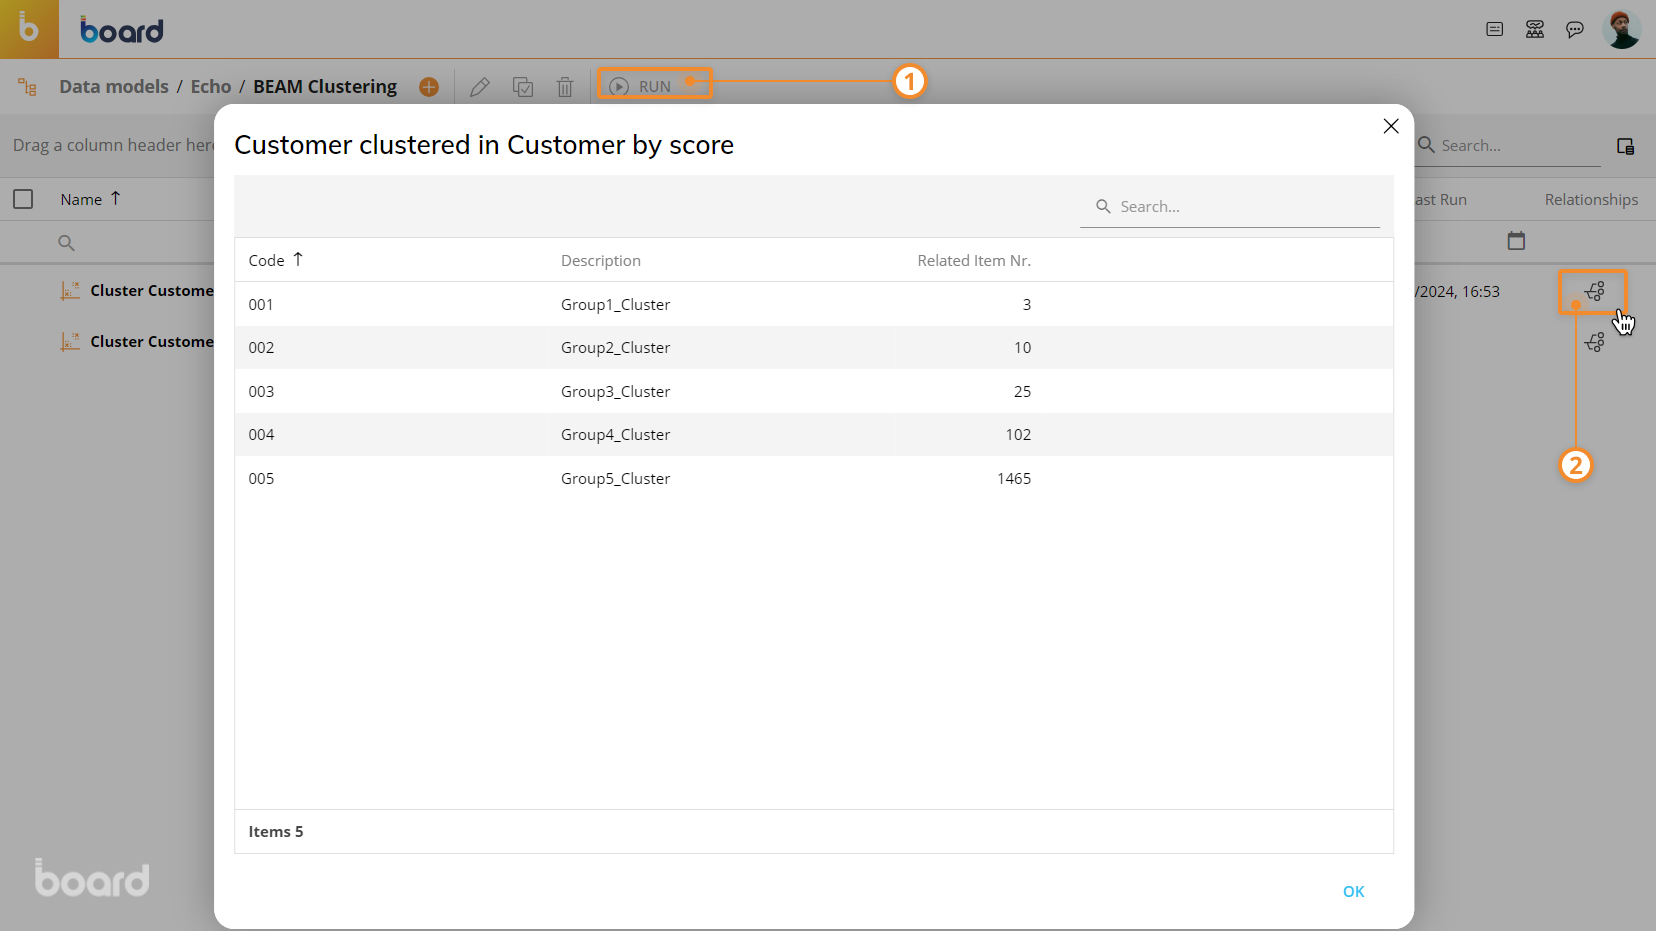
You may find new cluster members without any relations (missing children) in the results popup window. This can happen if the required number of clusters is too large for the values of the observed data set. For example, if you require 20 clusters for only 3 customers, Board will still create 20 new members, even if some of them will not have any Relationship: this will happen to be consistent with the required number of clusters.
Creating a Clustering Scenario
To create a Clustering Scenario:
Click on the orange plus icon (
 ) in the top left corner next to "BEAM Clustering" to bring up the scenario configuration panel.
Enter the name of the clustering scenario in the "Scenario" field.
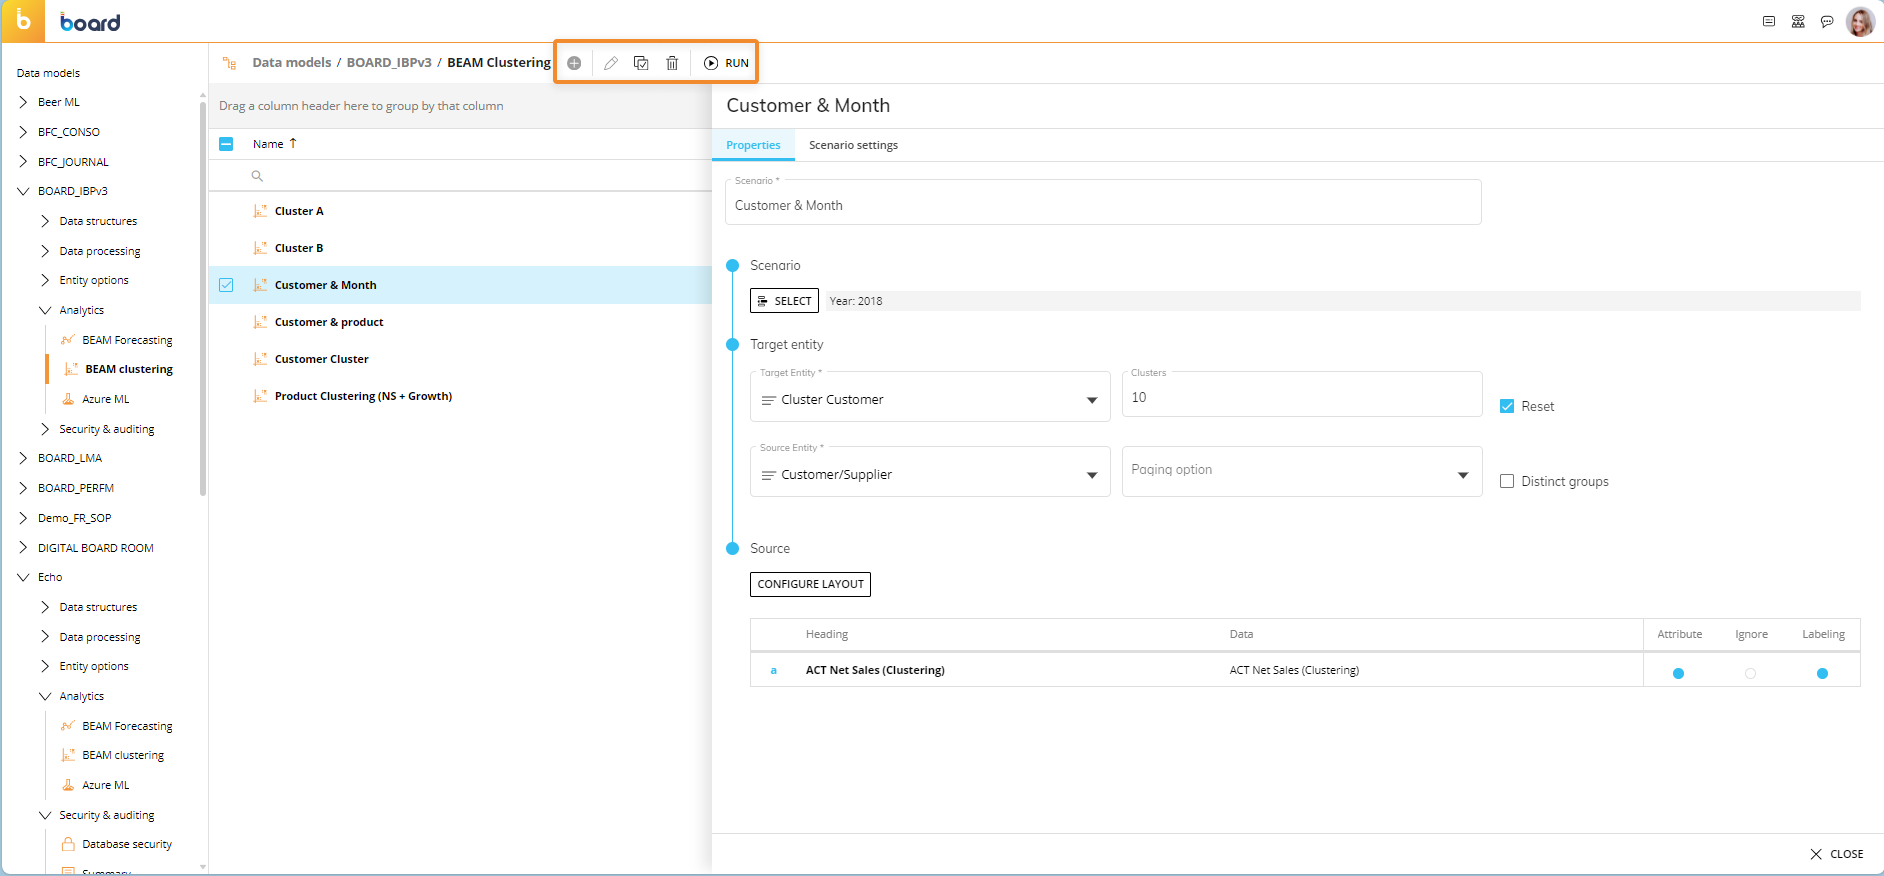
(Optional) Click on the "SELECT" button to apply a selection. In this case, the scenario will only analyzes data related to members included in the selection.
Select the target Entity from the "Target Entity" dropdown list. Note that the target Entity must be a parent (more-aggregate) of the source Entity (less-aggregate). See Relationships basic concepts for more information.
Enter the number of clusters in the "Clusters" field. This is the number of groups into which you want to divide the source Entity (i.e. the number of members that will be created in the target Entity).
Enable the "Reset" option if you want to clear existing Relationships between the source and target Entity members when you run the clustering scenario. This option is enabled by default.
Select the source Entity from the "Source Entity" dropdown list. The source Entity must be a child (less-aggregate) of the target Entity (more-aggregate) along the same Relationship tree. See Relationships basic concepts for more information.
(Optional) Select an Entity from the "Paging option" dropdown list. The clustering scenario will group the members of the source Entity in the number of clusters indicated above for each member of the Entity selected from this list. For example, if you want to cluster the members of a "Customer" Entity, you can choose the "City" Entity as a paging option. In this case, the clustering scenario will cluster the customers that are alike for each City and not similar overall. Only Entities related to the source Entity are displayed in this list.
Enable the "Distinct group" option if you want to create the desired number of clusters for each member of the Entity chosen in the "Paging option" list. For example, if the paging option is the Entity "City" which has 10 members and the number of desired clusters is 3, then the clustering scenario will create 30 new members (3 clusters for each member of the "City" Entity) .

Configure a Layout with the Data Blocks that will be analyzed by the clustering algorithm. For each Data Block, click on one of the following options next to them to choose how they will be interpreted by the clustering scenario:
Attribute. Data Blocks with this option enabled will be considered for the clustering. You can think of them as the axis on which the clustering is performed.
Ignore. Ignores the Data Block. This means that the clustering scenario will completely ignore the specified Data Block. These are Data Blocks that are needed in the Layout to perform calculations, but are not of direct interest.
Labeling. This Data Block is used to choose the order of the clusters. The newly created members are numbered according to this Data Block. Only one Data Block can be configured as Labeling and usually it is one of the Data Blocks that is already configured as an "Attribute".

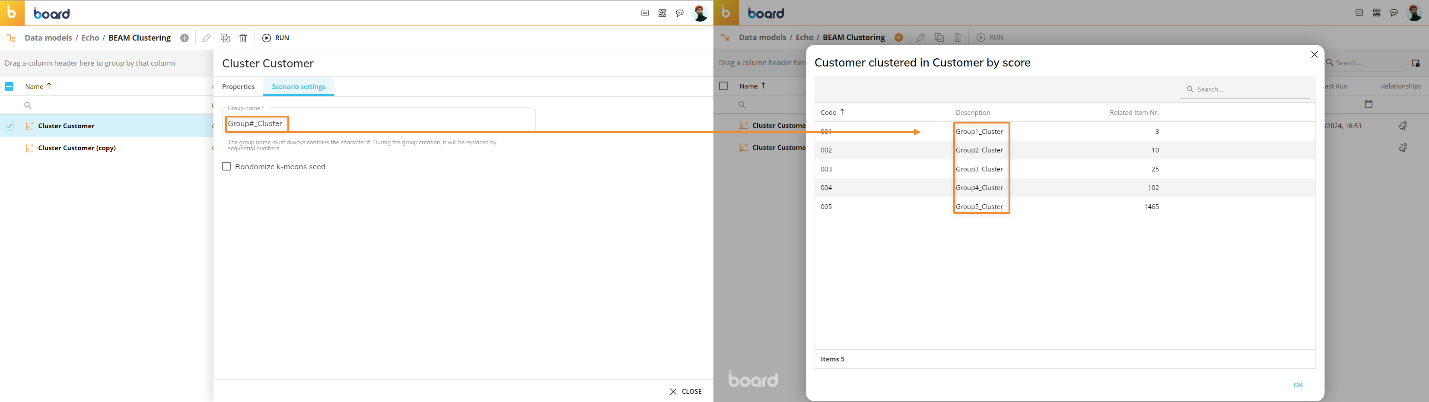
Configure the following options under the "Scenario settings" tab to finalize the scenario creation:
Group. Here you can enter a suffix to the descriptions of the members created by the clustering scenario. By default, the descriptions are created and numbered sequentially. When you enter a value in the "Group" field, Board will automatically add the "#" character, which represents the default number.
Randomize k-means seed. Enable this option if you want to randomize the k-means algorithm seed every time you run the clustering scenario.
Managing a Clustering Scenario
You can perform different actions on one or more existing clustering scenarios by selecting them and clicking on the different buttons that appear above the clustering scenario list.
The available BEAM Clustering page actions are described below:
To edit one or more clustering scenarios, select one or more clustering scenarios and click the pencil icon to open the scenario configuration panel. You can also click on a single clustering scenario directly from the table to modify the desired settings explained in the paragraph above.
When editing multiple clustering scenarios, only the Target Entity, Clusters, Reset option, and Source Entity can be edited.
To create a copy of an existing clustering scenario, select it and click on the Duplicate icon. A popup window appears where you can enter the name of the copied clustering scenario and save it
To delete one or more clustering scenarios, select them and click on the trash icon.
To run a clustering scenario, select it and click on the "RUN" button.
You can run an existing clustering scenario from the dedicated Procedure step. See BEAM Action group for more information.