This topic describes how to create and configure a Card Object in a Screen or Container, including its Layout, appearance, properties, and drill options.
Create a Card Object
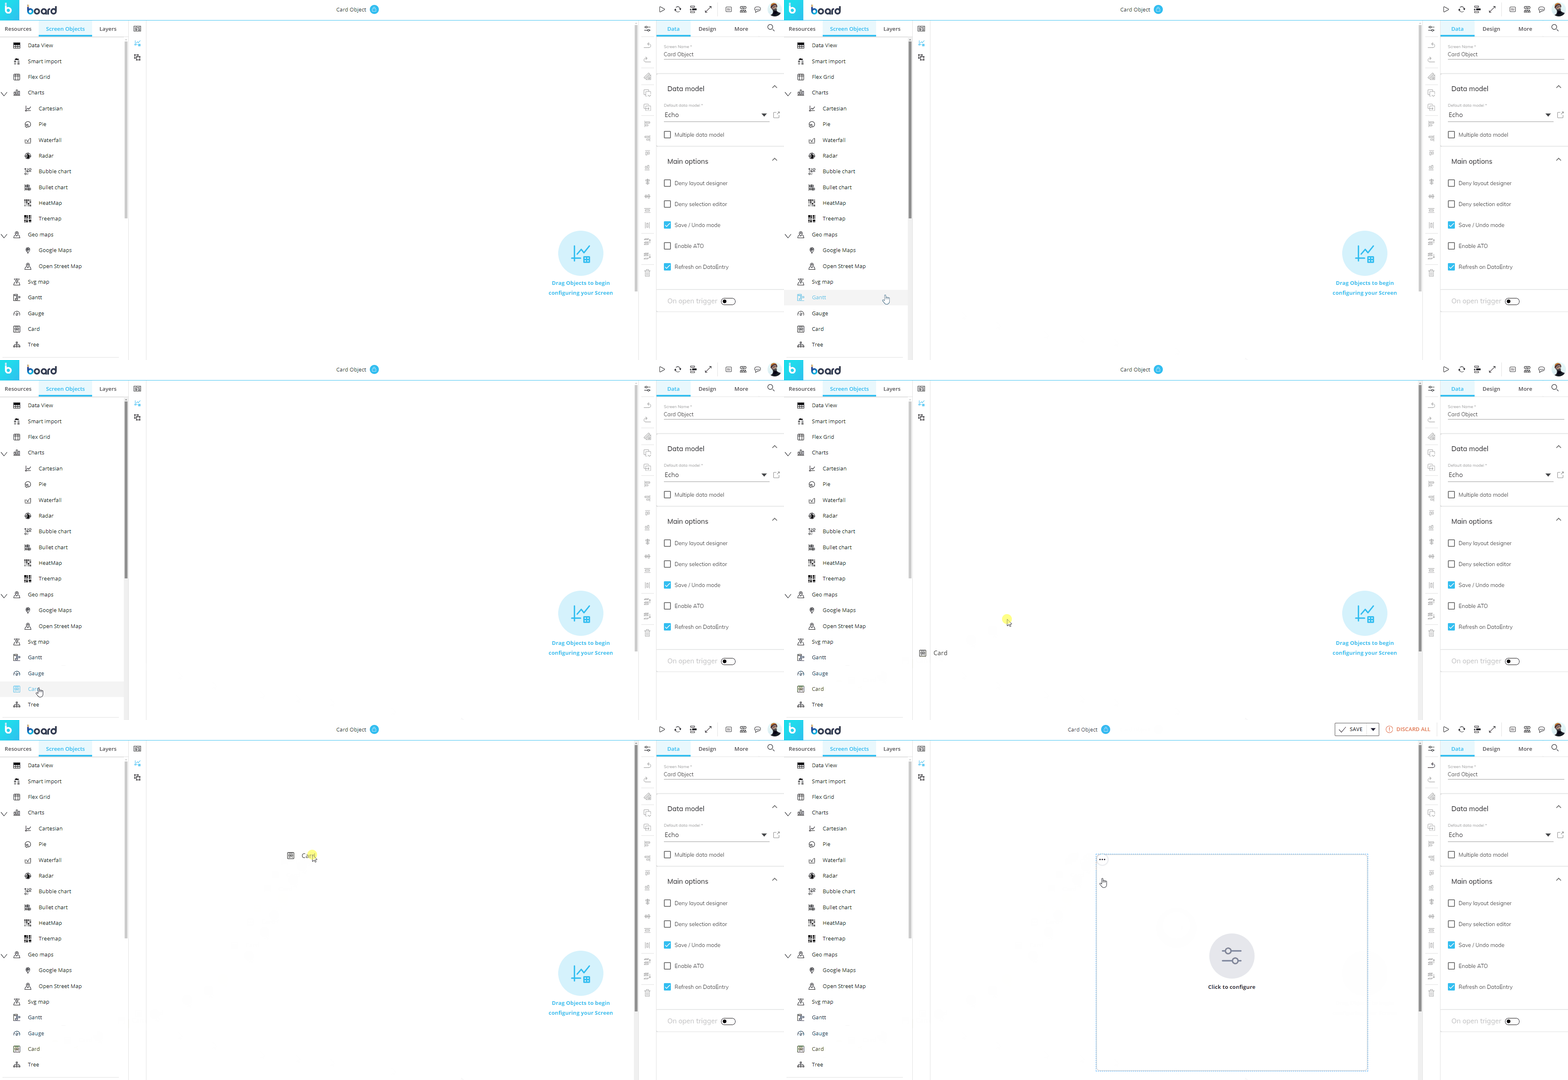
To create a Card Object, follow these steps:
Open a Screen in Design Mode.
From the Screen Objects list in the left panel, drag the Card Object onto the Screen or into a Container.
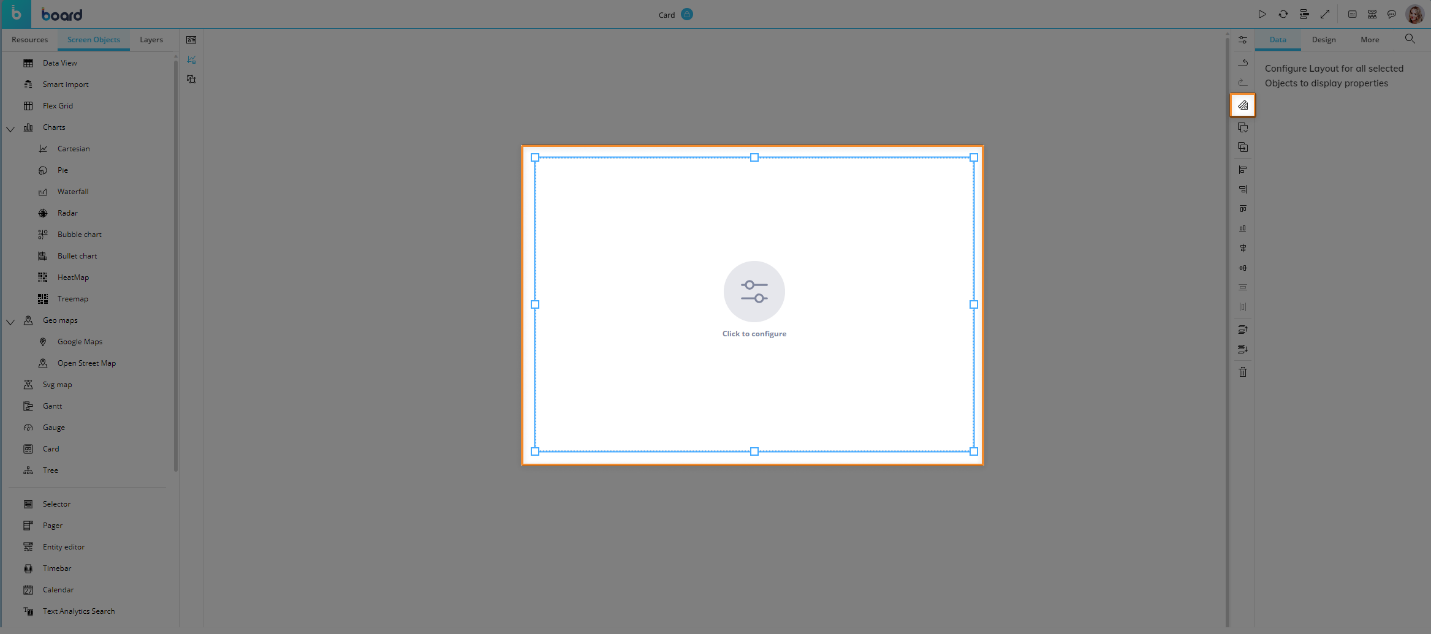
Select the Card Object.
Select the "Configure Layout" button
 from the Properties Toolbar, located vertically alongside the Properties panel to the right of the Screen.
Configure the Layout as described in the next section.
A new Card Object is empty until you configure its Layout.
See The Layout Object, Configure a Layout, and About Data Blocks of a Layout for more details on the Layout Object.
Configure the Card Layout
The Layout Editor for the Card Object includes Object-specific options and properties.
Unlike the standard Layout Editor, the Card Object supports only one Entity set By Row and no Entities set By Column.
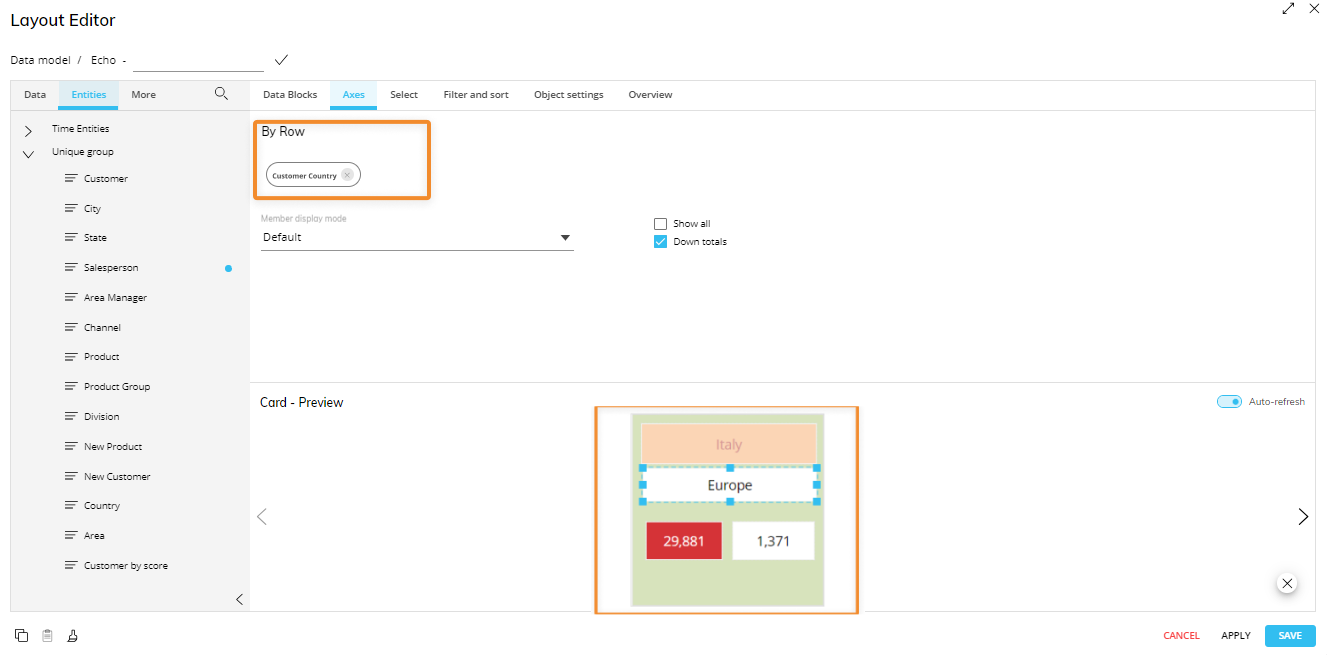
Data Blocks
The Data Blocks area supports all Data Block types, including Cubes, Algorithms, and Entities.
Most Data Block settings are supported, except Detail By. For example, you can enable Data Entry on one Block and a Color Alert on another.
Axes
The Card Object supports:
One Entity set By Row
No Entities set By Column
For each member of the Entity set By Row, the Card Object displays the data defined by the Blocks in the Data Blocks area.
The "Down totals" option is available in the Axes settings but is not supported by the Card Object. Changes to this setting are ignored.
Object preview
Each Block in the Data Blocks area appears as a rectangle within the card in the preview pane:
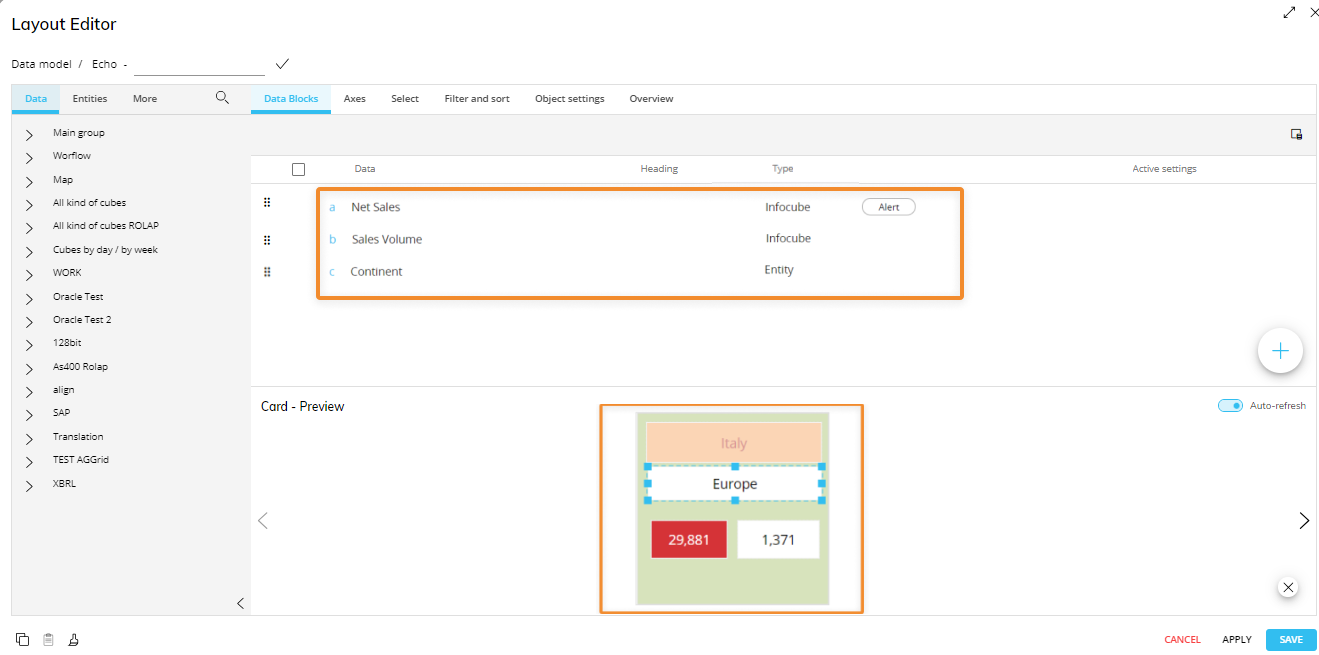
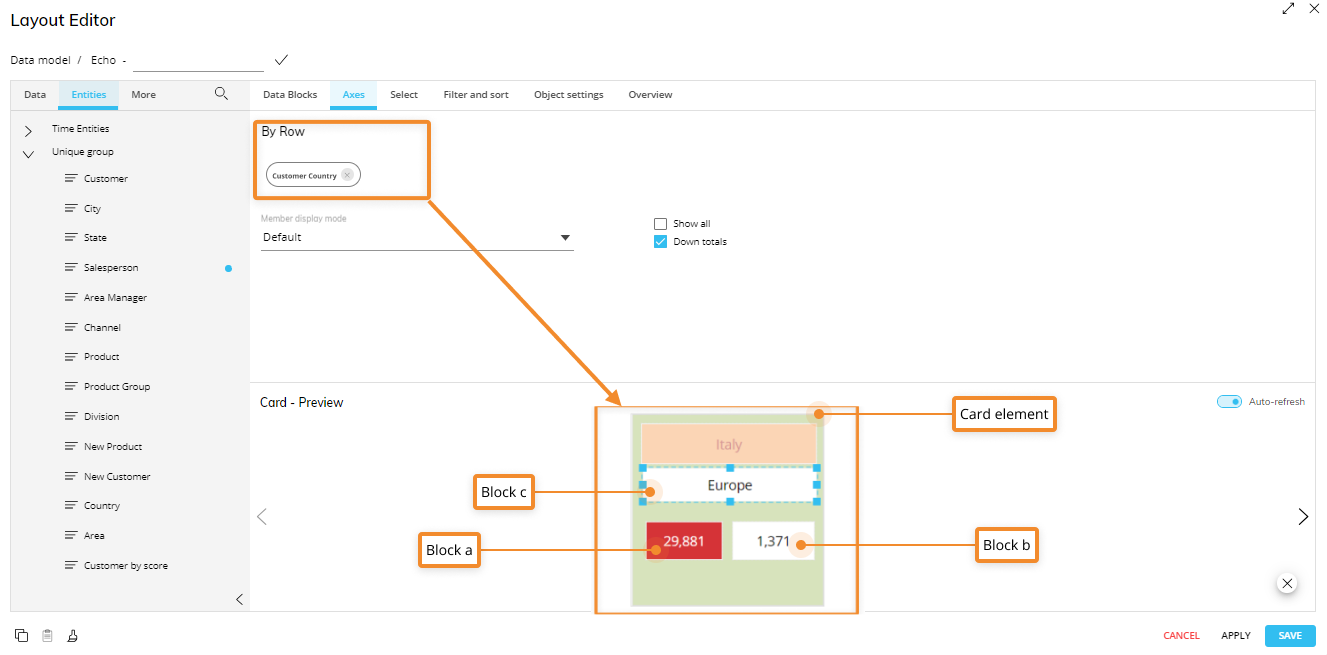
You can move and resize each rectangle within the Preview, just like Objects on a Screen. The size and position of Objects are applied to the corresponding Block in every card displayed in the Object.
Use the previous and next arrows to preview the cards for different members of the Entity set By Row.
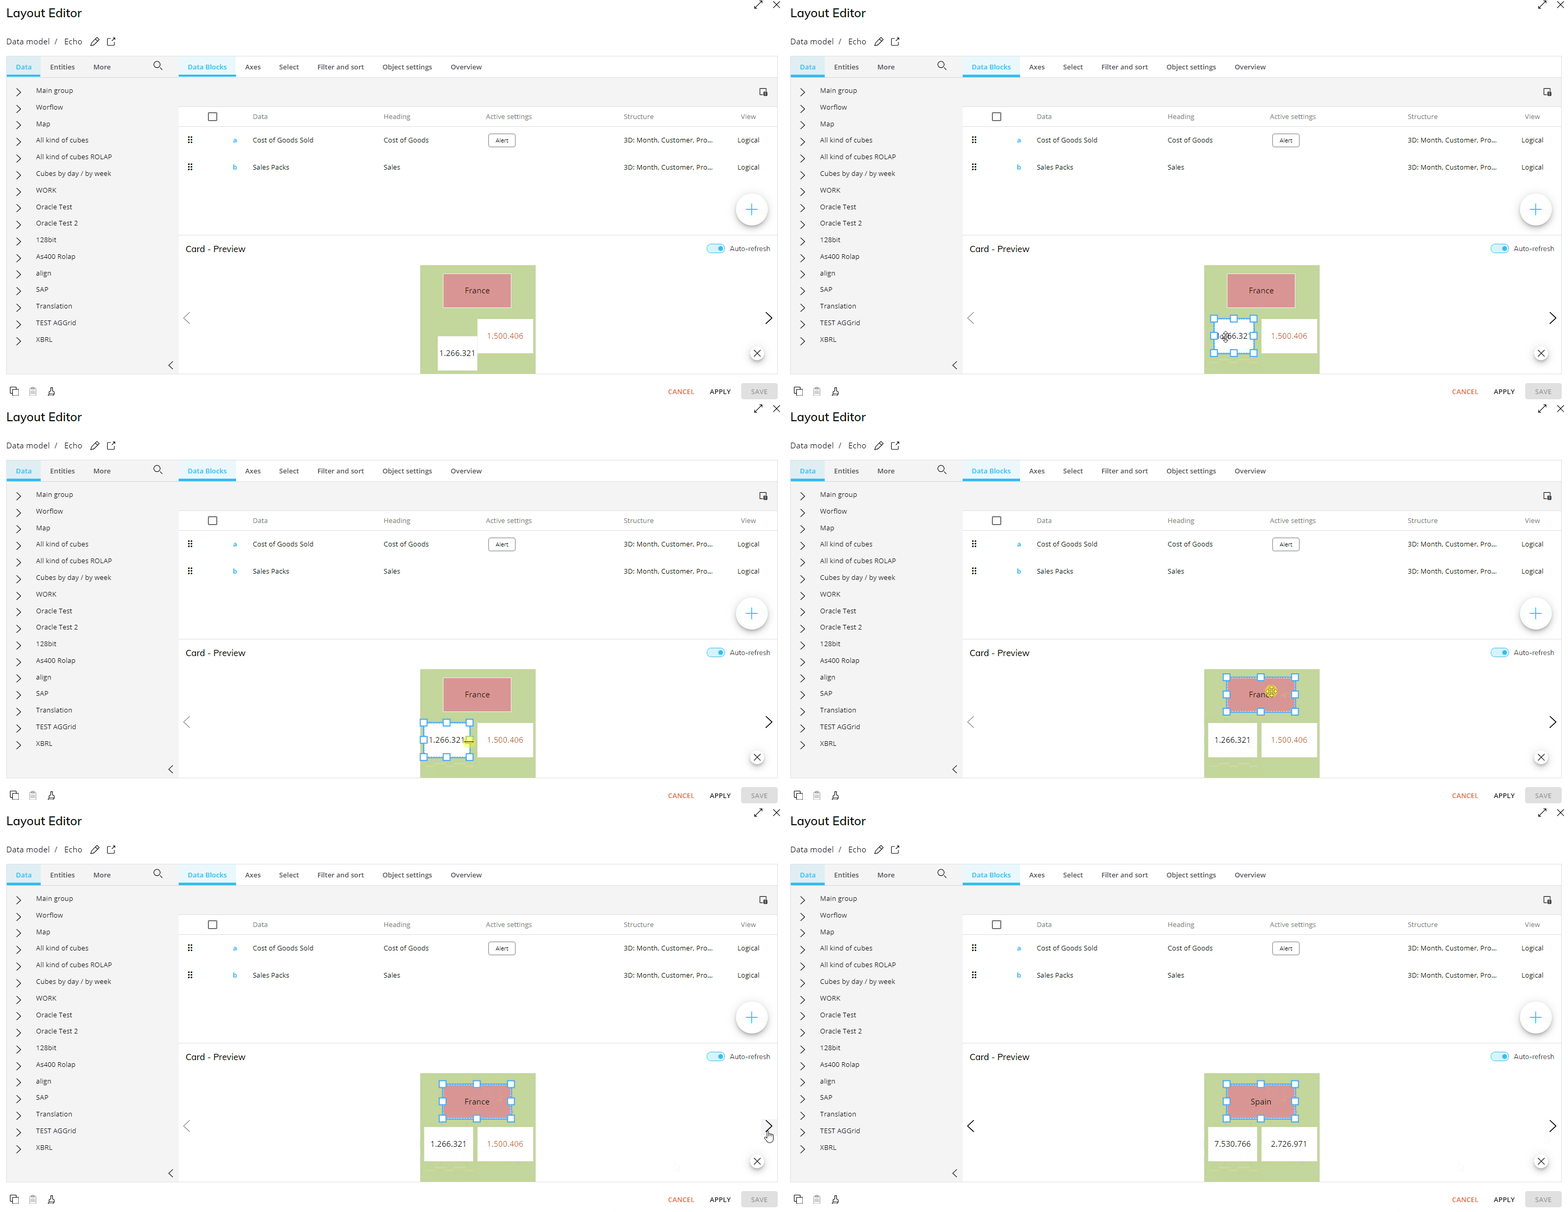
Text wraps automatically according to the available space. If a single word does not fit, Board truncates it and displays an ellipsis.
Object settings
Use the "Column appearance" menu to configure the appearance of each Data Block.
The available options include:
Button
Checkbox
Default
You can also select "CONFIGURE DRILL" to configure a drill on one or more Data Blocks.
Configure Card properties
After you configure the Layout, select the Card Object to access its properties in the Object Properties panel.
The Card Object supports the properties common to Screen Objects, except "Disable Drill down".
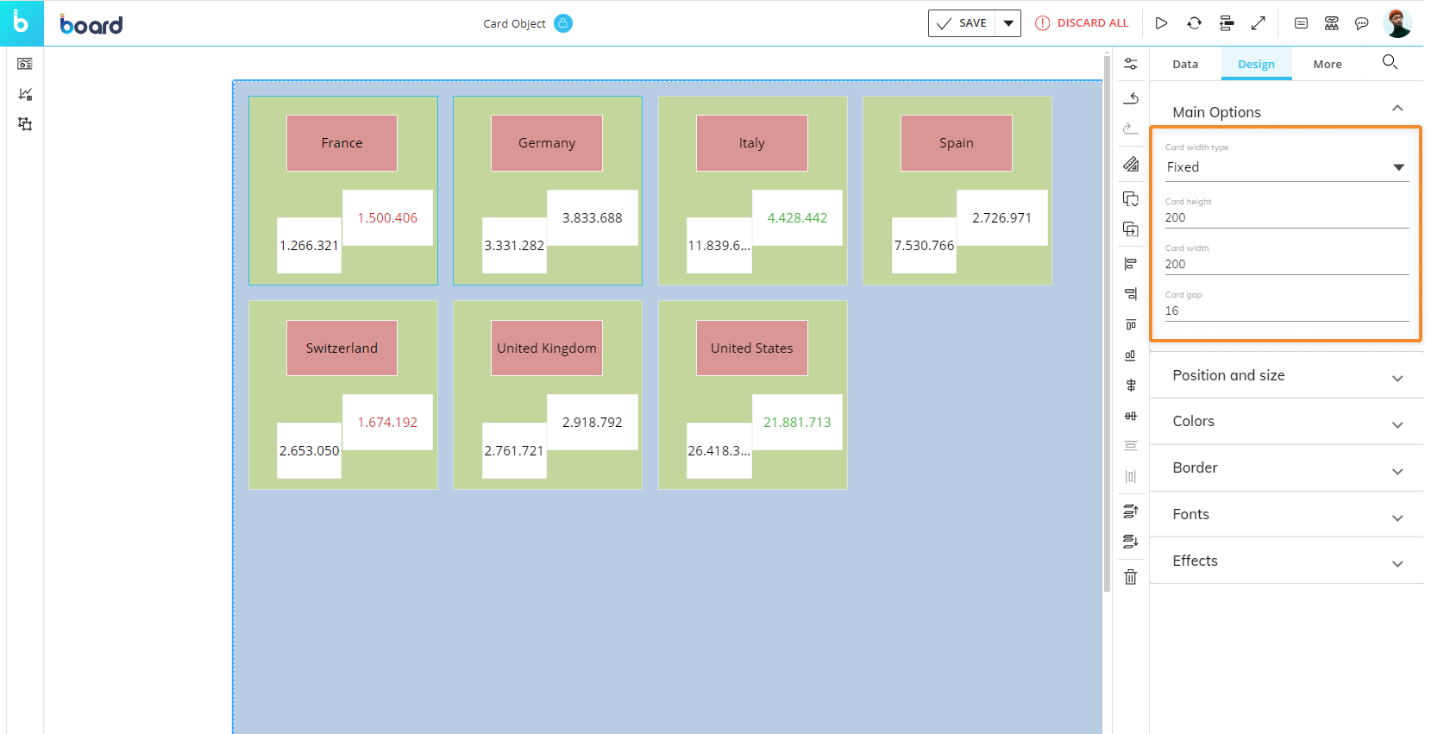
The Card Object is responsive and automatically displays as many cards as possible on each row according to the available space and configured card size.
You can use a fixed or dynamic card width and configure the space around each card. With a dynamic width, cards automatically resize within the configured minimum and maximum widths. Card dimensions and gaps are measured in pixels.
Under the "Design" tab, you can configure the following Card-specific properties:
Card width type. Select "Fixed" or "Dynamic".
Card height. Enter the card height in pixels.
Card width. When the width type is "Fixed", enter the card width in pixels.
Card min width/Card max width. When the width type is "Dynamic", define the minimum and maximum widths. Board resizes the cards within these limits according to the available space.
Card gap. Enter the space around each card in pixels.
Configure Drill options
In Design Mode, the Card Object provides the same interactive features available in Play Mode, with some differences for Drill functions.
You can configure which Object toolbar options are available to users in Play Mode.
To configure the Object toolbar:
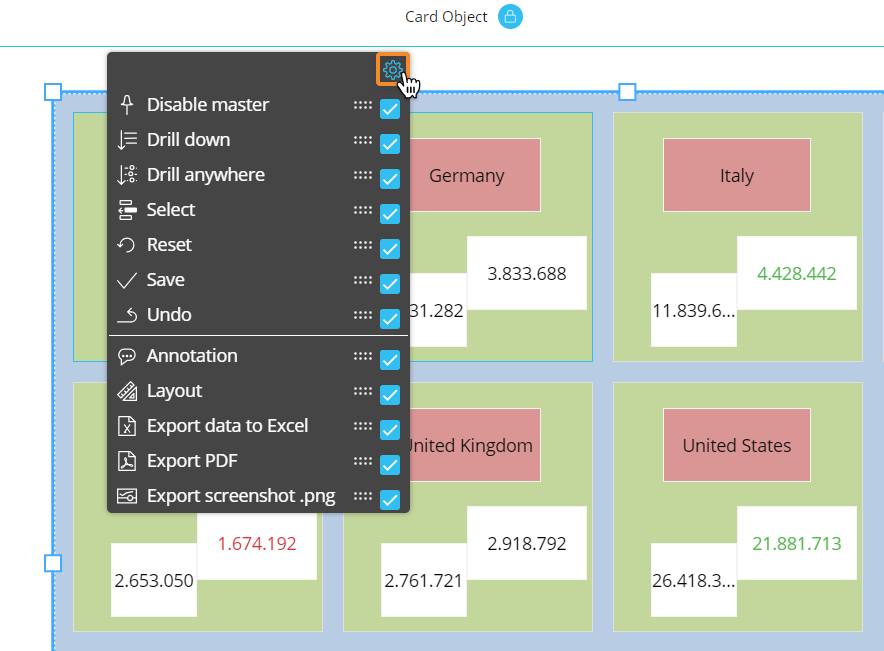
Double-click or Ctrl + click the Card Object to access its interactive options.
Select the Settings icon in the top-right corner of the toolbar.
Select or clear the checkbox next to each option to show or hide it in the Object toolbar in Play Mode.
You can configure the availability of options such as Drill down, Drill anywhere, Select, Reset, Save, Undo, Annotation, Layout, and the export options.
The available options can depend on the Card Object configuration.
Default Drill Down
You can configure a default Drill Down that is saved with the Card Object. The default Drill is performed in Play Mode when users select the Drill Down icon  or double-click the corresponding member of the Entity set By Row.
To configure a default Drill Down on an Entity:
Select a member of the Entity set By Row in a card.
Select the Drill Anywhere icon
 .
Select the Entity to drill down on.
Select "APPLY". The configured drill is performed and the data is displayed in the Data View.
Close the window.
Save the Screen.
The configured Drill becomes the default in Design and Play Modes.
Users can still configure other Drill Down paths in Play Mode if they are allowed to do so.
Screen Selections and selections made through Selector Objects also apply to the data displayed in Drill Down windows.
If no default Drill is configured, you can also start the configuration by double-clicking the item that you want to associate with a Drill Down path.
Limit Drill Down Entities
You can control which Entities users can select when configuring a Drill Down in Play Mode.
To limit the available Entities:
Select a member of the Entity set By Row in a card.
Select the Drill Anywhere icon
.Select "CONFIGURE".
Open the Entities tab.
Select the Entities that you want to make available.
Select "APPLY".
The selected Entities are the only ones available to users when configuring a Drill Down in Play Mode.
Disable the Entities option to prevent users from configuring Drill Downs on Entities.
Configure a default Drill Down from the Layout Editor
You can also configure a default Drill on individual Data Blocks:
Select the Card Object and open the Layout Editor.
Go to Object settings.
Open the Column appearance menu.
Select "CONFIGURE DRILL".
Select the element that you want to configure.
Click "APPLY" to save the Layout.
Drill-to-Screen
You can configure a Drill-to-Screen to navigate from the Card Object to another Screen in the same Capsule.
To configure the Screens available for Drill-to-Screen:
In a card element, select a member of the Entity set By Row.
Click on the Drill Anywhere icon
 .
From the popup window, click on the "CONFIGURE" button in the top right corner of the window to enter the "Drill Anywhere configuration" window, and click on the "Screen" subpage. Enable the toggle next to the Screen subpage title and select all the Screens that you would like to allow the Planners to drill to.
These Screens will be the only ones available when conducting a Drill-to-Screen for both Design and Play Modes, however, in Design Mode, you can see any hidden Screens from the Drill Anywhere window when you enable the "Show hidden" toggle in the top right corner of the window (which also shows you the hidden drills.
Click "APPLY" to close the configuration window.
From the Drill Anywhere window, you can now further configure your Drill-to-Screen with the following options:
Select the "Same tab" checkbox to open the destination Screen in the same browser tab.
Select the "New tab" to open in a new tab.
The Drill to Screen mode, if enabled, will open the destination Screen with a selection on the row header (a member of the Entity set By Row) when the user double-clicks on it or selects it and clicks on the Drill Down icon
 .
The Go to Screen mode, if enabled, will open the destination Screen when the user double-clicks on a row header (a member of the Entity set By Row) or selects it and clicks on the Drill Down icon
 . The destination Screen won't inherit any selection from the Data View.
The Dynamic Screen option allow to select a Block (an Algorithm) to dynamically change the Screen navigation based on another Block values (a text cube containing Screen names).
Click "APPLY" to save the configuration.
The Drill-to-Screen configuration process can also be started by double-clicking on the item you want to associate a drill path with if no configuration is yet set.
To create a default Drill-to-Screen configuration:
In a card element, select a member or double-click on the Object and click on the Drill Anywhere icon
 .
Select the Screen tab. If the "Screen" is not yet configured, enable the "Show hidden" toggle in the top right corner of the window.
If "Screen" is not yet configured as a drill option for Planners from the Drill Anywhere configuration window, you will not see a Screen tab in the Drill Anywhere window. You can make a default Drill-to-Screen without enabling Drill-to-Screens for the Planners. To do so, enable the "Show hidden" toggle in the top right corner of the window to see all the possible drills. If the drill headers are not configured for the Planners, then they have a "hidden" tag available next to their heading.
Make a Screen selection and click "APPLY" or double-click a Screen to save the Drill-to-Screen default configuration and close the window.
The Drill-to-Screen configuration process can also be started by double-clicking on the item you want to associate a drill path with if a configuration isn't already set.
To configure a Drill-to-Screen with a selection filter applied based on the selected member of the Entity set By Row from the Layout editor:
Select the Card and open the Layout editor.
Go to Object settings.
Go to the Column appearance menu. You can also change the cell appearance by selecting one of the options listed in the dropdown menu. Click on the "CONFIGURE DRILL" button to configure a Drill-to-Screen on one or more Data Blocks. Click on the "Screen" subpage.
Check the "Same tab" checkbox to open the destination Screen in the same browser tab, and "New tab" to open in a new tab.The Drill to Screen mode, if enabled, will open the destination Screen with a selection based on the on the row header (a member of the Entity set By Row) corresponding to the cell selected or double-clicked by the user in the Data View.
Screen selections and selections made by the user using Selector Objects (if any) also apply to data in the target Screen.
The Go to Screen mode, if enabled, will open the destination Screen when the user double-clicks on a cell of a configured Block or selects it and clicks on the Drill Down icon
 . The destination Screen won't inherit any selection from the Data View.
The Dynamic Screen option allow to select a Block (an algorithm) to dynamically change the Screen navigation based on another Block values (a text cube containing Screen names).
Save the Layout.
The Drill action will be triggered only if the user clicks on the rectangle corresponding to the Block where the Drill-to-Screen has been configured.
This feature allows you to nest your analysis in a more powerful way than the standard Drill Down, which only changes the level of granularity of a report. In a Drill-to-Screen navigation the data represented (values, indexes) and types of objects (Charts, Dashboards, Data Views) may vary as the user drills from a top level view to another Screen at a more detailed level.
Screen selections and selections made by the user using Selector Objects (if any) also apply to data in in the target Screen.
Drill-Procedure
It is possible to trigger a Procedure from a member of the Entity set by row displayed in a card element when the user double-clicks on it. The Procedure is launched with a selection filter applied based on the member clicked in the card element.
If a Drill-Procedure containing two or more Procedures is configured, when the user double-clicks on a member of the Entity set by row displayed in a card element, a pop-up window will allow the selection of the Procedure to be performed.
To configure a Drill-Procedure on a member of the Entity set By Row displayed in a card element:
In a card element, select a member of the Entity set By Row.
Click on the Drill Anywhere icon
 .
From the popup window, click on "CONFIGURE" in the top right corner of the window to open the Drill Anywhere configuration window and select the Procedures tab.
Select the Procedures for the drill configuration. Choose whether the Procedure comes from the "Capsule" or the "Data model" and then select the Procedure from the dropdown menu (as described below).
Capsule. If selected, the dropdown menu to the right allows you to choose from a list of Procedures saved at the Capsule level.
Data model. If selected, select a Data Model from the dropdown menu on the right. By doing so, only Procedures belonging to the chosen Data Model will display in the dropdown menu to the right.
After you've chosen the desired Procedure, click the "ADD" button on the right. Repeat the process for each Procedure that you want to add to the drill.
Enable Procedures with the corresponding toggle by the tab header to allow end users to configure a Drill-Procedure with the Procedures that you just added.
If the Procedure toggle is left disabled, its configuration will not be available in Play Mode.
Click "APPLY" to save the Drill-Procedure configuration and return to the Drill Anywhere window.
Double-click a Procedure or select one and click "APPLY" to set a default Drill-Procedure.
The Drill-Procedure configuration process can also be started by double-clicking on the item you want to associate a drill path with if a configuration isn't already set.
To configure a Drill-Procedure with a selection filter applied based on the selected member of the Entity set by row from the Layout editor:
Select the Card Object and open the Layout editor.
Click on Object settings.
Got to the Column appearance menu. You can also change the cell appearance, by selecting one of the options listed in the dropdown menu. Click on the "CONFIGURE DRILL" button to configure a Drill Procedure on one or more Data Blocks as described in bullet point n°2 of the previous bulleted list. Click on the "Procedures" subpage.
Save the Layout.
Screen selections and selections made by the user using Selector Objects (if any) also apply to data in the triggered Procedure.
Drill Through
It is possible to execute a Drill Through from a card element, when the user double-clicks on the member of the Entity set by row displayed in it. The Drill Through is executed with a selection filter applied based on the clicked Entity member.
Drill Throughs are configured in the Drill Through section of the Data Model.
To configure a Drill Through on a member of the Entity set By Row displayed in a card element:
Select the member of the Entity set by row and click on the Drill Anywhere icon
 .
From the popup window, click on the "CONFIGURE" button to open the "Drill anywhere configuration" window.
Select the "Drill Through" tab. Enable the toggle next to it and add the desired Drill Throughs you'd like to be available to the Planners below. If the toggle is not enabled, the Drill Through drill down will not be available within the Drill Anywhere window (when accessed by the Object toolbar) for Designers or Planners.
Click "APPLY" to save and return back to the Drill Anywhere window where you can now configure a default Drill Through.
Click "APPLY" to save the Drill Through configuration.
The Drill Through configuration process can also be started by double-clicking on the item you want to associate a drill path with if a configuration isn't already set.
Configure a Drill Through from the Layout editor
To configure a Drill Through with a selection filter applied based on the selected member of the Entity set By Row from the Layout editor:
Select the Card Object and open the Layout editor.
Click on Object settings.
Go to the Column appearance menu. You can also change the cell appearance by selecting one of the options listed in the dropdown menu. Click on the "CONFIGURE DRILL" button to configure a Drill Through on one or more Data Blocks. Click on the "Drill through" subpage.
Select a Drill Through and press "APPLY" or double-click on a Drill Through to save and close the window.
Save the Layout.
Screen selections and selections made by the user using Selector Objects (if any) also apply to data in the Drill Through.