You can configure a Layout in Design Mode or edit an existing Layout in Play Mode.
A Layout configured and saved in Design Mode defines the associated Object's default data configuration that the end user will interact with.
An existing Layout can be edited in Play Mode in order to change the data configuration of the associated Object and perform new analyses. But a Layout edited in Play Mode will not be saved permanently into the Capsule: refreshing the Screen or closing the Capsule will result in the loss of all changes. However, the end user can use the "My View" or "Add to Presentation" in the Sliding menu accessed by the burger icon (  ) in the Top Menu in order to save a customized Layout.
Users associated with any license can edit a Layout in Play Mode, provided that the appropriate Screen property is configured to allow it. See Screen properties for more details.

To configure a Layout in Design Mode, select an Object and click on the Layout icon (  ) in the Top Menu. You can also open the Layout editor by hovering over the Object and clicking on the object tollbar icon (
  ) that appears in the upper left corner.
To configure a Layout in Play Mode, hover over the corresponding Object and click on the Object toolbar icon (  ) that appears in the upper left corner.
Depending on the Object with which the Layout is associated, the Layout editor may have slightly different features and configurations available.
Layout Configuration
The instructions below suggest an optimal configuration workflow and assume that the required Cubes, Entities, and Relationships in the target Data Model have already been created and populated with data.
Once the Layout Editor is open, proceed as follows:
Give your Layout a title. (Optional, but highly recommended.)
Select a target Data Model (required only in case the multiple Data Models mode is enabled in the Screen Properties).
Apply a Layout Selection that applies only to the Layout (optional, but recommended in case you're working with highly granular Cubes with many dimensions in order to avoid slowdowns during calculations). Click on "Select" and choose the Entity or Entities from the dropdown menu under "Layout Select" to configure the Select.
If a Selection has been applied on a Screen in Design mode, then the Layout will automatically inherit it. Its configuration will be displayed under "Screen Select". See About the Select for more details.
Create some Data Blocks. Drag and drop Cubes, column algorithms, Rules, ranking functions, Entities, and/or Relationships from the Data panel under the "Data" tab on the left to the Data area under the "Data Blocks" tab on the right. You can also create Data Blocks by clicking the "+" button below the Data area. To create a Data Block defined by a column algorithm, drag and drop the Algorithm placeholder from the "More" tab of the Data panel to the Data area, or click the "+" button below the Data area and select the Algorithm icon.
The first Data Block of a Layout must be a Cube or an Algorithm.
Click on a Data Block to reveal the Block settings panel on the right-hand side of the page. Click the "Filter and sort" tab to configure sorting options and filtering conditions based on Data Block values.
You can change the Data Blocks order by dragging and dropping them to a different position in the list. To do so, hover over the (
 ) icon displayed in the row header of the desired Data Block to reveal the movement cursor and to start dragging it.
If you add an algorithm as a Data Block, two scenarios may occur:
If the arguments for the formula include other Data Blocks (for example, "a-b"), the algorithm Block is displayed for all Entities set by column in the Layout.
If the arguments for the formula do not include other Data Blocks or no formula has been entered, the algorithm Block is only displayed once.
Configure the Axes area. Set Entities in rows and columns by dragging and dropping them from the Data panel under the "Entities" tab on the left to the "By Row" and "By Column" areas in the Axes area under the "Axes" tab on the right. Additional Axes settings will be available under the Entities in both the "By Row" and "By Column" areas.
When you add multiple Entities by row, Board automatically detects the grouping: the most nested Entity in a Relationship is arranged in the rightmost position in the "By Row" field. You can rearrange the Entity order in each of the two fields only if those Entities are unrelated. To do so, drag and drop them in the desired position.
Check the Object preview pane and click the "Object settings" tab to configure additional Layout settings.
The preview will update every time the Layout configuration is changed. Depending on the Object the Layout is associated with, the "Object settings" area may have different features and configurations available.
Once the Layout Configuration is complete, you can:
Click on "SAVE" to apply all changes. The Layout editor will close and the Layout is refreshed to immediately reflect the changes.
Click on "APPLY" to apply all changes and close the Layout editor without executing the Layout.

By default, when RAM saturation exceeds 85%, any Layout executions that have been running for more than 5 minutes are aborted. Both the RAM saturation threshold and the Layout execution timeout can be configured via the RamSaturationPercentage and the LayoutExecutionMinutesTimeout parameters respectively.
On-premises installations. The RamSaturationPercentage and the LayoutExecutionMinutesTimeout parameters have been added to the server_config_v2.xml file that can be found in the path C:\Program Files\Board\Board Server\ on the machine where the Board Server has been installed.
Cloud subscriptions. For Cloud customers, custom configurations can be applied by raising a ticket through the Board Support Portal. The ticket must contain your Platform name (e.g. customer1-s1.board.com). The Board Cloud Operations team will then handle your request.
The Out of memory management system applies to all Layouts, except those configured in "Extract" Procedure steps and in the R Calculation step.
When Layouts get stopped by the Out of memory management system, they are logged in the RamSaturationActions log.
Unbalanced hierarchy in the "By Row" field
Once an Entity that contains an unbalanced hierarchy is added in the "By Row" field in a Layout, values are aggregated on-the-fly along the roll-up hierarchy.
The items displayed in the Layout are those selected in the Select filters. Note that the on-the-fly aggregation is not affected by the Select filters therefore the values of parent items doesn't vary if you Select or Exclude one or more children. The Select filters only affect which rows are returned by the Layout.
For example, let’s consider a hierarchy made up of three members:
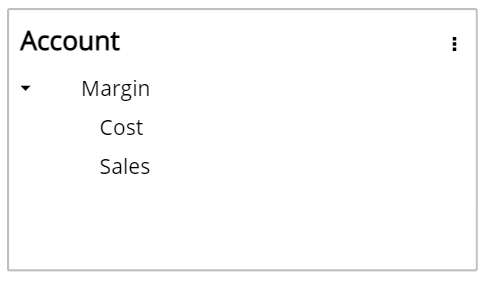
In this scenario, Margin is parent of both Cost and Sales.
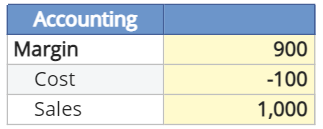
The data saved at physical level within the Cube are the following:
Cost -100
Sales +1000
The corresponding Data View will show the following values:
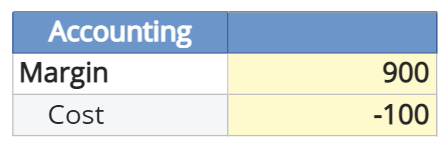
By selecting Margin and Cost only, the Data View will show the following values:
When the Entity that contains the unbalanced hierarchy is added in the "By Row" field in a layout, it is also possible to apply Rules and Nexel formulas to it.
Layouts with Unbalanced hierarchies, Rules, and Algorithms
If a Layout includes Algorithm Blocks and Blocks with unbalanced hierarchies on which Rules have been applied, values are calculated following the sequence described below:
In non-algorithm Blocks with unbalanced hierarchies, the Parent members are calculated based on their child members.
The rules are executed.
The algorithms are calculated. In case of Blocks with unbalanced hierarchies, they are calculated on their child members.
The algorithms are calculated on parent members for Blocks with unbalanced hierarchies.
In the event that an Algorithm Block refers to a Block with an unbalanced hierarchy and a Rule applied to it, then in order to have the algorithm calculated on the values resulting from that Rule, you can:
Apply the same Rule to the algorithm Block.
Disable the unbalanced hierarchy on the algorithm Block.
Entity in a Select
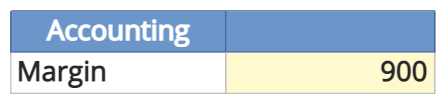
Suppose the Entity containing the unbalanced hierarchy is not in the "By Row" field of a Layout, but a parent is selected via a Select; the Layout displays the total of that parent’s children’s values.
By selecting Margin in the previous example, the Data View would show the total sum of 900.
Improve performance of a Layout execution
To optimize RAM consumption, a runaway query protection system is available in order to reduce the memory usage for a Layout execution which improves Board’s overall performance. The runaway query protection system is disabled by default, but can be enabled to kill queries that generate more than a specific maximum number of cells. The runaway query protection system does not apply to "Extract" Procedure steps, the Dataflow step, the R Calculation step, and all requests coming from Office Add-ins.