The Data Entry option allows data entry on the selected Data Block. By default, cells that accept Data Entry actions are displayed with an ivory background.
Data entry can be enabled on Blocks populated with:
A Cube. In this case, a Data Entry action saves a value (numerical, text, a date) or a file in the specified Cube.
Data entry actions on BLOB cubes must be performed at physical level, i.e. the cube dimensions must be present in the "BY ROW" or "BY COLUMN" fields in the axis area.
An Algorithm. In this case, a Data Entry action saves a value to a Cube by reversing the formula of the calculated Block (see the "Reverse algorithm" paragraph below).
An Entity. In this case, a Data Entry action allows the assignment or change of a hierarchical relationship.
Activating this option alone is not sufficient to enable Data Entry.
Data Entry conditions
The following additional Data Entry conditions must be met:
The user must have an appropriate Board license and the necessary security privileges to perform write-back actions.
For text, date, and BLOB Cubes, Data Entry is supported only at physical level, not on aggregate views.
Time Functions (such as Previous Year, Yearly Cumulated Valued, etc.) and reference functions (such as Refer to, Detail by, etc.) cannot be activated if the Data Entry option is enabled.
If the Layout view is an aggregate view on the Data Entry Cube, the Data Split & Splat (logical data-entry) feature must be enabled (Split & Splat is automatically enabled by default when Data Entry is enabled).
Optional Data Entry settings
In conjunction with the Data Entry, it’s possible to enable the following options on the same Data Block:
Split & Splat (enabled by default): enables or disables the Data Split & Splat (logical data-entry) feature.
Reverse algorithm: allows you to enter a value on a calculated Block (algorithm) in order to recalculate one of the factors of the formula and write it on the corresponding Block.
Data Entry Example
Consider the following report: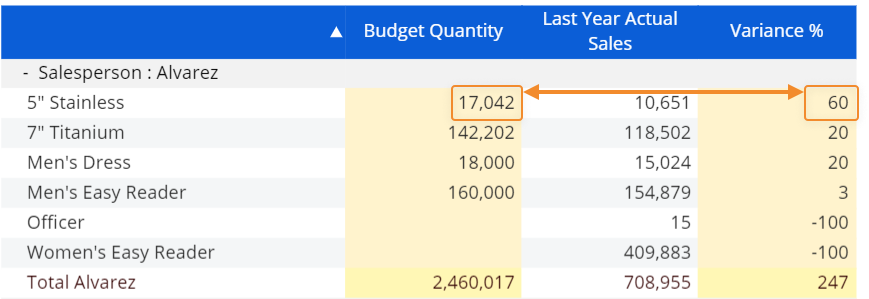
The Data Block "a" contains the Budget Quantity Cube and the Data entry option is enabled, so the user can enter a budget value on this Block.
The Data Block "b", Last Year Actual Sales, contains the sales value of last year: it is a reference value that helps the user to define the budget.
The Data Block "c" is the variance percentage obtained with an algorithm whose formula is: c=(a-b)/b*100. The Data entry option is enabled on this Data Block, so the user can enter a desired variance percentage and Board is able to derive the Budget Quantity corresponding to the given variance.
The Budget quantity value is derived by applying the following reverse formula in the "Reverse algorithm" field: a=b*(c+100)/100.
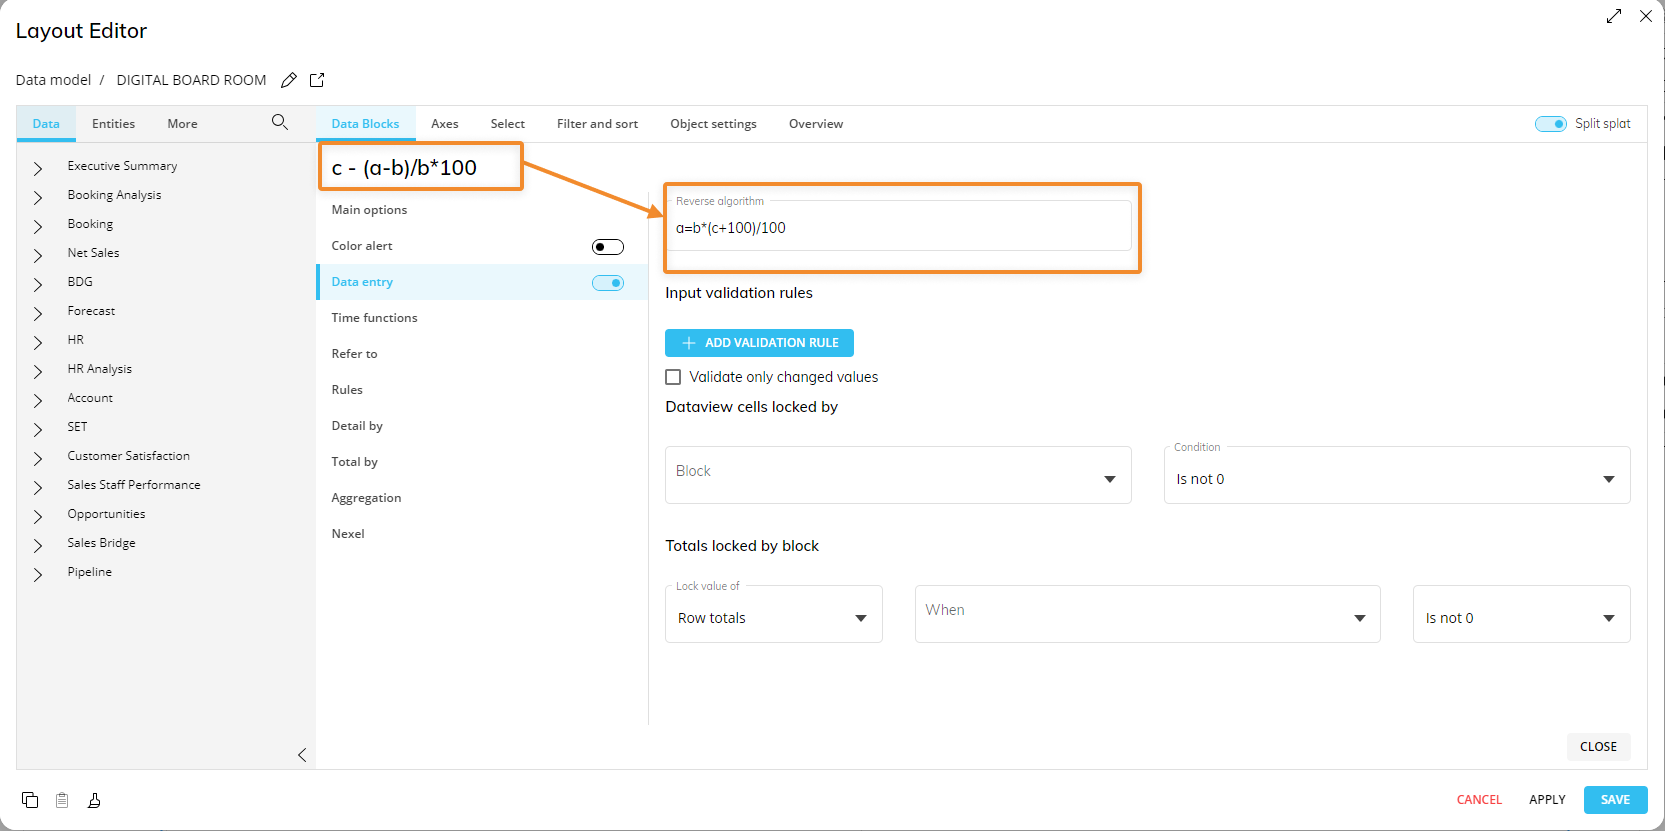
Reverse Algorithm
In the reverse algorithm field, enter the necessary elements in the following order:
The Data Block that represents the variable to change when the user enters a value (Block "a" in the example above).
The equal sign (=).
The formula itself (a=b*(c+100)/100 in the example above).
The target Data Block of the reverse algorithm must be a Cube with the data entry option enabled.
Validation rules
Validation rules allow you to define a validation formula in order to automatically accept or reject entered values.
This allows, for example, to accept the input value only if it is positive (in case of a budget price), or only if it is lesser or greater than a given value or a value of another Data Block.
A validation rule is a logical expression, which checks whether the condition for the entered value is TRUE or FALSE: if the expression returns TRUE then the rule is met and the entered value is accepted; if the expression returns FALSE the entered value is not accepted and an error icon with a custom message is displayed.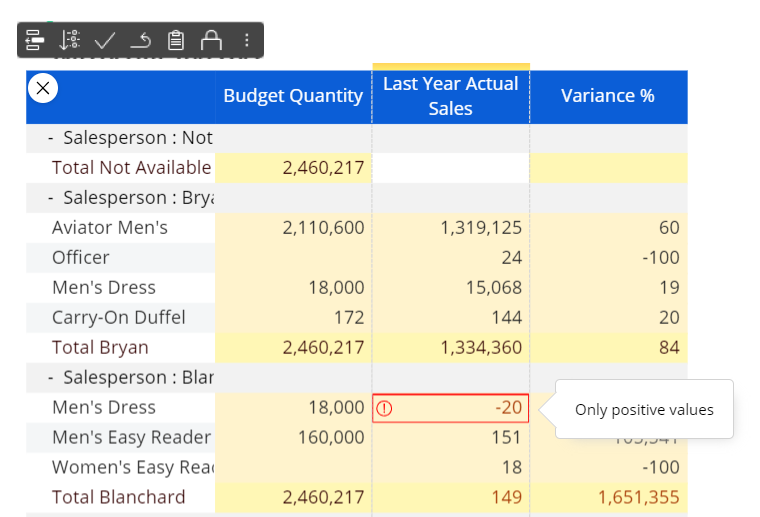
Validation rules are defined in the "Data entry" subpage: under "Input validation rules", click on "ADD VALIDATION RULE" and type the logical expression and the corresponding error message to display when the rule is not met.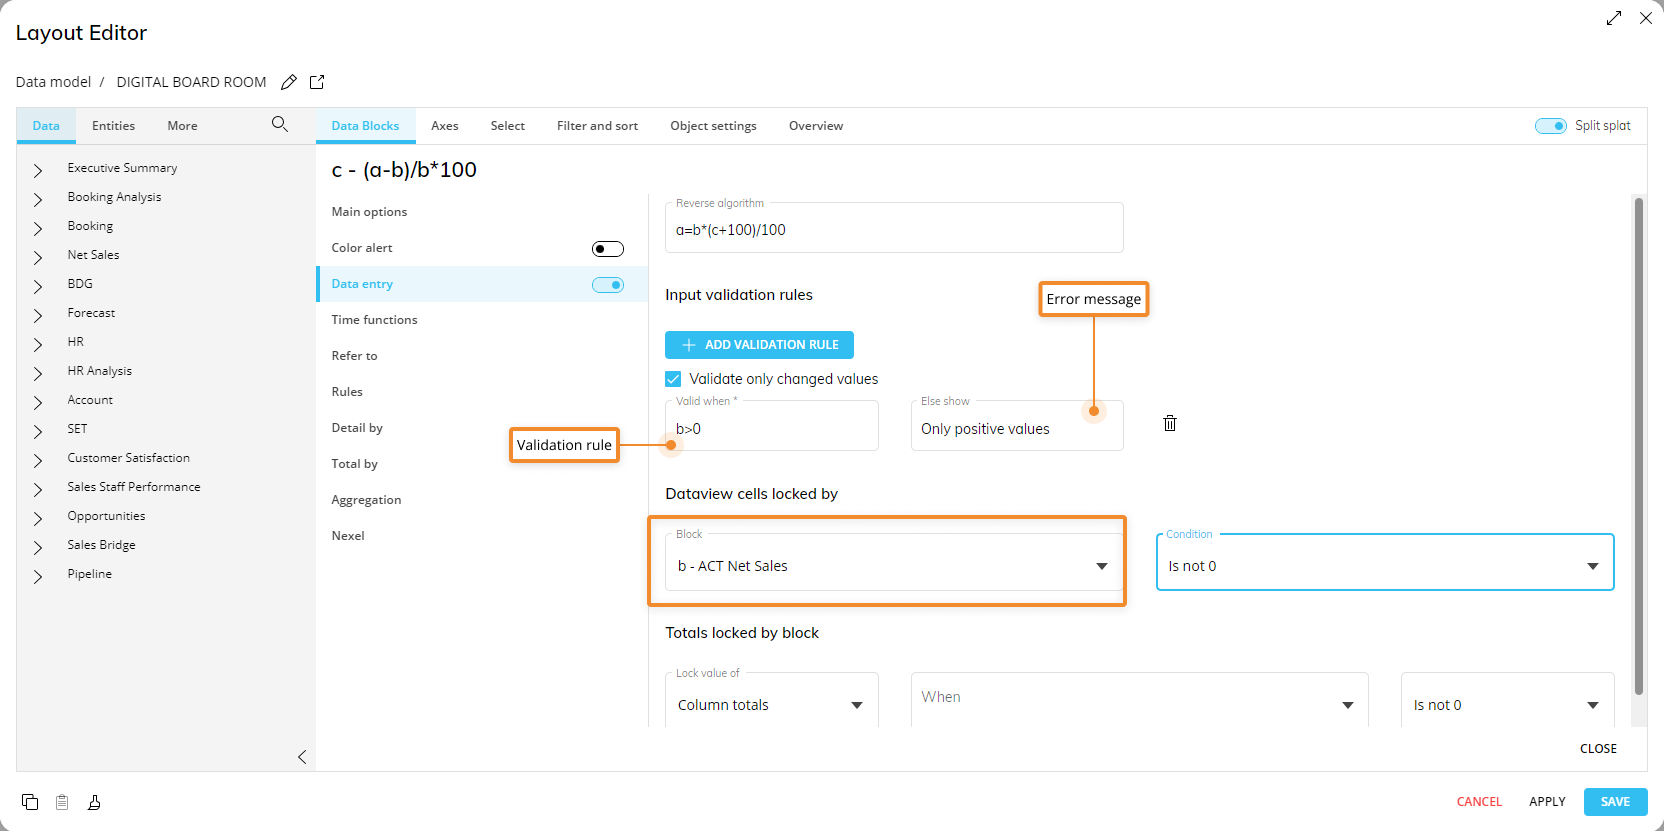
Logical expressions use the same syntax as Algorithms. The "Validate only changed values" option applies the validation rule only to cells that have been modified. This is particularly useful when adding a validation rule to an existing Layout that results in values that don't meet the new rule, but still need to be displayed (for example, historical data).
Suggested values
Suggested values allow the configuration of suggested values that will be shown to the user during data entry actions (i.e. double-clicking on the cell to be modified). These values are taken from another Block or Entity in the Layout, or from a manually configured Custom List.
Example:
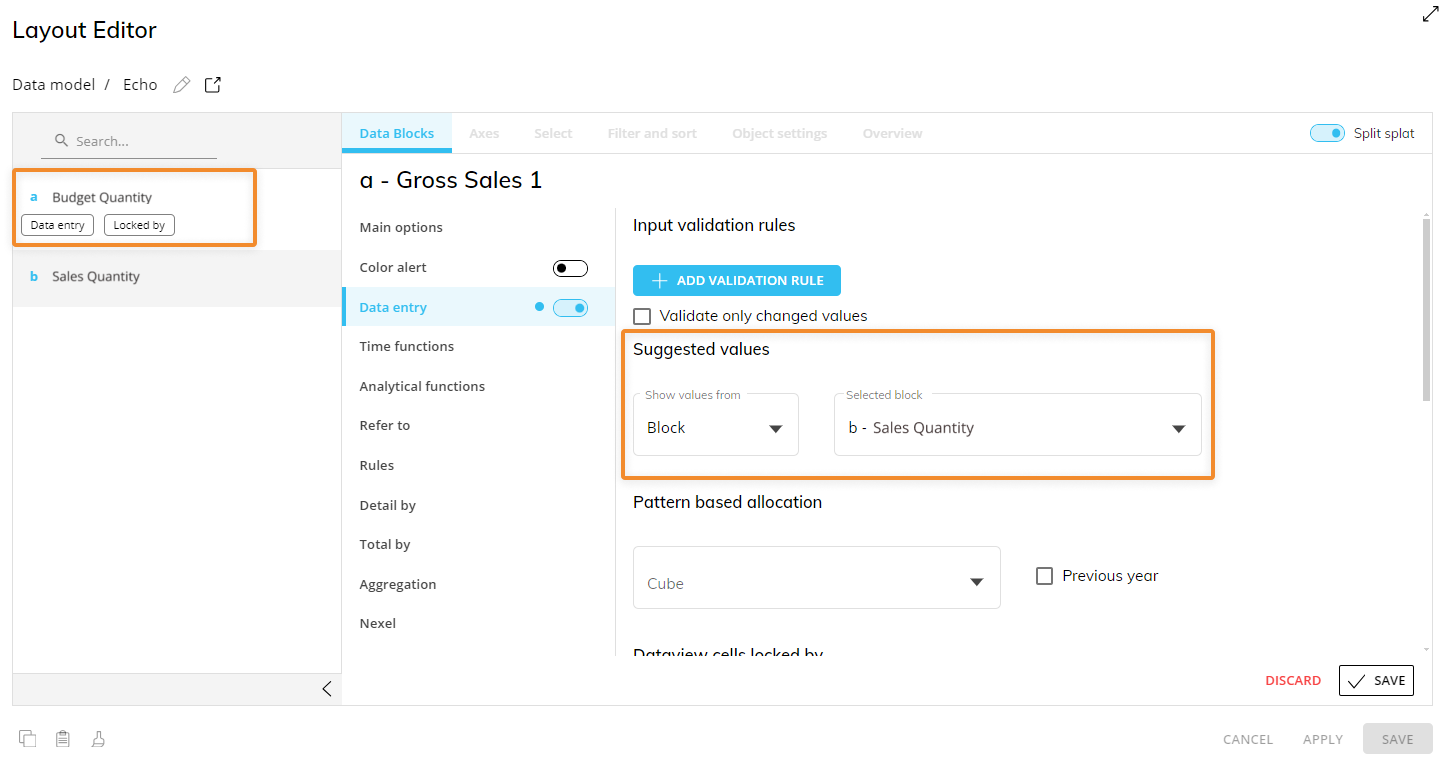
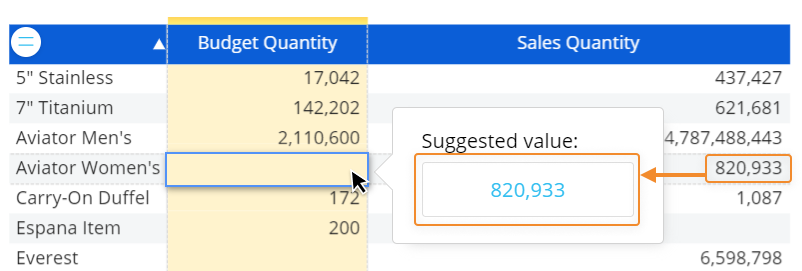
On Block "a", "Budget Quantity", the Data entry and the suggested values options have been enabled. Block "b", "Sales Quantity", contains the values to be suggested to the user.
Here's the configuration in the Layout editor:
The result of this configuration in a Data View is the following:
In case of suggested values taken from an Entity or a Custom list, the user will be presented with multiple suggested values for a single Data Entry action. The list supports vertical scrolling and its elements are filtered as the user writes in the cell. The list displays a maximum of 200 items: if the desired item is not displayed in the list, start typing in the cell to search on the entire set of suggested values.
Pattern-based allocation
Pattern-based allocation uses a pattern obtained from the values of another Cube. This is only possible in combination with Split & Splat.
The logical Data Entry mechanism, also called Data Split & Splat, is a feature that allows you to enter numeric data at any aggregation level and Board automatically allocates it down to the underlying cells of the Cube. In combination with a pattern-based allocation, when a total value is entered by the user on the selected Cube, the Data Split & Splat feature uses a pattern obtained from the values of another Cube to automatically allocate values to the other cells that contribute to that entered total value of the Data Entry-enabled Cube.
For example, if we have Cube "a" with a pattern-based allocation based on Cube "b" in which we are entering data, and Cube "b" has the following data pattern: "Cell 1: 5; Cell 2: 5; Cell 3: 5; Cell 4: 5; Total: 20", then when we enter "100" into the total value of Cube "a", the pattern-based allocation function will output the following data: "Cell 1: 25; Cell 2: 25; Cell 3: 25; Cell 4: 25".
The allocation happens across any dimension of the Cube, such as product, customers, territories, and time, down to the most detailed level in the hierarchy.
The Cube with Data Entry enabled and the Cube providing the Data Entry pattern must share the same structure. This feature allows you to allocate data using patterns (drivers) other than proportional ones.
Pattern-based allocation is not recommended to use in combination with Unbalanced Entities.
When a pattern-based allocation is active, the user is prompted to use it for each Data Entry action performed on the configured Cubes. If the user chooses not to use it, a traditional Split & Splat allocation will be performed.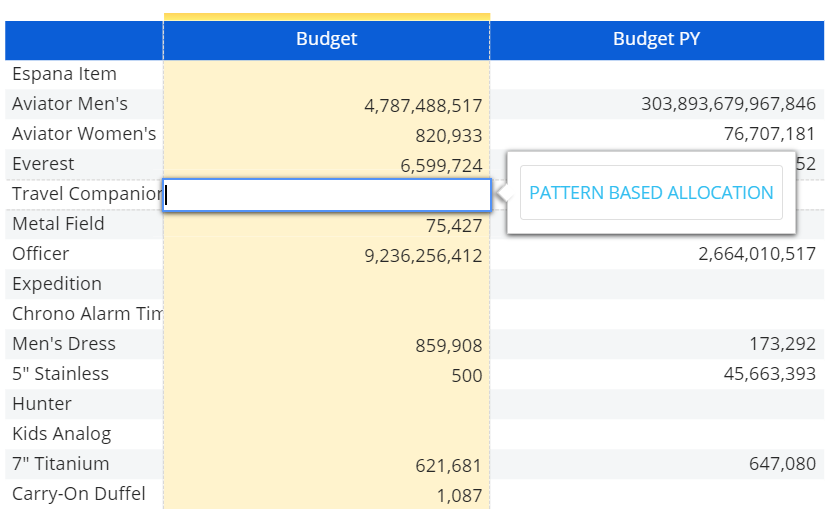
Here's the configuration in the Layout Editor: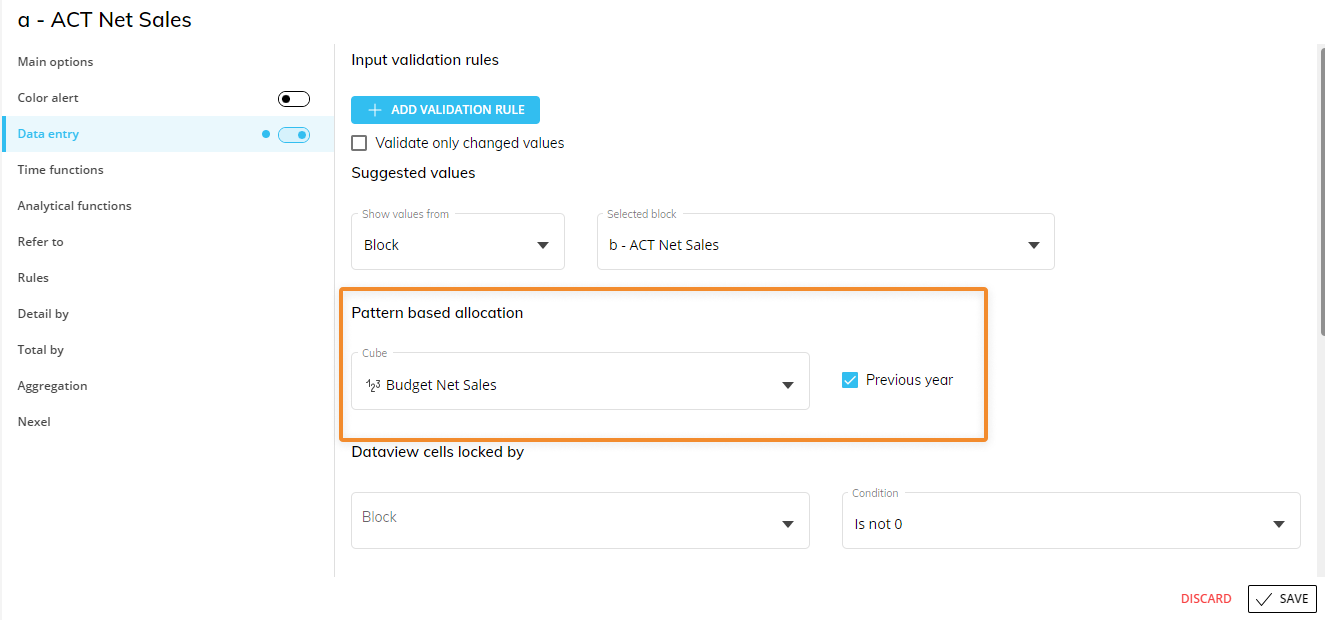
The pattern-based allocation allows the insertion of data at an aggregate level, even on empty cells.
To verify the allocation, drill down to a less aggregate dimension on a cell where you performed a data entry action and review how the value you entered has been split between underlying cells. Pattern-based allocation is also available as a procedure step called "Save Data entry using a pattern-based allocation", under the "Data entry" actions group.
Cells Locked by Block
This option allows locking or unlocking Data Entry on cells based on values from another Block. Locked cells are shown with a different background color.
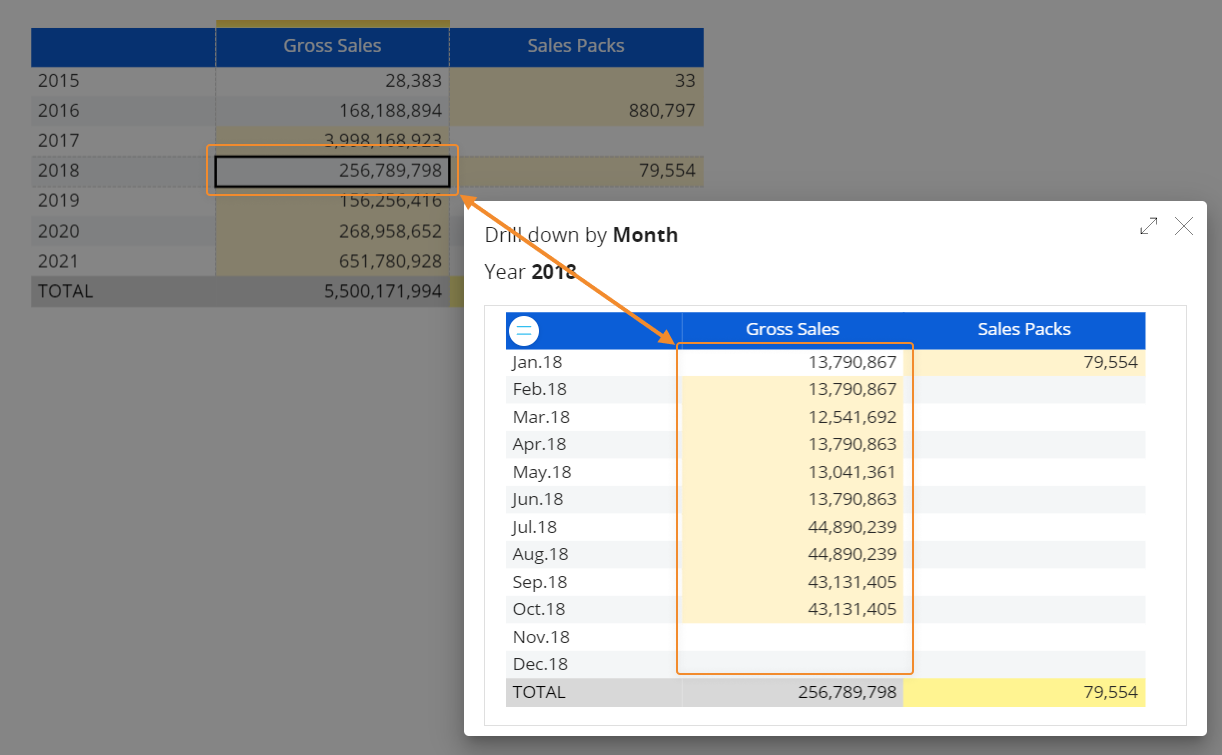
The locking rule works at the data aggregation level displayed in the Data View or Flex Grid, so it considers only cells that are visible on the Screen. If you drill down to a different aggregation level, the locking rule will only consider cells displayed in the Drill Down window.
If the value of the locking Block (the Block that the "Cells Locked by Block" rule is based on) is equal to zero (or is not equal to zero, depending on your configuration) then data entry actions are allowed on the current Block. For any other value of the locking Block, data entry actions are disabled even if the Data Entry option is active.
Cells Locked by Example
For example, consider the following Data View where a "Cells Locked by Block" rule has been configured on the Gross Sales Block:
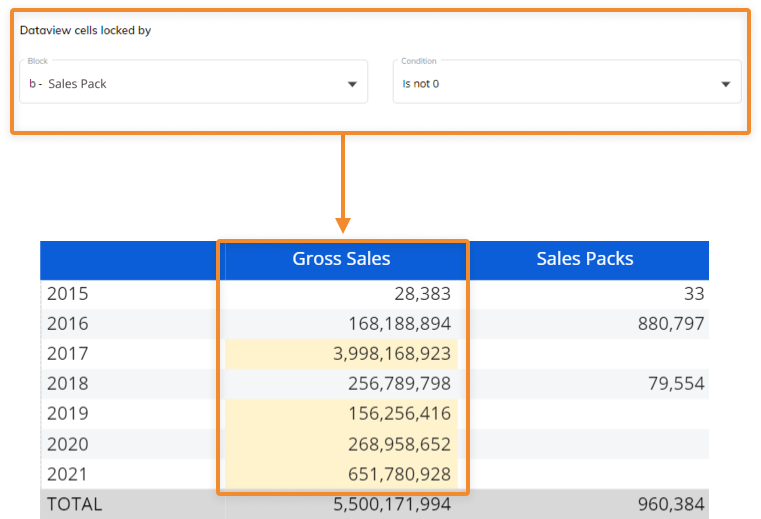
If you drill down by Month on the cell corresponding to the year 2018, which is locked in the Data View, you will still be able to enter data on the Cube, since the locking rule considers only cells displayed in the Drill down window (i.e. cells at that current level of aggregation).
Totals Locked by Block
Totals Locked by Block applies the conditional locking either on Row totals or on Column totals of a single Block. With every Data Entry action, this option proportionally reallocates data on the cells associated with the sum which is the fixed (locked) total.
When a total is locked, a small lock icon appears in the cell:
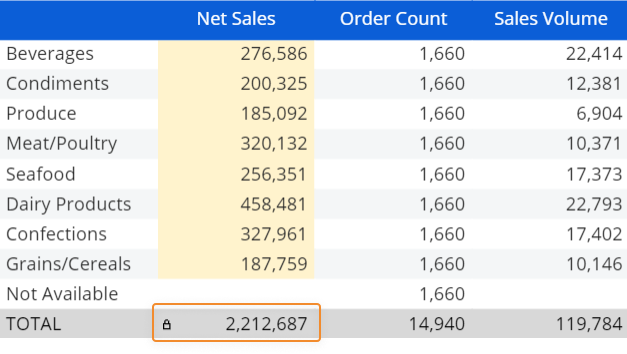
If the value of the locking Block is equal to zero (or is not equal to zero, depending on your configuration) then Data Entry actions are allowed on the currently selected Block in Row totals cells or in Column totals cells.
For any other value of the locking Block, Data Entry actions are disabled in Row totals cells or in Column totals cells, even if the Data Entry option is active.
Grand totals limitation
Grand totals do not lock if multiple Entities are configured by row.
Cube Cells Locked by
Cube Cells Locked by option allows you to lock or unlock data entry on physical cells of a specific Cube based on values from another Cube and to show or hide locked cells. Locked cells are shown with a different background color.
The "Cube cells locked by" rule works at the Cube level, across any level of aggregation, regardless of the cells actually displayed in the Data View: you will always be able to perform data entry actions if at least one underlying cell allows the allocation (and the value in it is not 0).
The "Display" dropdown menu allows you to show only values of free (editable) cells or values of both free and locked cells: if you select the "Free cells only" option, aggregated views will only consider cells that are not locked at the physical level of the Cube.
If the value of the locking Cube is equal to zero (or is not equal to zero, depending on your configuration) then data entry actions are allowed on the current Cube. For any other value of the locking Cube, Data Entry actions are disabled even if the Data Entry option is active. The "Cube cells locked by" option is ignored if a Reverse Rule is defined in order to write data into a locked cell, since Reverse Rules are always allowed to write into any cell of the Cube.
Cube Cells Locked by Example
For example, consider the following Layout where a "Cube cells locked by" rule has been configured on the Gross Sales Block: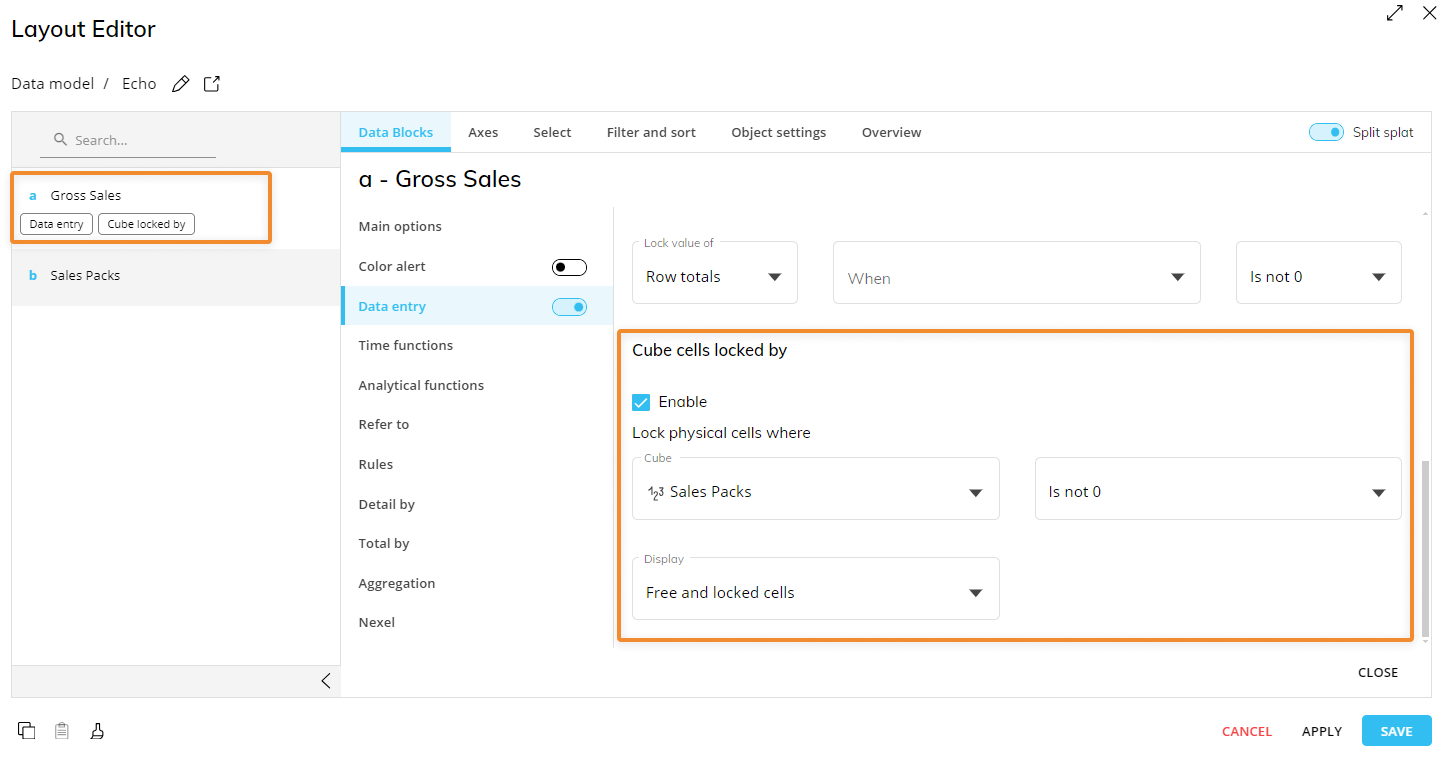
If you drill down by Customer on the first row of the resulting Data View, you will notice that one underlying cell is locked as per the locking rule and the other one is free (editable):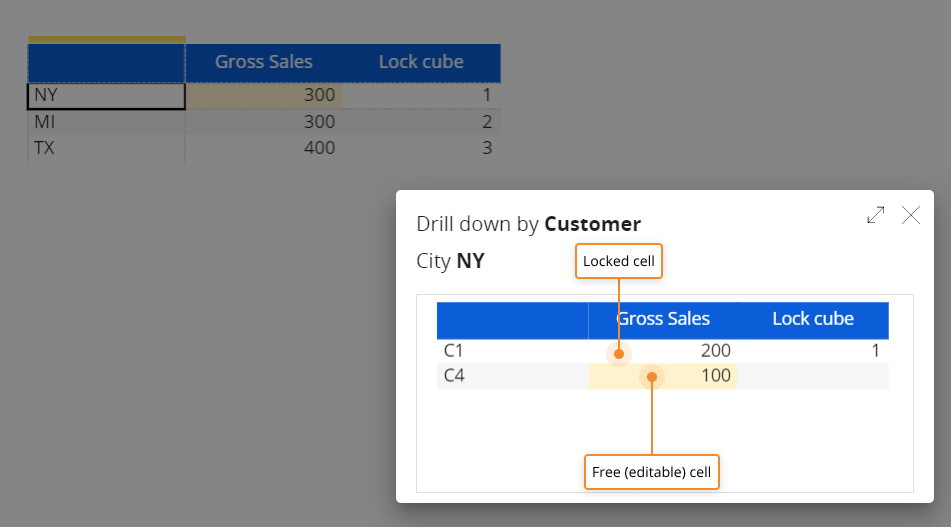
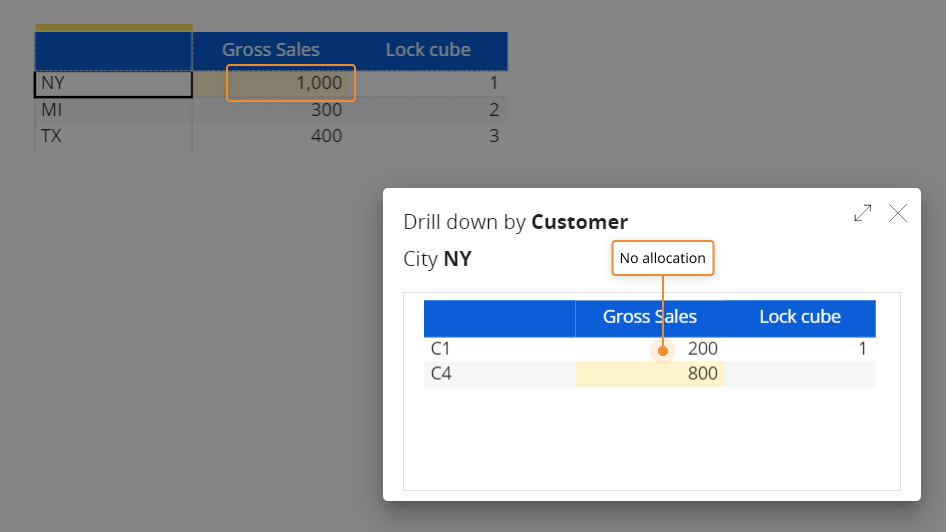
If you change the Gross Sales value for NY in the Data View and drill down again, only the free cell will display a different value: the locking rule has prevented the Split & Splat feature from allocating new values in the underlying locked cell of the Cube.