This topic describes the Procedure Actions included in the Screen Action group and their specific properties.
The Extract Actions allow you to extract data from Board into delimited text files. These steps are useful for different use cases such as upgrading to a new Board version, performing a Regression test or a simple backup.
The Extract Action group offers the following steps:
Extract Cube
This step allows you to extract the values of a desired Cube to a text file, similar to what happens when you extract a Cube from the "Cubes" section of a Data Model.
To configure this step, choose the desired Cube in the "Cubes" dropdown list. Board will automatically enter the name of the extracted file as "Cube CubeName.txt" in the "Path/File" field. The filename can be changed manually if needed.
After selecting a Cube, a list of the Entities related to the dimensions of the Cube is displayed. The list contains the full hierarchies that include the Entities selected in the Cube structure (see Creating a Cube for more details).
Select the Entities for which you want to extract the members values into the text file. The chosen Entities will be displayed as columns of the text file, in the same order as shown in the list. You can change their order by dragging and dropping them in a different order (left to right) as desired.
If no Entities are selected, then the Entities of the Cube structure will be extracted.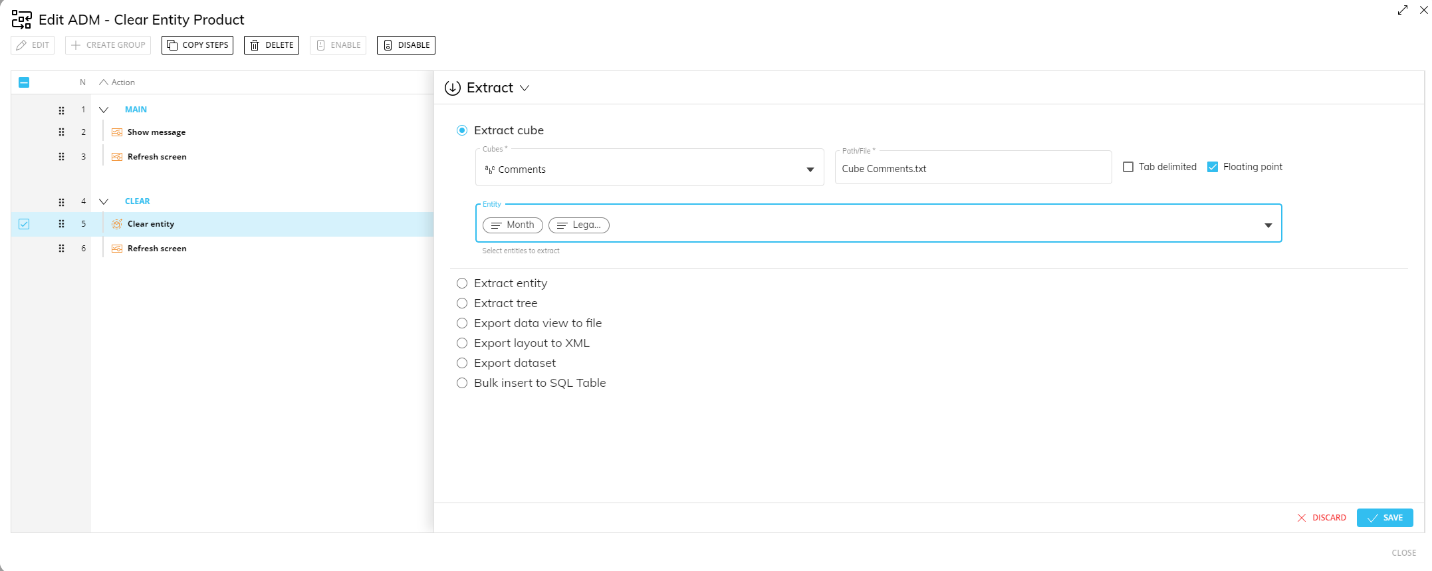
The "Floating point" option is meant for only numeric Cubes. If enabled, the Procedure step will extract the values in the floating-point data format, which will include every decimal digit in most cases. If this option is disabled, the extracted values will only have a maximum of 5 decimals digits.
Enable the "Tab delimited" option if you want the values in the extracted file to be tab delimited.
Extract Entity
This step allows you to extract all members of a selected Entity into a text file, similar to what happens when you extract an Entity from the "Entities" section of a Data Model.
To configure this step, choose the desired Entity from the dropdown list. Board will automatically enter the name of the extracted file as "Entity EntityName.txt" in the "Path/File" field. The filename can be changed manually if needed.
Enable the "Tab delimited" option if you want the values in the extracted file to be tab delimited and to show the "Parent" column, specifying the parent member of each child member of the selected Entity.
Extract tree
This step allows you to extract the hierarchy of a desired Entity and its relationships into a text file.
To configure this step, choose the Entity from the "Tree" dropdown list (only the least-aggregate Entity for each hierarchy is included in the list). Board will automatically enter the name of the extracted file as "Tree EntityName.txt" in the "Path/File" field. The filename can be changed manually if needed.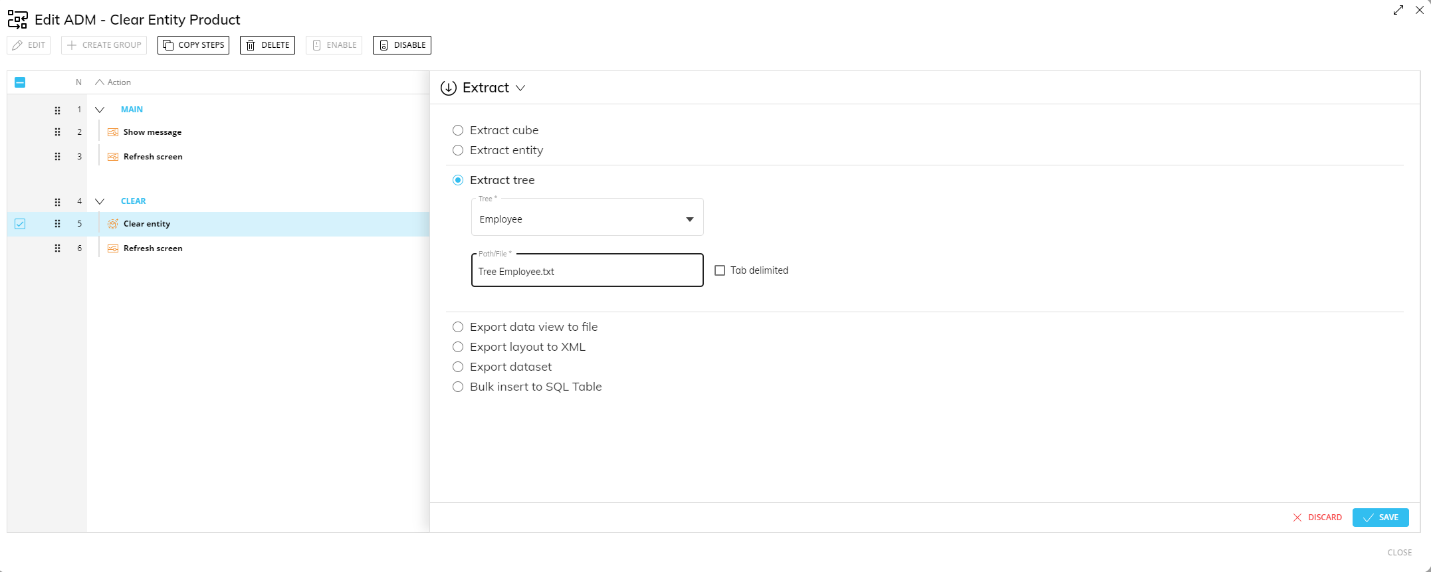
Enable the "Tab delimited" option if you want the values in the extracted file to be tab delimited.
Export Data View to file
This step allows you to extract a Data View into a text file.
To configure this step, choose the file’s delimiter character from the "Delimiter" dropdown list, then configure the Layout of the Data View and specify the name and extension of the extracted file in the "Path/File" field.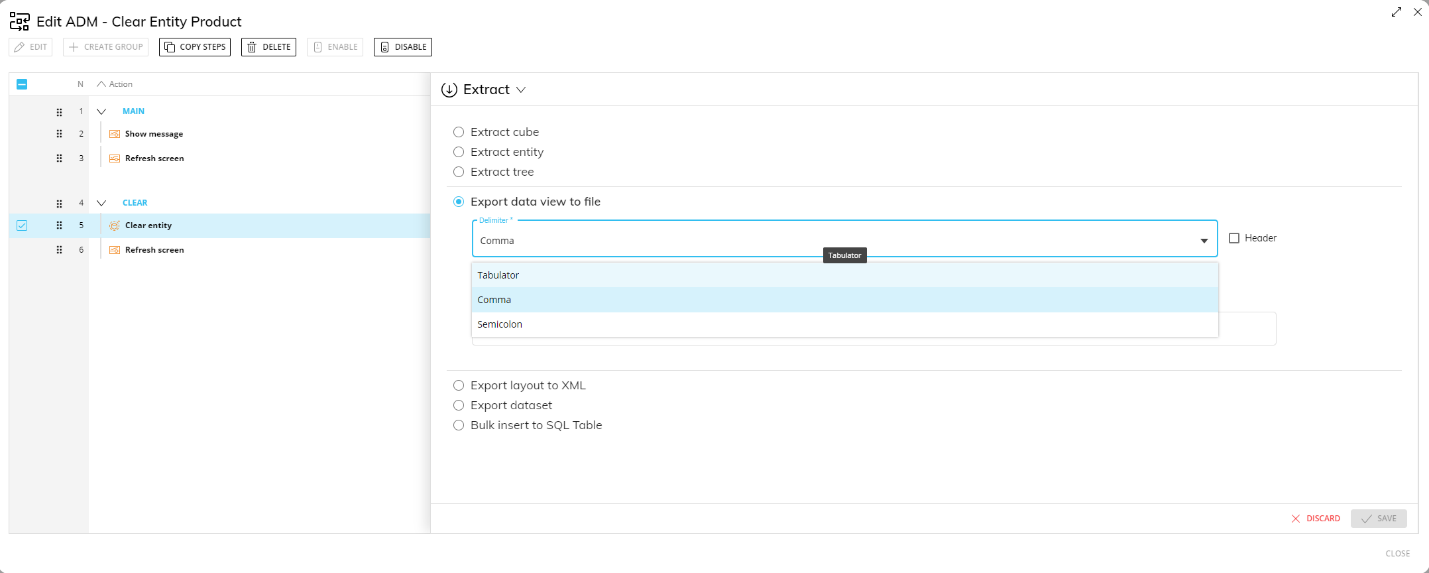
Enable the "Header" option to include the column headers of the Data View in the extracted file.
Export Layout to XML
This step allows you to configure a Layout and extract its result into an XML file.
To configure this step, configure the desired Layout and specify the name and extension of the extracted file in the "Path/File" field.
The resulting XML file will have a flat structure by default, meaning that the XML tags of rows and columns are repeated for each cell.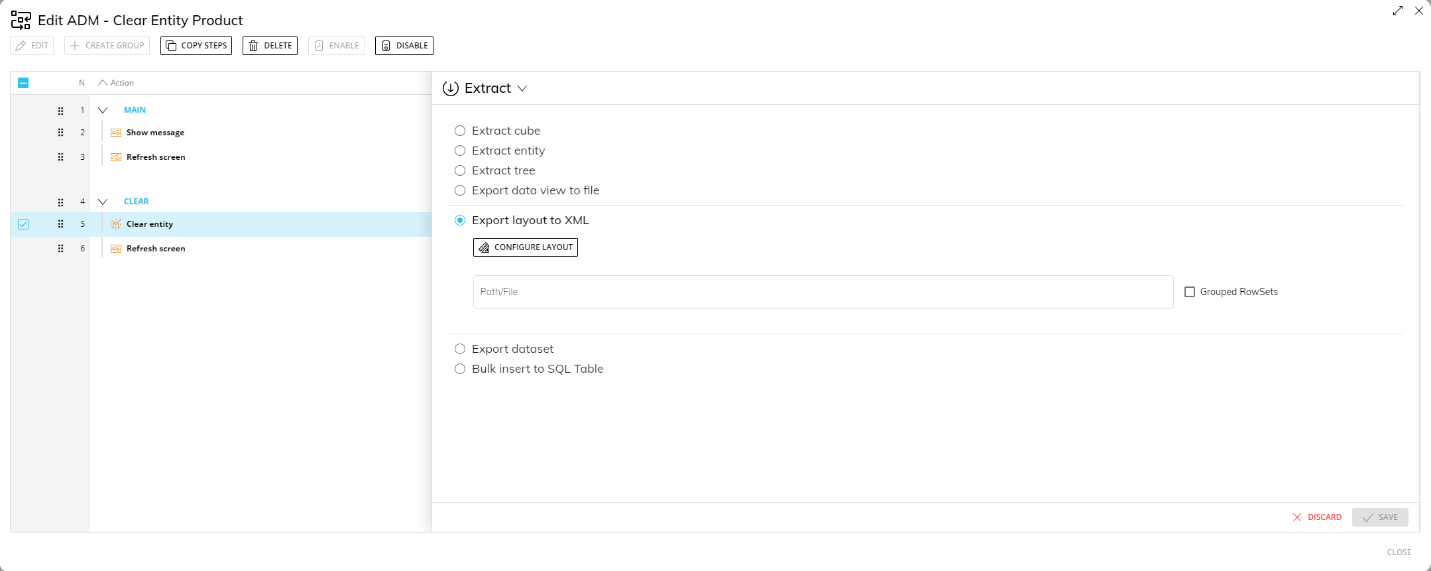
If you enable the "Grouped Rowset", the resulting XML file will have a grouped structure, meaning that the XML tags of columns are nested within the rows.
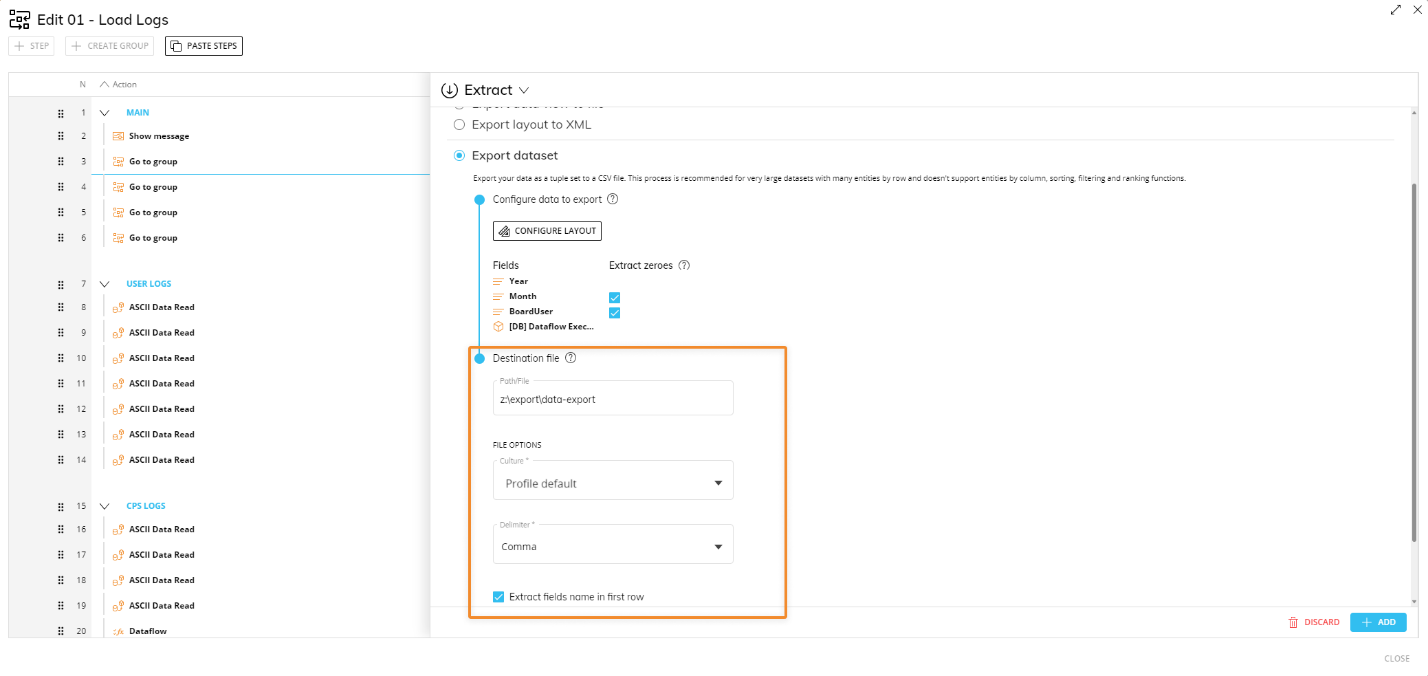
Export dataset
This step allows you to export data to a CSV file much faster than the Extract Data View to file (formerly named "Export Layout to file") step. It also overcomes limitations of the Extract Cube step, since it supports data extraction from multiple Cubes at once.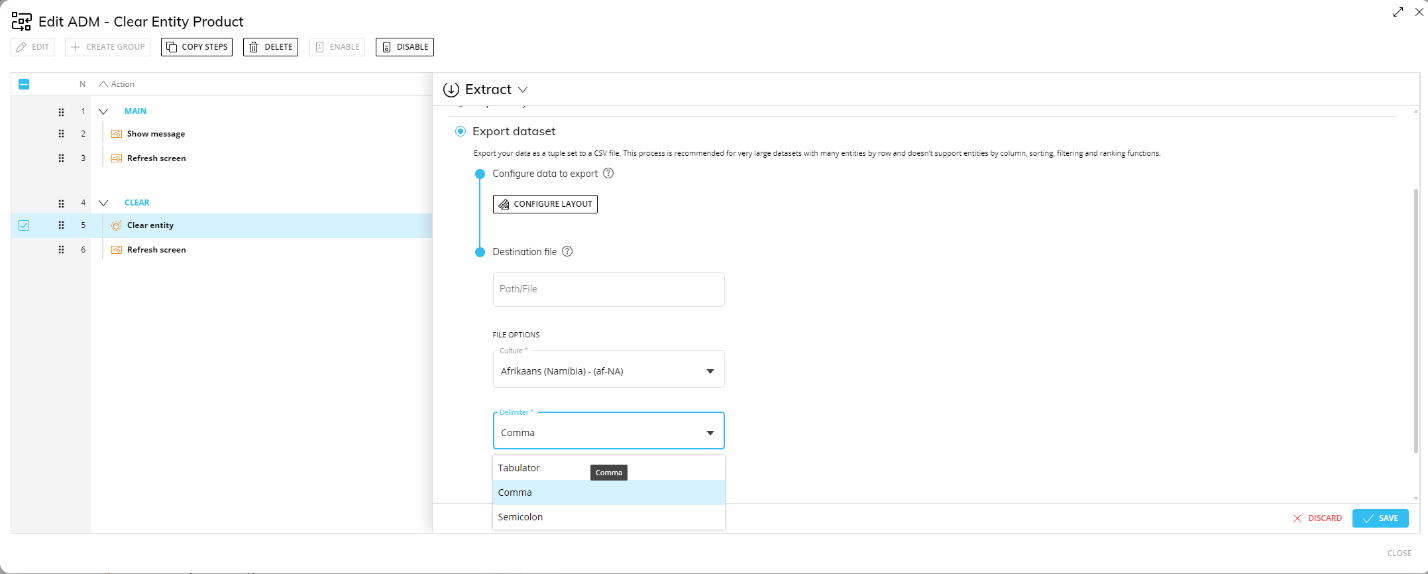
We recommend this step if you need to export massive amounts of data with a Layout configuration that has multiple Entities set By Row.
To configure the new Export dataset step:
Configure a Layout to define the data to be extracted. Once the Layout query is defined, a table showing information about the data (Board Entities and Data Blocks) will appear.
In this case, the Layout Editor does not return down totals and does not support Entities by column, Rules, sorting, filtering and ranking functions.
Enable the Extract zeroes option to include zero values for selected Entities in the exported file. You can enable the option only on the most nested Entity (of each Relationship tree) set By Row. This option works just like the Dataflow "extend" option for the calculation domain (introduced in Board 11).
Any active Select also applies to data extracted from the Layout query.

Configure the CSV file to export: define the destination path, the file name, its regional settings, its delimiter and whether to extract fields names as headers.
The destination path field supports relative and absolute paths as well as environment variables.
For On-premises environments: if no custom path is entered, the default extraction path will be used. The default extraction path is (c:\Board\Dataset\DataModelName\filename.txt), where "DataModelName" is the name of the related Data Model.
For Cloud-based environments: Cloud Customers will need to export data to their shared storage area (Z:\) by entering the specific path (Z:\MyFolder\filename.txt) or by using the %bss% and %computername% environment variables available in the cloud instances: (%bss%%computername%\MyFolder\filename.txt). Using environment variables ensures that the extraction paths are always coherent with the execution instance. If the path you entered doesn't exist, Board will automatically create non-existent directories on the shared storage area. If no file name and no path are entered, Board will automatically export a file named Export.txt to the default extraction path (c:\Board\Dataset\DataModelName). The pathway (Z:\)is not used. Under the "Culture" menu, you can apply the desired regional settings to data in the output file. Choose "none" to apply the server default culture, while the "profile default" setting applies the culture of the user running the Procedure.
Click "ADD".
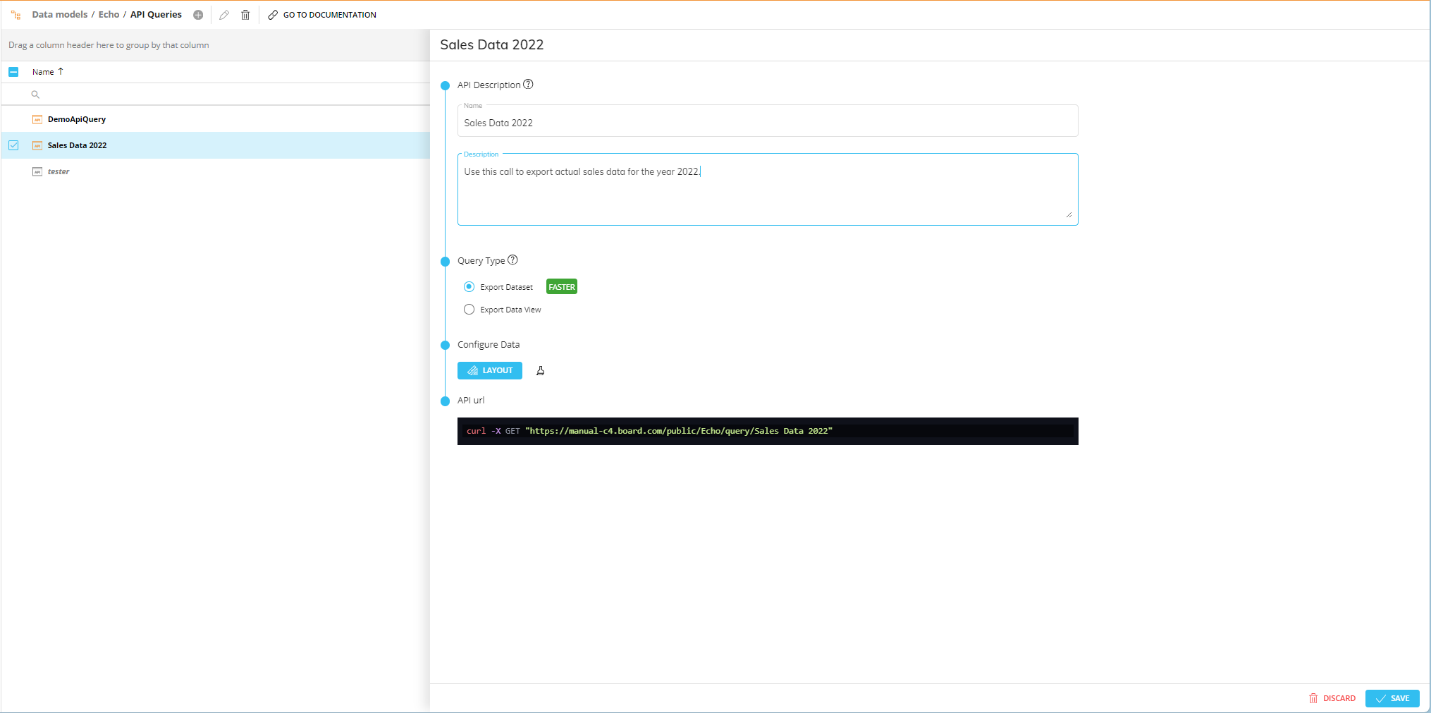
The Export dataset action can also be invoked through a Board REST API call.
To configure the request:
From the API Queries section of the target Data Model, click on the orange plus icon (
 ) in the top left corner next to "API Queries".
In the query configuration panel, give your API a name that will be used to make the API call and write an optional description to explain which data will be returned from the API call.
Select Export Dataset as query type and configure a Layout query to define the data that will be returned from the API call.
The Export Dataset option, just like the Procedure step described above, doesn’t return down totals and doesn’t support Entities by column, Rules, sorting, filtering and ranking functions. We highly recommend this option over the Data View one, since is faster and works better with datasets of any size.
The Export Data View option returns a complete set of data using Board’s Layout Object capabilities, but can be slower with very large datasets and many Entities set in the Axes. It's still available for back compatibility reasons.
Click on the brush icon next to the LAYOUT button to reset the current Layout definition and start over.
Copy the GET request to perform your newly created query and retrieve data from the selected Data Model.
Bulk insert to SQL Table
This step allows you to export huge amounts of records from different Cubes and quickly insert them into an SQL table.
To configure the Bulk insert to SQL Table step:
Configure a Layout to define the data to be extracted. Once the Layout query is defined, a table showing information about the data (Board Entities and Data Blocks) and values to be inserted will appear: values are color coded in order to better identify them in the final INSERT INTO statement.
In this case, the Layout editor doesn’t return down totals and doesn’t support Entities by column, Rules, sorting, filtering and ranking functions. Enable the Extract zeroes option to extract all data for all members in the active selection, regardless of whether Blocks in the Layout contain data or not. You can enable the option only on the most nested Entity (of each Relationship tree) set By Row.
Any active Select also applies to data extracted from the Layout query.
Connect to the target relational database:
Select an existing SQL Source and click on the CONNECT button.
Once you're connected to the SQL database, the button will turn green to indicate a successful connection and the "Table" dropdown menu will show all available SQL tables.If the SQL connection you need hasn't been configured, click on the CREATE button to jump to the Data Sources configuration page.
Select a destination table. When a table is selected, information about its columns will appear as shown below.
Table and column names are color coded in order to better identify them in the final INSERT INTO statement.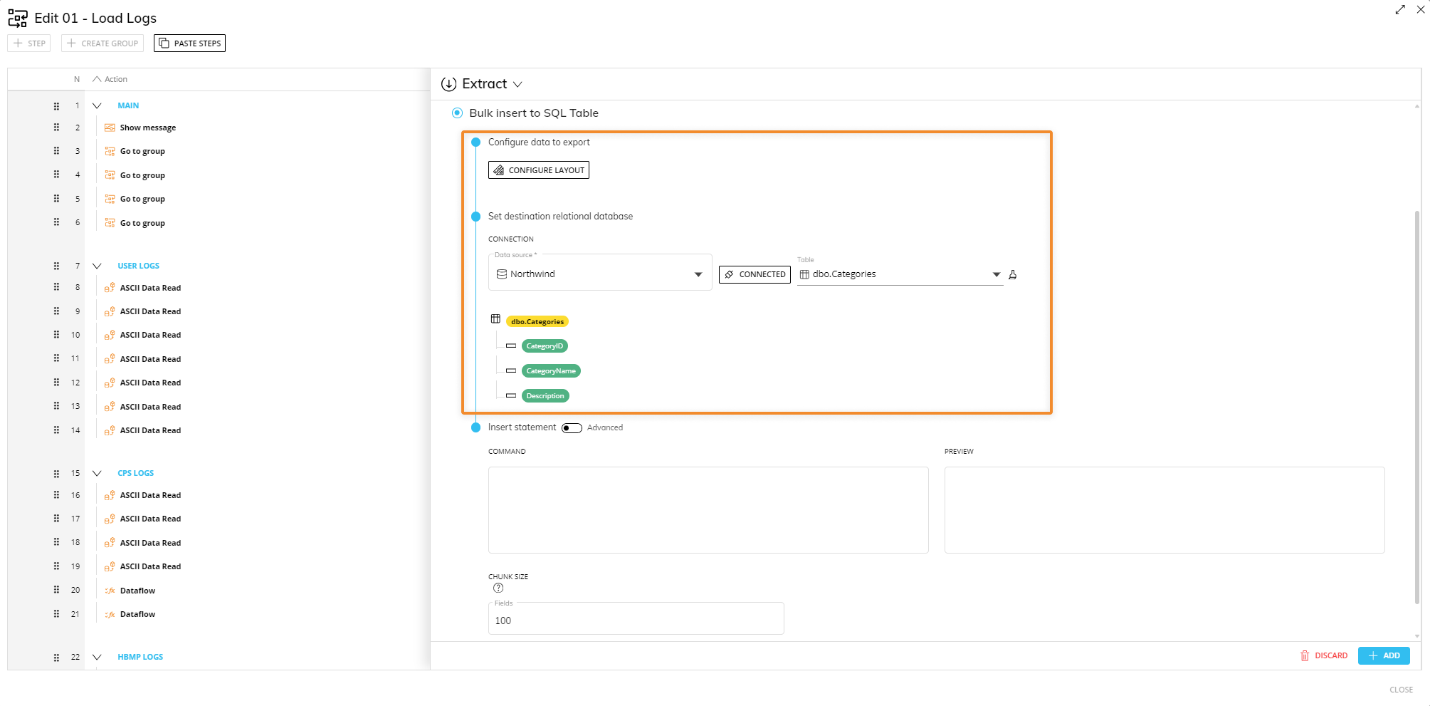
Click on the paint brush icon to disconnect from the current SQL database and start over.
Write the INSERT INTO statement using values, table name, and column names displayed above. If entered correctly, all identifiers in the statement will automatically reflect the background color displayed in previous configuration steps.
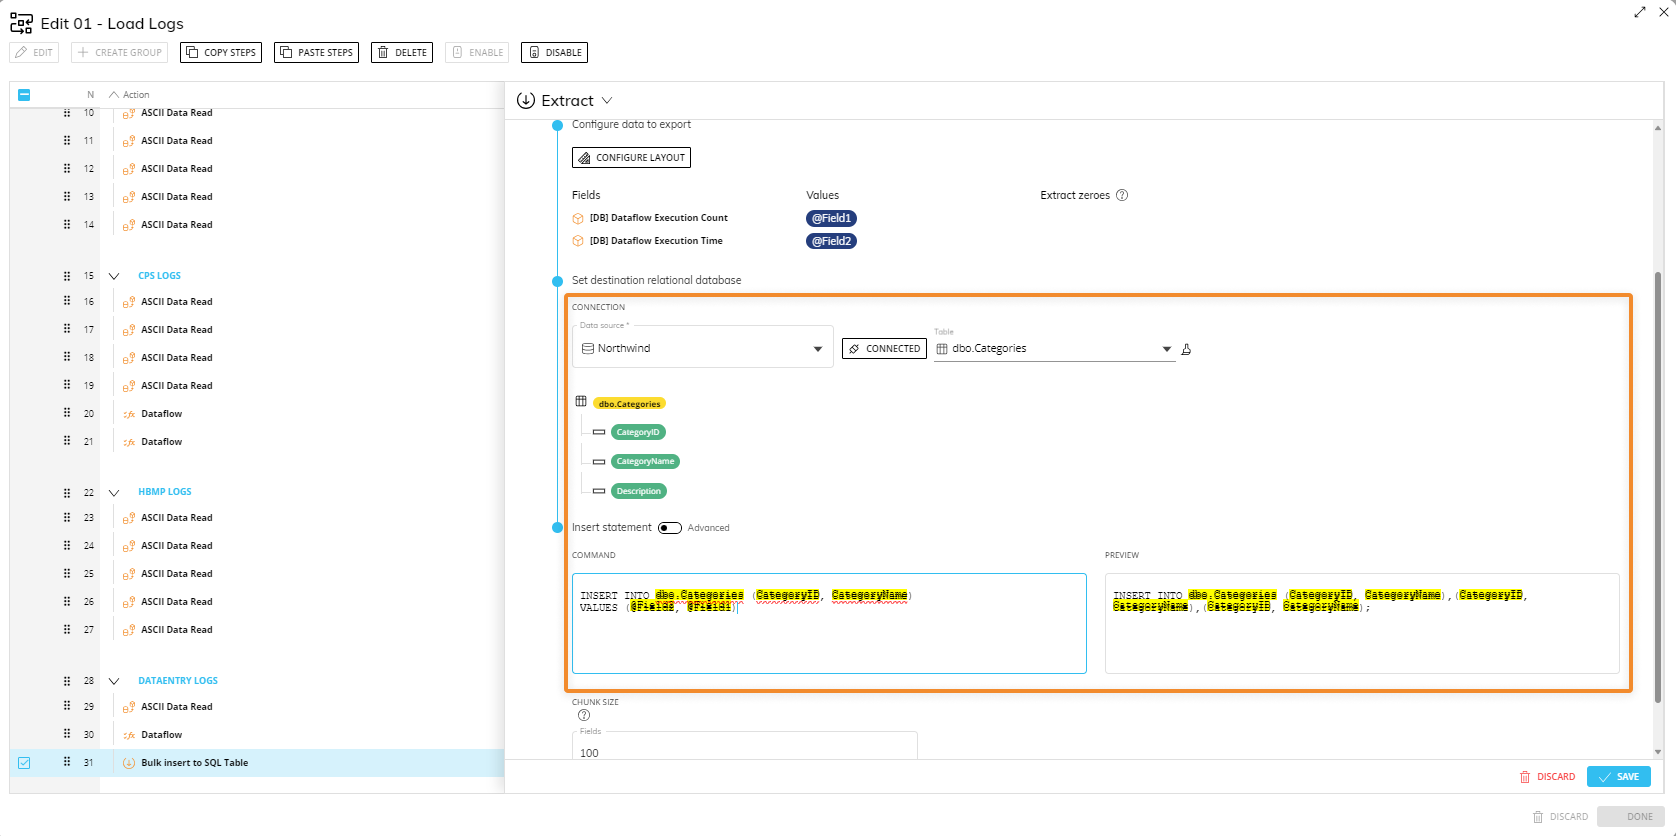
The only command allowed in the "SQL command" field is the INSERT INTO statement. The chunk size option allows you to set the number of fields (columns) processed with a single INSERT INTO command. You should always adjust the chunk size value in order to obtain a good balance between performance and payload size when working with very large datasets. If you set a low chunk size value, the INSERT INTO command will be iterated multiple times with smaller payloads. If you set a high chunk size value, the INSERT INTO command will be executed fewer times, but with larger payloads. Be sure to check the target SQL database limits and set the chunk size accordingly.
Click "ADD".
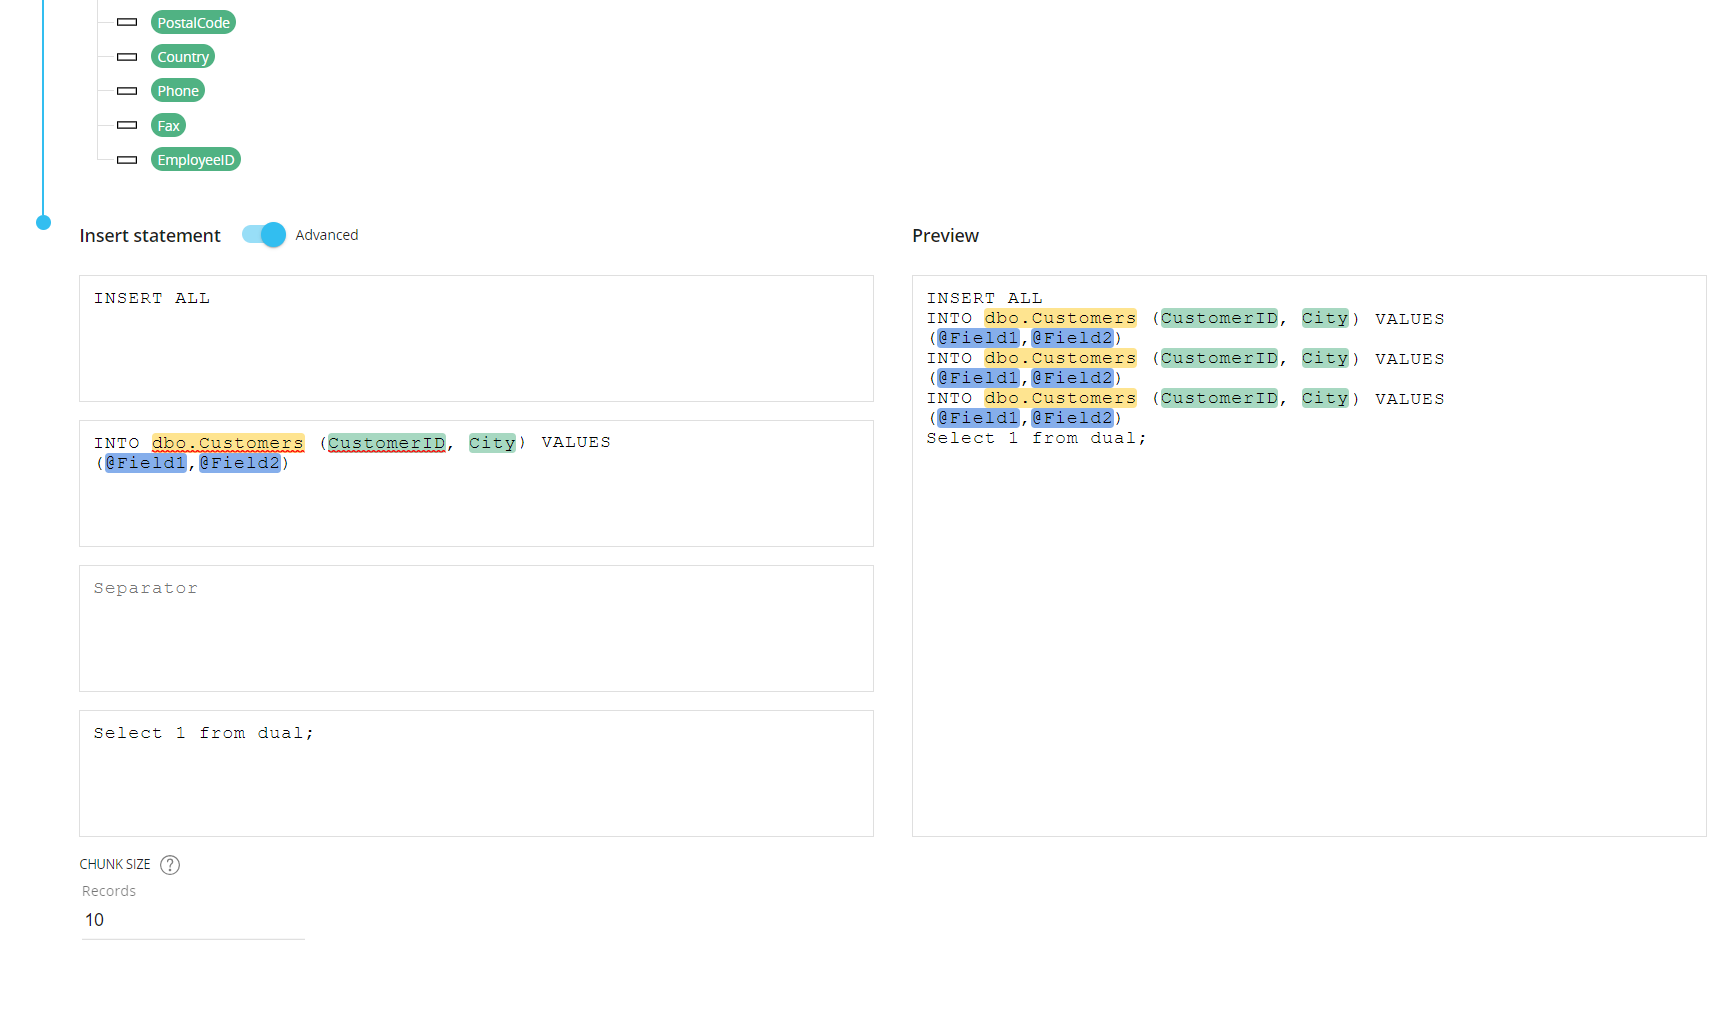
Bulk insert to SQL Table: Advanced Mode
Using the Advanced mode, you can build an insert statement with more control over its structure, thus supporting other databases other than Microsoft SQL Server and use Board Procedures to insert new rows into any external database.
The new Advanced mode allows you to create an insert statement for a wide range of databases that use the SQL dialect, such as Oracle, while the simple mode allows you to create an insert statement only for Microsoft SQL Server.
This feature can be toggled in the "Bulk insert to SQL Table" step configuration page. Once it's enabled, the following four input fields will appear:
Header. Write the appropriate insert command along with additional parameters that don't need to be repeated.
Body. Typically, the column names and the values are inserted here. This information is repeated up to three times in the preview box, to give you an example of the new rows that will be inserted into the target database based on the chunk size value.
Separator. Enter a separator that will be repeated at the end of each line of the information written in the Body field.
Footer. Enter the character that marks the end of the statement.
Example
The following example shows an INSERT statement for inserting multiple records from a Board Layout into a table in Oracle.
Where do the extracted files go?
For all the steps described above, the extracted files are created in the directory "Board\Dataset\DataModelName" by default. You can choose another path by manually entering it in the "Path/File" fields before the file name (i.e. D:\MyFolder\Customer.txt).
You can also insert Windows variables (%userprofile%\Desktop\Customer.txt) as well as Substitution Formulas (%userprofile%\Desktop\Customer_@username.txt) in the filename.
In addition to the text file, Board also generates a structure definition file with the same name and a ".cfg" extension: this file contains names, starting positions, and lengths of the fields included in the extracted text file. This information is useful to have Board automatically generate a Data Reader protocol capable of reading and importing the contents of the extracted text file.
When a Procedure starts, the range or scope of execution on the Entities is inherited from the Select and the Pager selections of the screen from which the Procedure is launched. These inherited selections will be combined with the Procedure selections. In order to replace any prior selection, add a new "Remove all selections" step or tick the option "Reset all previous selections" when adding a new "Select" step in your Procedure. If the Procedure is run directly from the Data Model, the Screen selections are not carried in. The Procedure will start with a full selection instead of the Screen selections made on the Screen where it is usually triggered from.
All steps above support only these documented Substitution Formulas in the "Path/File" field: @User, @UserName, @Database, @ProcedureId, and all the @Date variants. In addition, environment variables such as %bss% can also be used in the "Path/File" field.
In the case of a Capsule Procedure, a Data Model drop-down menu on the upper right corner allows you to select the Data Model on which the Procedure step will be executed, except in cases where the Procedure step has specific options that act on other Data Models (for example, the "Save Pending Changes to Disk" step in the "Advanced Action Group" can be configured to act on all Data Models or only on the Data Model where the Procedure resides).