Formatting a Table in the Board M365 Excel Add-in allows users to adjust how the retrieved data appears in Excel. After the Table displays, use standard Excel formatting tools such as number formats, fonts, colors, and conditional formatting to improve readability and highlight key values.
Formatting options are available only when Pivoting is enabled.
How to format a Table
To format a Table:
There are two ways to start formatting a Table:
Select Format Table from the Board ribbon.

Click the Table icon in the Task pane and open the Format accordion to display four formatting categories. Board Format is enabled by default.
Open the format category accordion in which you want to format and configure the settings according to the specific category. Each category has specific options as described in the below paragraphs (linked to each category).
Quick Formatting. Like in excel, preconfigured formats are ready to choose and apply automatically. Select an already configured template from the options
Table Format. Controls formatting at the Table level, such as the overall style applied to the Table output. Use Table Format to keep a consistent look for the entire Table.
Field Format. Applies formatting to specific fields, such as number formats and how values display. Use Field Format to standardize how each field appears.
Field Templates. Saves and reuses field-level formatting patterns. Use Field Templates to apply consistent formatting to the same fields across multiple Tables or refreshes.
Click Apply to save and apply the configured formatting. Formatting does not appear in the Table until it is applied.
Formatting applied outside the Board-managed Table area remains in place when refreshing or re-executing the Table.
Formatting applied inside the Board-generated area can reset when the Table is re-executed, especially if the result size or structure changes.
If the Table structure changes after refresh, Board might reset formatting applied to Board-managed cells.
Select the reset arrow to restore the default value for the settings.
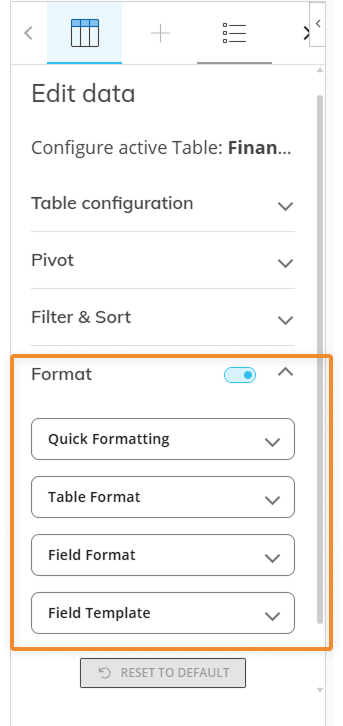
Table Format
Controls formatting at the Table level, such as the overall style applied to the Table output. Use Table Format to keep a consistent look for the entire Table.
Colors. Choose a Table element to apply the customizations of font colors to. Each Table element has specific customizations.
Grid. Choose background, foreground and border colors.
Headers. Choose background and border colors.
Cells. Choose background and border colors.
Groups. Choose background and total background colors.
Table border. Configure the Table border color and thickness.
Table fonts. Set the color of the Table text and values by category
General Font. Change the color of all text and value font in the Table.
Header Font. Change the color of the header values.
Cell Font. Change the color of the cell values.
Group Font. Change the color of the grouped fields.
Total Font. Change the color of the total values.
Field Format
Applies formatting to specific fields, such as number formats and how values display. Use Field Format to standardize how each field appears.
Field. Choose a field from the dropdown to apply the following formatting.
Field Element to choose which part of the field to format:
Header. Applies formatting to the column header only.
Values. Applies formatting to the detail values in the column.
Totals. Applies formatting to subtotal rows (when totals are displayed).
After selecting the Field and Field element, the following options appear:
Background. Choose a Table background color
Border. Choose a border color and thickness
Border customization is only available for “Header” elements.
Font. Choose a font, size, style, and color.
Alignment. Choose the vertical and horizontal alignment of the cell value.
Content Format. Select a content format to configure how the values should display:
Accounting. To display values with a currency symbol and in decimal format
Symbol. Choose a currency symbol from the dropdown to apply to each cell.
Decimal digits. Slide the bar or type in the field how many decimal digits to display.
Format negative numbers with Parenthesis. Disabled by default. Enable to show negative numbers in parenthesis instead of the negative symbol.
Date.
Date Preset. Choose between “Long date” or “Short date” formats in the drop down.
General. Customize your own content format or apply none. Default.
Symbol Before and Symbol After. Customize an optional symbol or unit before and/or after the cell value.
Decimal digits. Slide the bar or type in the field how many decimal digits to display.
Format negative numbers with Parenthesis. Disabled by default. Enable to show negative numbers in parenthesis instead of the negative symbol.
Number.
Use 1000 separator (,). Enabled by default. Disable if you do not want to use the comma as a thousands separator.
Decimal digits. Slide the bar or type in the field how many decimal digits to display.
Format negative numbers with Parenthesis. Disabled by default. Enable to show negative numbers in parenthesis instead of the negative symbol.
Percentage. Apply a % after all values. Symbol Before and Symbol After values are not customizable.
Decimal digits. Slide the bar or type in the field how many decimal digits to display.
Text. No special formatting. This setting is specifically for text values.
Field Templates
Saves and reuses field-level formatting patterns. Use Field Templates to apply consistent formatting to the same fields across multiple Tables or refreshes.
Field. Choose which field the following template should apply to.
Template. Choose one of the available templates in the dropdown to apply it to the field. If no templates exist, you can create a template in the Format section of the Web platform.
Using Excel Formatting
You can use Excel formatting in the Excel sheet and in a Board Table. There are two different use cases that have different behaviors:
Using Excel formatting in combination with Board Format
Disabling Board Format and only using Excel formatting
Excel formatting is static and remains in place while the Table pivots within the formatting, meaning that the formatting stays where it is and does not correspond with the original value formatted.
Using Excel’s format does not update dynamically during pivoting, data refresh, Selection changes, hierarchy expand/collapse, or other actions affecting the table size. This means that Board does not keep Excel formatting applied to a Board Table when the Table redraws but Board Format does. This can occur when you collapse and then expand rows or columns, change a Selection, reconfigure data, or apply/remove a sort or filter.
This behavior is by design. When the Table redraws, Board recalculates the Table area and may remove custom Excel formatting from cells, rows, or columns.
When you move the Table, the Excel formatting moves with the Table.
This option is best for static tables with a fixed number of rows and columns.
Disable Board Format
You can disable Board Format by navigating to the Format section of the Table editing pane and disabling the toggle.
Board Format is enabled by default.
Disabling Board M365 formatting lets you use Excel’s native formatting only. Current Board formatting is removed and cells revert to Excel’s default format.
How to refine data after formatting
After the Table displays, users can further analyze and customize the worksheet using Excel features while keeping the underlying Board configuration.
Add custom rows, columns, and formulas outside the Board-managed Table area to support ad-hoc analysis.
Use Excel formulas that reference Table cells as you would in any worksheet.
Keep custom formulas and calculations outside the dynamically populated Table range to avoid overwriting content when the Table is refreshed or re-executed.
Configure alerts and advanced formatting logic using the dedicated features in Board, not in the Excel Add-in Table editor.