💡This article contains version changes.
Spot the light bulb icon? That means you’ll find helpful details about what’s changed across versions. Read more about version changes here.
Presentations can be accessed in two working modes: Play Mode or Edit Mode.
When Play Mode is active, you can view the Presentation Slides, apply selections to them, and interact with the available Screen Objects.
When Edit Mode is active, you can create new Slides and modify the configuration of the available Screen Objects.
When you open a Presentation, you will enter into Play Mode.
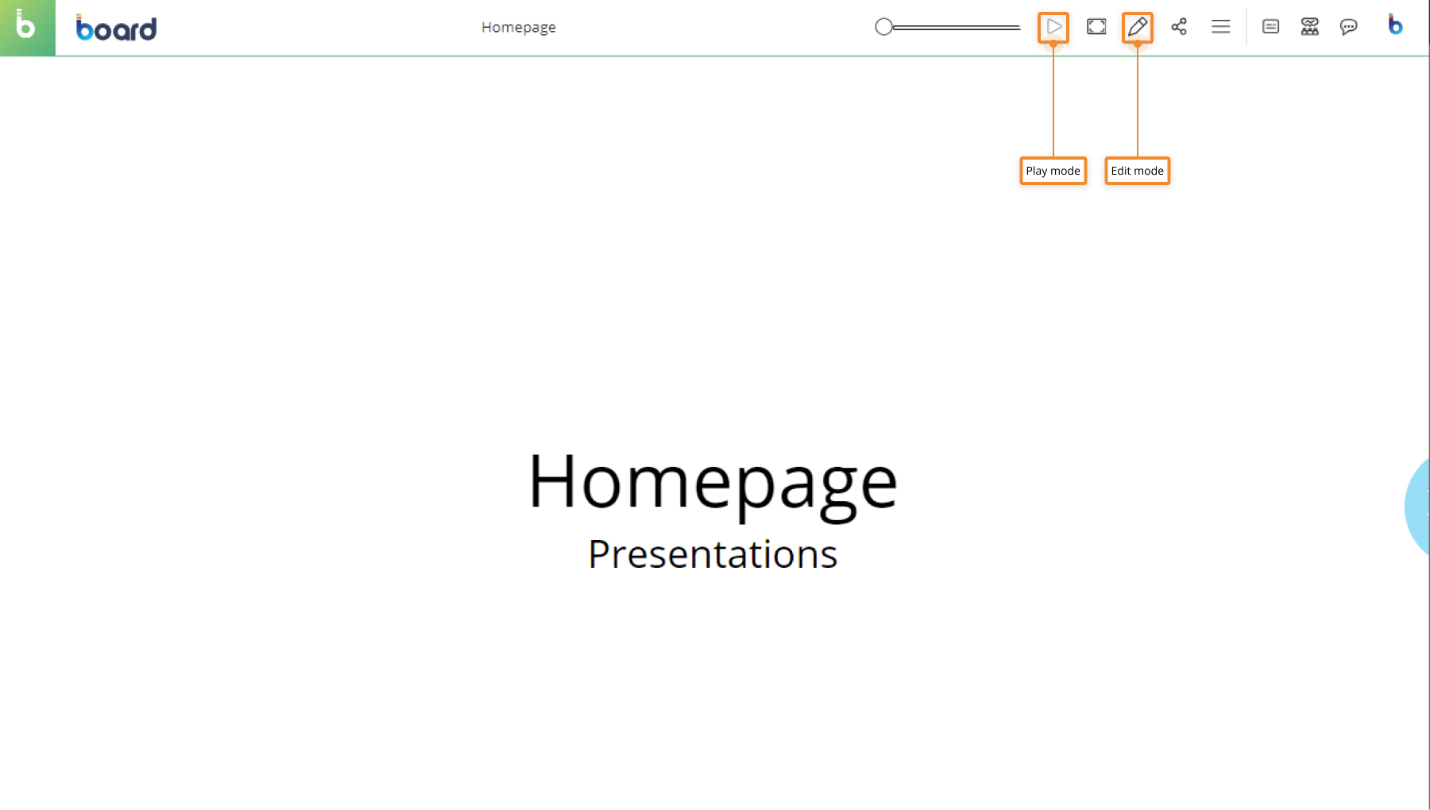
You can easily switch between these modes by clicking on the Play (  ) and Edit (
  ) icons located in the Top Menu of the Presentations workspace.
Presentations in Play Mode
Open a Presentation in Play Mode to view and interact with it. While in Play Mode, the workspace provides a simple environment with fewer icons providing basic functionalities for navigating the Presentation. If a Slide has a note attached, it will also appear as an overlay text at the top.
You can also access Board's Collaboration services. All those icons are located in the Top Menu.
Top Menu
From the Presentation Top Menu, you have the following options:
Slider's thumb. Navigate the Presentation by dragging the slider's thumb.
Play/Pause. You can play and pause the Presentation.
Fit mode. Adjusts your viewing area. You can choose one of the following three options:
Fit to width
 . The Slide width fits the web browser window size width. The Slide area is stretched horizontally and a vertical scrollbar may appear.
Fit to page
 . The Slide is readjusted so that it is entirely visible in your web browser window size without any scrollbar.
Actual size
 . The Slide is displayed at its actual pixel size. Vertical and horizontal scrollbars may appear if the Slide area exceeds your web browser window size.
Edit mode
 . Click to switch to Edit Mode.
Share
 . Share this Presentation with other users or a User group. You can also grant editing privileges to users which gives them the ability to edit and share the Presentation, but the owner always has full access to the Presentation which will never be revoked.
Sliding Menu. Click on the burger icon in the Top Menu to reveal the following panel menu.
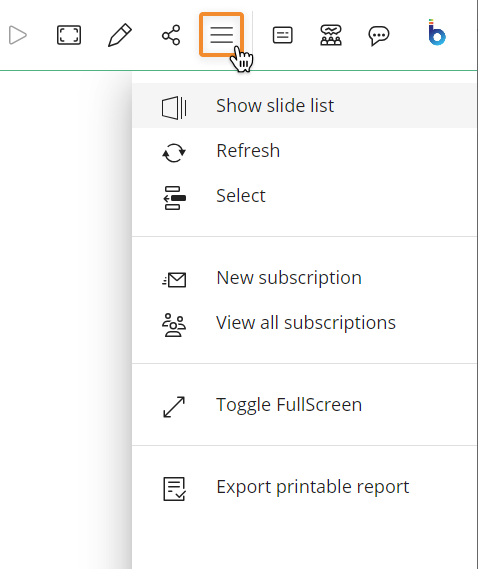
Click the appropriate icon to:
Show the Slide list.
Refresh. This will re-execute all Layouts associated with the Screen Objects displayed in the current Slide.
Apply a Select to the entire Slide..
Export a printable report. This will export the current Slide as a PDF file or a Microsoft PowerPoint presentation
Set up a new subscription or see all existing subscriptions. By setting up a subscription, Board will send the current Slide to your email address as an attachment (PDF, Excel, Word or PowerPoint file) at a given time, with a custom frequency and recurrence, starting from a specified date. You can also customize the email message as you prefer.
By hovering over a single Screen Object, you'll have access to all multidimensional navigation features such as filtering, sorting, drill-down, and so on. These features are different for each Screen Object and are covered in the Objects section of this manual.
While in Play Mode, it is possible to navigate through the Slides, but you will not be able to change their default configuration or create a new Slide. To do that, you need to switch to Edit Mode.
Presentations in Edit Mode
Top menu
In Edit Mode, the Top Menu allows you to switch to Play mode and share the Presentation with one or more Board users. Click the burger icon in the Top Menu to reveal the sliding panel menu containing all features described in the "Presentations in Play Mode" paragraph.
💡 Left panel
In version 14.2.2 and earlier, the side panel on the left of the page, a list shows all existing Slides in their playing order: the first Slide of the Presentations is on top of the list. When Edit Mode is active, from the side panel on the left of the page you can create new Slides or see the Presentation’s information where you can edit the properties of the Presentation.
You can also perform various actions on existing Slides by hovering over a Slide name in the list and then clicking on the 3 vertical dots that appear to the right to open a menu of options:
Slide details. Allows edits to the Slide properties, and shows details about Slide source.
Go to source Screen (only for Screen Slides). Redirects the user to the original Capsule Screen from where the Slide was created.
Restore source Screen (only for Screen Slides). Restores the Screen to the same settings as the original Capsule Screen from where the Slide was created.
Save As. Saves Slide to another Presentation.
Duplicate. Duplicates the Slide.
Delete. Deletes the Slide.
In the side panel on the left of the page, a list shows all existing Slides in their playing order: the first Slide of the Presentations is on top of the list. When Edit Mode is active, from the side panel on the left of the page you can create new Slides or see the Presentation’s information where you can edit the properties of the Presentation.
You can also perform various actions on existing Slides by hovering over a Slide name in the list and then clicking on the 3 vertical dots that appear to the right to open a menu of options:
Slide Details. Allows edits to the Slide properties, shows details about Slide source and Custom Changes made.
Go to source screen (only for Screen Slides). Redirects the user to the original Capsule Screen from where the Slide was created.
Clear Custom Changes (only Screen Slides). Clears Custom Changes made to the Slide (see Custom Changes below for more details).
Save As. Saves Slide to another Presentation.
Duplicate. Duplicates the Slide.
Delete. Deletes the Slide.

Right panel
In Edit mode, the side panel on the right of the page allows you to access additional Slide details.
To access it, click on a Slide name, click on the icon that appears next to it, and finally click on "Edit Slide" to reveal the Slide Properties panel to the right of the Screen. The following options are available:
Slide properties
Title. Enter a title for your Slide that will be displayed on the top bar in Play mode.
💡 Notes. Enable Notes to associate a textual annotation to your Slide: see Presentation Notes for more information.
In version 14.2.2 and earlier, Notes are available in only a banner format and only support text.
💡 Last Opened Date. Displays the date of when the Slide was last opened. Displays the date of when the Slide was last opened.
In version 14.2.2 and earlier, this information is not available.
Slide source (only for Screen Slides). View the Slide’s source Capsule path, source Screen’s name, the Slide’s creation and last modified dates, and Custom Changes made.
Capsule. The name of the original Capsule.
Screen. Goes to original Screen. Click the link icon next to the Screen that's been added to the Presentation to open it in the Capsule environment in Play mode. The Screen opens in the same browser tab.
💡 Screen creation date. Displays the date of when the Slide was created.
In version 14.2.2 and earlier, this information is not available.
💡 Slide last modified date. Displays the date of when the Slide was last modified.
In version 14.2.2 and earlier, this information is not available.
💡 Custom changes. Indicates if changes have been made to the slide regarding custom filters and object configurations.
In version 14.2.2 and earlier, this information is not available.
Content (only for Section headers)
Title text. Enter an additional title that will be displayed as a large print title in the center of the Side.
Title font size. Enter the number of the font size you would like the Section title to be.
Section subtitle (only for Section headers)
Subtitle. Enter a subtitle that will be displayed as a smaller print subtitle below the title in the center of the Slide.
Subtitle font size. Enter the number of the font size you would like the subtitle to be.
Style (only for Section headers)
Background. Choose a background color for the Slide.
Foreground. Choose the title and subtitle font color.
💡Presentation Notes
In version 14.2.2 and earlier, Notes are available in only a banner format and only support text.
The Presentations Notes provides a WYSIWYG (What You See Is What You Get) editor which offers presenters the ability to create detailed, formatted notes. This editor supports a variety of formatting options, including bold, italic, underline, text color, and the ability to add images, offering greater flexibility in how notes are displayed and presented.
Additionally, the "Auto show on open" feature allows for the automatic display of the notes when the slide is opened, making it easier for presenters to follow their notes without needing to manually trigger them.

Presentations Notes supports the following formats:
Panel Notes. Positioned alongside the presentation content, these notes can be resized with a simple click and drag for a customized viewing experience.

Modal Notes. Displayed as pop-ups during the presentation, allowing for focused information delivery at specific points.

Banner Notes. These appear as overlays at the bottom of the screen. While they offer a basic format, they allow for changes in the background color and are limited to text content.

These are independent notes, which empower presenters to create and manage their own notes without needing to modify the source Screen. This eliminates the dependency on Screen owners, preventing unauthorized changes to shared Screens and ensuring more control over the presentation content.
💡Custom Changes
In version 14.2.2 and earlier, Custom Changes are not available.
Custom Changes are represented by an icon that indicates Slides with modifications compared to its original Screen.

This feature provides visibility into the following custom modifications:
Custom filters. Visible changes to Screen Select, Screen Object Select, Selectors, and Pagers.
Object configurations.
For Flex Grid objects, this includes changes made in Play Mode via Edit Layout, Fields Panel, Filters, Column Headers, and Drills.
For Data View and other Objects, it captures changes made in Play Mode via Edit Layout, Quick Layout, Frozen Rows, Column Visibility, Active Tab in Folder Container, Drills, Column Resize, and Numbers Scaling.
Custom Changes can be reset/deleted from the left or right panels by clicking on "Clear Custom Changes". A popup window will display where you can choose which custom changes you want to delete (Custom filters or Object configurations)
Custom Changes have implications when it comes to creating a Slide. Read more about it here.